About Me

My photo
I'm a retired primary school teacher, who started paper crafting in 2008, when I had a fancy to make my own Christmas cards. Since then, I have tried all sorts of techniques and styles - and I kind of like them all. I have been lucky enough to be on blog teams and large design teams and to do a bit of freelance demonstrating - and I love the challenge of working with different products. My crafting style is very varied - from junk journaling and art journaling, bookbinding and journal making, to quilting and patchwork - and of course I still make cards. This variety keeps me interested - and my crafty stash growing!! I'm always seeking inspiration for new projects.
Showing posts with label #watercolour. Show all posts

Monday, 14 November 2022

Elizabeth Craft Designs - Garden Party

Well, it's been almost 6 months since I last blogged and shared anything crafty on social media. And that is for a whole host of reasons.

Up until the end of June, I was fortunate to have the opportunity to create a lot of video content with a whole range of products and techniques. I have shared some of this previously, but still have a massive amount to share. My intention is to begin to blog the rest of this from now onwards. 

Once this came to an end, I kind of breathed a sigh of relief at having time to step back a bit. Don't get me wrong, I thoroughly enjoyed the 9 months I had, but it was good to take a step back. I have also not really been crafting since then - apart from friends and family and am now starting on my Christmas cards. I have spent the past four and a half months focussing on other things I enjoy - predominantly my garden, but also cooking, preserving and baking.

I am now at a point where I feel that I want to start playing again. I spent some time sorting through my craft stash and re-discovered a whole load of things I forgot I had, and it's time to start using it! Having been on Design Teams and been a demonstrator, your stash builds without you really being aware of how much you have. Once I have shared all the things already created and filmed, I am thinking of potentially having a go creating some content independently. Not sure how - or if - this will happen, but it's bubbling around in my head.

Anyway, my intention is to share the 60+ projects and videos that I haven't yet shared, grouping them together where I have created different projects with the same item.

So, am starting with some Elizabeth Craft Designs. These are created using a set of stamps called Garden Party. 

Both were stamped with Versafine Clair - Nocturne and embossed with clear embossing powder. 

For this one, I used Cosmic Shimmer Watercolour Ink to colour the image.

And for this one, I used Faber Castell Goldfaber Aqua pencils. 


The patterned papers and card are from my stash - as are any dies used to cut the layers.

Click on the images to see the video demos, and please feel free to follow me here on my blog, or on FaceBookTwitterInstagram or Pinterest.

Thanks for popping by. Happy crafting,

Cxxxx

Tuesday, 26 April 2022

Earth Laughs In Flowers

Today I am sharing a Journal page, created using Julie Hickey Designs Dinky Circles die set, Sweet Pea die set, and stamps from Daisy Blooms and Garden Blooms. I made it to fit my TN, which I created a while ago. Click on the picture below to go to the video demonstration. 

I used watercolour card with Salvaged Patina, Cracked Pistachio, Kitsch Flamingo and Squeezed Lemonade Distress Oxides. 

I used the flower from the Dinky Circles die set to create a stencil, which I inked through, and I also used the little stamp from Daisy Blooms too. To create the feeling of the flowers having foliage, I stamped the focal stamp from both the Daisy Blooms and the Garden Blooms sets onto the card, with Cracked Pistachio. It doesn't stamp particularly well as the card is textured, but it gives enough of an impression that I was able to then paint the leaves with the ink.


I used more watercolour card to mop up the ink from when I made the background, and then die cut this for the flowers and for the letters.

Thanks for popping by, and I hope I have given you a little inspiration. Feel free to follow me here on my blog, or on FaceBookTwitterInstagram or Pinterest. For lots of video demonstrations, pop over to the Hixxy Studio YouTube channel to subscribe. The main items I use can be found on the Hixxy Crafts website - have a look under the Hixxy Studio tab.

Happy crafting,

Cxx

Friday, 25 March 2022

Spring Foliage Card

Hello. Have a quick share today. This is an 8x8 card made using a combination of Creative Expressions Forget-Me-Not frame 3D Embossing Folder, and Julie Hickey Designs Floral Foliage Stamps.

I used white embossing powder with the stamp, as I didn't want a "hard line". 


I used Faber-Castell Goldfaber watercolour pencils (tin of 12) to colour the foliage, and Lucky Clover and Twisted Citron Distress Oxides to ink the edges of the frame.

The lettering is Julie Hickey Designs Sweet Pea Alphabet.

Thanks for popping by, and I hope I have given you a little inspiration. Feel free to follow me here on my blog, or on FaceBookTwitterInstagram or Pinterest. For all the videos, pop over to the Hixxy Studio YouTube channel to subscribe. And FB lives are streamed on both the YouTube channel and the Hixxy Crafts FB page. The main items I use can be found on the Hixxy Crafts website - have a look under the Hixxy Studio tab.

Happy crafting,

Cxx


Saturday, 12 March 2022

Sparkly Pocket Card

Hello! Am continuing my shares of projects using Julie Hickey Stamps. Today, I have a pocket card with an added tag! I have coloured it all with Cosmic Shimmer Pearlescent Watercolour Inks for added shimmer. Click on the photo below to see the video demo.


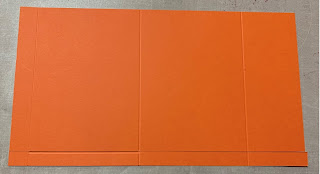
The base card is  6 1/2" x the length of A4. Mark on a line 1/2" from the long edge. 


Score at 2 3/8" from one end, and 3/4" and 5" from the other end. Also, score along the 1/2" line in the place where the flap will be - as shown below.


Cut off the bottom, along the 1/2" line, leaving the tab, then fold and burnish all the scored lines.


Attach a piece of card - 4 1/4" x 6" - to the flap on the right to form the back of the card, then glue the tabs and stick to create the pocket on the front.


I stamped the main image from the Floral Fantasy set onto stamping card with Versafine Clair - Nocturne, and embossing with clear powder. I used Cosmic Shimmer Pearlescent Watercolour inks to colour: Ray of Sunshine, Golden Sunrise, Flamingo Pink, Fiery Sunset, Holly Green and Turquoise. I also used Juicy Orange and Peacock Teal - both of which are not pearlescent.


I did the same with the individual flowers. I deliberately went over the edges, to reduce white edges when I fussy cut them out.


The base tag is 6 1/2" x 3 1/2", with each layer being 1/4" smaller than the previous. 


The stamp on the front is from the Floral Fantasy set - designed to fit in that little aperture. The Happy Mother's Day comes from Julie Hickey's Everyday Sentiment stamps and the lettering is Julie Hickey's Sweet Pea Alphabet set. 


I just love the sparkle the inks provide!!


Thanks for popping by, and I hope I have given you a little inspiration. Feel free to follow me here on my blog, or on FaceBookTwitterInstagram or Pinterest. For all the videos, pop over to the Hixxy Studio YouTube channel to subscribe. And FB lives are streamed on both the YouTube channel and the Hixxy Crafts FB page. The main items I use can be found on the Hixxy Crafts website - have a look under the Hixxy Studio tab.

Happy crafting,

Cxxx

Sunday, 6 March 2022

Peacock Easel Card

Another peacock card today, using the Amy Design: Colourful Feathers - Peacock die set. This time, I used the complete die set along with Cosmic Shimmer Watercolour Inks. The angle of the photo makes it look oval, but it is definitely circular! 


To start with , I cut the pieces of the peacock in white stamping card. For the feathers, I used Golden Sunrise, Turqoise Cascade, Ray of Sunshine and Holly Green - which are all pearlescent - and Peacock Teal - which isn't.


I mixed the yellow and green for the central part (and also the separate small part that sits behind the body of the peacock), and mixed the turqoise and teal for other parts of the feathers. The orange I kept the same. The body of the peacock is painted turquoise.

To create the easel, I score a piece of A4 card in half and used a large circle die placed just off the edge of the fold. It opens out like this. Score one of the circles in half to create part of the easel, and stick another circle onto this.


I used several mats and layers - and used an embossing folder for a little texture. The it's all assembled with a blingy stopper! If you want to see the video demonstration, then click on the main photo for the start (last 12 minutes of the clip) - then click here for the finish (first 18 minutes of the clip). Apologies for this - we had a little glitch during the FB live, so, unfortunately, the video is in two parts. 

Thanks for popping by, and I hope I have given you a little inspiration. Feel free to follow me here on my blog, or on FaceBookTwitterInstagram or Pinterest. For all the videos, pop over to the Hixxy Studio YouTube channel to subscribe. And FB lives are streamed on both the YouTube channel and the Hixxy Crafts FB page. The main items I use can be found on the Hixxy Crafts website - have a look under the Hixxy Studio tab.

Happy crafting,

Cxxx

Thursday, 5 August 2021

Pause, Relax, Unwind

I have recently been trying out art journaling as a way to just create and try to unwind. I started with Everything Art's 5 day re-boot. I enjoyed having a go, so signed up for their 100 small steps. I have completed a few of the days, but have come to the realisation that I am not enjoying the process at all, and that the journaling side is really not for me. I also was falling out of love with my spiral bound journal, as I just wanted to cover the whole page with colour - and that was virtually impossible. It also meant that the two pages did not flow together. Don't get me wrong - I LOVE the Pink Pig journals, and have invested in both an A4 and A3 version so that I have scope for much larger areas - but, for this, I wanted something fairly compact and not spiral bound. I have ended up with Arteza's 14cm square (roughly 5 1/2 inches) watercolour sketchbooks. The paper is 230gsm - and seems plenty heavy enough for what I want to do.

Rather than trying to follow a prompt - which I think was another thing I was struggling with - I decided on a colour palette, and just spent some time looking through my stamping stash to see what jumped out. I ended up with the mandala - Spectrum Noir Colorista Background 3 stamp - texture stamps from Crafter's Companion Textures collection, and words from Crafter's Companion Destinations.

I used Antique Linen, Tea Dye and Ground Espresso Distress Oxides for the background. I stamped the mandala with Harmony Waterproof Ink in Pebble (was meant to be Rustic Brown but picked up the wrong one). It didn't stamp very well, so I went over it with a brown Sharpie. I then painted it using my ancient watercolour tin. 

I have to admit to being happier with the outcome of this than perhaps I was with previous pages. We'll have to see how it goes - and whether I can follow my own advice to pause, relax and unwind. 


Happy crafting,

Cxxx

Monday, 4 May 2020

Circles and Furry Things

Morning. It's another new week. I've just kind of bumbled through this past one, with plenty of baking and tidying keeping me occupied in the not so nice weather.

And a new week means a new challenge over at Use Your Craft Stash. This week it's Furry Critters and/or circles. So any animal with fur or just use circles - whichever is easier. And of course, we would love to see any type of craft within the theme. 


I chose to use this Darkroom Door Eclectic Stamp called Sitting Dog. It was a gift from a good crafty friend of mine, and I'm ashamed to say that I've never used it before.  And to stamp it, I dug out another piece of stash which wasn't even out of the bag - this Crafter's Companion Stamping Mat.  I stamped the image using Gathered Twigs Distress Ink onto Neenah Classic Crest Card.


I marked out the circle I would be cutting out, so as I didn't bother colouring too big an area. I used water to move the Distresss Ink and added a little more detail by going back in with the ink on a brush. The tongue was coloured with Watermelon Aqua Pencil (Crafter's Companion) from the Florals tin.


The background was created using Charcoal Brown Aqua Pencil from the Essentials Tin, and Tumbled Glass Distress Ink. To keep with the theme, I mounted it onto circles of card - all from my scraps box.  The large piece of brown card at the back has an aperture cut into it (where you can see the white) and was embossed using Crafter's Companion Textures Distress 8x8 folder.


We look forward to seeing what you come up with this week. 

Take care,
Cxxx

Monday, 27 August 2018

Time to relax

Afternoon! Haven't been on for a while as we've been away on our hols, and I got a bit busy before we went. While we were away, I had the opportunity to take part in some watercolour sessions - something I haven't done in over 20 years!! it was great to be able to do something creative purely for myself - not for friends or family, or for allocations or demonstrations. 

They are not great works of art, but I found it so much fun that I don't mind. There were challenges along the way - like being bolder with colour, which I finally achieved with the parrot, and the portrait - which I found really difficult. So here they are! 


Back soon
Cxxx

Out of fear of seeming ridiculous, we often end up not tackling the challenges around us. John Ruskin

Creativity takes courage. Henri Matisse

Friday, 3 February 2017

Everlasting Love

Morning!! Today I have a card made using Leonie Pujol's Everlasting Love, coloured with Spectrum Aqua Markers.  If you know the stamp, you will know that it only has two flowers, and I wanted three, so I used Pebeo Masking Gum to mask out the first stamp, and then inked up only the extra piece I wanted.


I then masked the third flower off so I could do the background - essentially a wet on wet technique. I did this on another piece of card, too, for an extra layer for the card.


I then built up the colour on the flowers. 


And, as always seems to happen, I forgot to take anymore photos!! So, I completed the flower, leaves and stems, and then matted and layered to complete the card. 


The main Spectrum Aqua colours I used were: Florals - Marigold, Jasmine, Sunflower, Bud Green, Leaf Green, Orchid, Heather.

Cxx

Monday, 30 January 2017

Sparkling Flowers

Today's offereing is an 8x8 card that uses a Just Inklined digi called "Open Rose Vase". The sentiment is from Crafter's Inspiration 6, stamped with Onyx Black Versafine.


I used Spectrum Noir Sparkle pens to colour the image:
Roses: Red Berry, Crystal Clear, Spun Gold 
Leaves: Black, Holly Green, Crystal Clear
Vase: Black, Sterling, Crystal Clear 

The embossed background was created using an Embossalicious 8x8 folder called Rose Garden.

Cxx

Sunday, 29 January 2017

Spectrum Noir AquaBlends

Fiona was on Hochanda yesterday with the gorgeous Spectrum Noir AquaBlends. This is using Sheena Douglass' Magnolia Blossom on Crafter's Companion Watercolour Card.


The pencils I used were :
Flower: Florals - Elderberry
Leaves: Naturals - Cypress, Oregano
Stem: Essentials - Black Umber 

I made the image into a circular easel card using Crafter's Companion Matt Black card, with some pink from my stash.

Cxxx

Tuesday, 24 January 2017

A little watercolour....

Something totally different today! A circular tent fold card I made using the Spectrum Aqua pens and Sheena's Passion Flower stamp from the "A Little Bit Sketchy" range.


I love the Spectrum Aqua pens as you can scribble them on a tile, spritz them, and use them for backgrounds, as well as using them directly on the card. That's how I created the background for the card.


I did attempt the Bokeh effect with Pebeo White Gesso too - but it was rather a feeble attempt and really doesn't show up.

The main colours I used were from the Nature set- Sea Green and Peacock Blue. I also used Essentials Black and Spice for centres and Florals Jasmine and Orchid for centres.


Cxxx

Wednesday, 24 August 2016

Sunset!!

Back today with another Spectrum Aqua card. This again uses Sheena's "The Beach" stamp - but this time with more sunset colours.
The colours I have used for this one are: Sunset, Amber, Topaz, Kingfisher, Peacock Blue, Sea Green, Boulder, Evergreen, Desert, Fawn, Chestunut from the Nature set and Charcoal and Moss from the Essentials set.
I used the scribble technique to create the background card, then spritzed it with water...
... before placing a piece of watercolour card on top to soak up the colour. Matt Black card helps to bring out the the sunset colours. And now I shall be heading out into the garden to do some tidying up before a little family BBQ tonight.
Cxxxx

Monday, 22 August 2016

The Beach

Morning!! Thought I would pop on quickly to share another Spectrum Aqua Pen card. This one is using Sheena Douglass A Little Bit Sketchy - The Beach.
I used Peacock Blue, Sea Green, Kingfisher, Desert, Fawn, Chestnut, Boulder and Evergreen from the Nature pack - and also Slate from the Essentials. For the image, I masked areas as I went along with Pebeo Drawing Gum. 

The background was create by scribbling onto a white tile, spritzing and transferring to Crafter's Companion Watercolour card. I added a little rock salt while it was still wet.
The green flowers were originally white, and I coloured them with the Sea Green marker.
Cxxxx

Sunday, 21 August 2016

Watercolour Orchids!!

Finally have found some time to blog!! And thought I would share one of my samples for the Spectrum Aqua pens that are on Hochanda this weekend.
I really enjoyed making this one - I absolutely love watercolours - and Sheena's flower stamps are always great to colour. This one is A Little Bit Sketchy - Orchids.
I started by stamping the image to the left of a piece of Sheena Stamping Card, and painted over it with Pebeo Drawing Gum. 


I then used my paint daubers/sponges to add colour. I scribbled it onto a white tile first and added some water before splodging it on! I used Red Violet and Aquamarine from the Primaries set.
The drawing gum was rubbed off - and the re-applied just around the edges of each petal.

I then used Red Violet for the Orchids, Sepia (Essentials) for the stems, and Jasmine (Florals) for the centres.
I stamped the orchids twice more, and painted them in the same way, before cutting them out and layering them onto the original one.
The sentiment is also from the same set.

Hope you are enjoying the shows! 
Cxxxx