
About Me

My photo
I'm a retired primary school teacher, who started paper crafting in 2008, when I had a fancy to make my own Christmas cards. Since then, I have tried all sorts of techniques and styles - and I kind of like them all. I have been lucky enough to be on blog teams and large design teams and to do a bit of freelance demonstrating - and I love the challenge of working with different products. My crafting style is very varied - from junk journaling and art journaling, bookbinding and journal making, to quilting and patchwork - and of course I still make cards. This variety keeps me interested - and my crafty stash growing!! I'm always seeking inspiration for new projects.
Showing posts with label #tag. Show all posts

Saturday, 12 March 2022

Sparkly Pocket Card

Hello! Am continuing my shares of projects using Julie Hickey Stamps. Today, I have a pocket card with an added tag! I have coloured it all with Cosmic Shimmer Pearlescent Watercolour Inks for added shimmer. Click on the photo below to see the video demo.


The base card is  6 1/2" x the length of A4. Mark on a line 1/2" from the long edge. 


Score at 2 3/8" from one end, and 3/4" and 5" from the other end. Also, score along the 1/2" line in the place where the flap will be - as shown below.
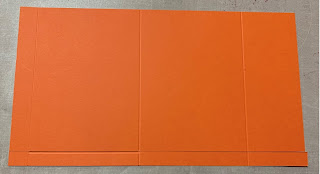

Cut off the bottom, along the 1/2" line, leaving the tab, then fold and burnish all the scored lines.


Attach a piece of card - 4 1/4" x 6" - to the flap on the right to form the back of the card, then glue the tabs and stick to create the pocket on the front.


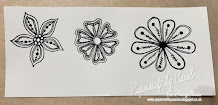
I stamped the main image from the Floral Fantasy set onto stamping card with Versafine Clair - Nocturne, and embossing with clear powder. I used Cosmic Shimmer Pearlescent Watercolour inks to colour: Ray of Sunshine, Golden Sunrise, Flamingo Pink, Fiery Sunset, Holly Green and Turquoise. I also used Juicy Orange and Peacock Teal - both of which are not pearlescent.


I did the same with the individual flowers. I deliberately went over the edges, to reduce white edges when I fussy cut them out.
 

The base tag is 6 1/2" x 3 1/2", with each layer being 1/4" smaller than the previous. 


The stamp on the front is from the Floral Fantasy set - designed to fit in that little aperture. The Happy Mother's Day comes from Julie Hickey's Everyday Sentiment stamps and the lettering is Julie Hickey's Sweet Pea Alphabet set. 


I just love the sparkle the inks provide!!


Thanks for popping by, and I hope I have given you a little inspiration. Feel free to follow me here on my blog, or on FaceBookTwitterInstagram or Pinterest. For all the videos, pop over to the Hixxy Studio YouTube channel to subscribe. And FB lives are streamed on both the YouTube channel and the Hixxy Crafts FB page. The main items I use can be found on the Hixxy Crafts website - have a look under the Hixxy Studio tab.

Happy crafting,

Cxxx

Friday, 18 February 2022

Flower tag

Today's share is a gorgeous green and white tag, using Jeanine's Art: Welcome Spring Flower and Leaf Borders. I used this die set on the lantern that I blogged a while ago. It's a really simple tag - so quick and easy to make and looks great! Click on the picture if you would like to see the video of this project.

I have a set of greyboard tag templates that I use when making tags. I find them useful for when I want to cut something really thick that a die won't go through. But they are a great tool if you don't own a set of tag dies.

I used the tag template on the left below for the base, and actually created a new template that is roughly 1/8" bigger all round. The next size down was too small - so I wanted something just that bit bigger for the white part.

The larger tag was covered in patterned paper, and inked on the edge with Mowed Lawn Distress Oxide.

The new template was used to cut the white tag out of hammered card. I then cut the leaf border out of this and stuck it on the main tag, but replaced the "waste" so it looked more defined. You can see this on the video.  I cut the white leaves in half ready to go with the flowers.

I cut the flower die twice with co-ordinating green card and arranged them with the two pieces of the white leaves. 

I used a couple of reinforcers from Elizabeth Craft Designs Reinforcement Pack 2, to strengthen the hole, before adding the ribbon.

Thanks for popping by, and I hope I have given you a little inspiration. Feel free to follow me here on my blog, or on FaceBookTwitterInstagram or Pinterest. For all the videos, pop over to the Hixxy Studio YouTube channel to subscribe. And FB lives are streamed on both the YouTube channel and the Hixxy Crafts FB page. The main items I use can be found on the Hixxy Crafts website - have a look under the Hixxy Studio tab.

Happy crafting!!

Cxxxx

Thursday, 13 January 2022

Flowers in Umbrella

Sharing a tag today, made using Crafter's Companion White Stamping Card, sprayed with Wilted Violet, Picked Raspberry, Spiced Marmalade and Fossilized Amber Distress Oxide sprays.

The die set I used to create the image is a Thinlets set from Sizzix called "Flowers in Umbrella". There are lots of lovely little dies in this set, and it is absolutely perfect for using up scraps! 

Click on the picture to see a video of how I made this! 

Happy crafting, 

Cxxx


Monday, 12 October 2020

Times Gone By Tag

It's the second week of our S & T challenge over at Use Your Craft Stash. My "T" project is a Triple Tag with a "To You" sentiment, using Crafter's Companion Times Gone By CD for the papers, with a bit of Teabag folding and some Twine. There are trains, timepieces and top hats on the papers but you can't really see them - so I won't count those ones.


There's a real vintage theme to the CD, so I printed the papers onto Kraft card, and cut the tags using Sheena's Contemporary Tag dies (the 3 largest).  The sentiment was cut using Diamond Press Block Alpha, and the Twine is from Sara Signature Rustic Wedding collection. The wooden corners have been in my stash for so long I have no recollection of where I got them, and the embellishments are beads from broken bracelet.

Remember to share your makes with us!!
Happy crafting,
Cxxxx

Friday, 30 November 2018

Rusty Tag

Hope you managed to catch the shows yesterday! There's 3 more opportunities today to catch MJ's fab demos - 9am, 1pm and 5pm. 

Here's a large wooden tag decorated using one of the rice papers (design 012), with a Magi Cutz key and padlock decorated with Rusty Patinas - Rustique, Verdigris and Cafe Creme.
I used the same Rusty Patinas around the edge of the tag too. Hopefully it looks suitably rusty!
Cxxx

Friday, 2 November 2018

Paris Tag

So today's the day. Sue will be on your screens at 6pm for the launch of the Imagination Crafts Parisian Hochanda One Day Special. Today's share is an MDF tag.
For this, I used Rich Gold and Green Starlights with White Gesso to cover the tag, then added rice paper to the bottom left corner. I then masked off the scissors in the stencil, to leave the flowers, and used a combination of Gold and Malahit Relief Pastes. For the flowers, I rubbed French Lavender (Purple) Alchemy Wax over the relief paste. 

The little Paris and France circles are Magi Cutz covered with paint and wax. Lots of ribbon to finish off!! 

Don't forget to tune in to see Sue with lots more samples from the DT and loads of demos!

Take care,
Cxxx

Wednesday, 31 October 2018

Pack your case!!

... although you really won't get much in this little one!  I've got a thing for little boxes and cases - and have had this (and a few more like it) in my stash for a while. Friday is the day when Sue is back on your screens for the One Day Special on Hochanda at 6pm. 


The case itself needed a couple of layers of gesso before I could start, so the pattern didn't show through the paint and rice paper. Once that was dry, I covered the whole thing with Clotted Cream Starlight paints. Then most of it was covered with rice paper. 


I added a bit of texture with Malahit Relief Paste and Sage Shabby Chic Relief Paste through a stencil. Inca Gold and Peridot (Green) Alchemy wax were used sparingly to add more colour around the edges.

The tag is made from rice paper stuck onto card, and the little "buttons" are from the same piece of card, sprayed with red and cut with a punch.

I will be back tomorrow with another sample to share with you.

Cxxxx

Monday, 22 May 2017

Foiltastic

The latest edition of Crafter's Companion Crafter's Inspiration is out - and one of the fab free gifts is the foiling kit.

Foiling is such a fab way to add a little touch of elegance to your projects. Or just to send a message like with these "easy to make" tags.
I used the Create a Card Stacey Base Die to cut the tag shapes, and embossed the blue card with the Kimono Oriental Screen folder.
The sentiments on these dies come from either the Modern Mandalas and Delicate Details transfer sets.
And I then used the Electric Blue foil over the transfer. And then I finished them off with a few square clear gems and ribbon.
Cxxx

Wednesday, 1 February 2017

Tropical Nectar

Morning!! Fiona is on again today with the Spectum Noir Illustrator pens. 


This tag is made using Sheena Douglass "A Little Bit Sketchy" Tropical Nectar stamp, coloured with:
Flower: Basics - Flame Red, Portrait - Cream, Hues - Gold 
Leaves/Stem: Tints - Pale Citrus, Hues - Pear Green

The sentiment is from Crafter's Inspiration 6, stamped with Versafine Onxy Black.

Enjoy your day!!
Cxxx