About Me

My photo
I'm a retired primary school teacher, who started paper crafting in 2008, when I had a fancy to make my own Christmas cards. Since then, I have tried all sorts of techniques and styles - and I kind of like them all. I have been lucky enough to be on blog teams and large design teams and to do a bit of freelance demonstrating - and I love the challenge of working with different products. My crafting style is very varied - from junk journaling and art journaling, bookbinding and journal making, to quilting and patchwork - and of course I still make cards. This variety keeps me interested - and my crafty stash growing!! I'm always seeking inspiration for new projects.

Thursday 27 January 2022

Spring Window Wreath

I have a very pretty window wreath to share today. I say it's for a window, because I have used alcohol inks with acetate so that the light can shine through the middle.


The wreath base is a 15cm polystyrene half ring. I wrapped it in approximately 4.5m of ribbon. This is a lot - but the trick is to get the cheaper ribbon. Hobbycraft have a great selection of colours at £1 for 15m!! 

I cut out a circle of Centura Pearl Ivory card big enough to be securely touching the sides of the wreath, as this is how the front will be attached. It also needs to be big enough to cut out the gorgeous "The Circle of Flowers" die, from Jeanine's Art Happy Birds collection. I also cut two circles of acetate the same size.  For the back, I cut a ring using two circle dies - one larger than this circle, and one smaller. 


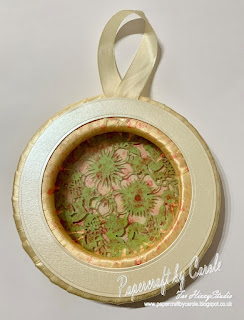
I then used "The Circle of Flowers" die to cut a piece in green card, and also to cut into the ivory circle. The green piece then fits into the ivory piece, secured at the back with a little tape.

To colour the acetate, I used Shell Pink, Lemonade, Peach Bellini and Watermelon alcohol inks. One circle was stuck to the back of the die cut pieces and attached to the front of the wreath. The other was stuck to the ring for the back, and was attached after securing a hanging loop of ribbon. 

Thanks for popping over to have a look. Feel free to follow me here on my blog, or on FaceBook, Twitter, Instagram or Pinterest. For the videos, pop over to the Hixxy Studio YouTube channel to subscribe. And FB lives are streamed on both the YouTube channel and the Hixxy Crafts FB page. The main items I use can be found on the Hixxy Crafts website - have a look under the Hixxy Studio tab.

Happy crafting,

Cxxx


Wednesday 26 January 2022

Seaside Canvas

Last week, I demonstrated this canvas on the FB live for Hixxy Studio. The full video is on the YouTube channel (click on the final picture for the link), but I have a few pictures of the stages to share here. I have recycled an old box canvas for this project - you can just make out the stripes underneath the layer of white gesso.

For the sea, I used white tissue paper and decoupage glue to create some texture like the waves.

For the sand, I used Imagination Crafts Icy White Paste because it has a grainy texture.

I used acrylic paints mixed with Gesso to paint both parts of the canvas.


I used Amy Design Maritime Fishing Net die to cut out the mesh from funky foam. I used white as it is easier to add colour to - with acrylic paint. I tore this up to add to the top of the canvas. To adhere it, I used transparent texture paste.


More paste was used to add the twine. You will see in the finished picture that I tweaked it and pulled it around once the picture was on. 


The photo was mounted onto a piece of card torn from a box. I ripped the edges of the card to expose the corrugated parts. And finally, I added shells.

Feel free to follow me here on my blog, or on FaceBook, Twitter, Instagram or Pinterest. For all the videos, pop over to the Hixxy Studio YouTube channel to subscribe. And FB lives are streamed on both the YouTube channel and the Hixxy Crafts FB page. The main items I use can be found on the Hixxy Crafts website - have a look under the Hixxy Studio tab.

Happy crafting,

Cxxxx

Monday 24 January 2022

Flower Corner Gift Bag

Hello. Today I have a gift bag to share. It's just a standard Kraft gift bag that I have decorated to use for a Thank You present.  I have layered Centura Metallic card from the Precious Golds selection, with Kraft card and some wood effect paper from one of the Crafter's Companion 12x12 paper pads. 


The Flower Corner die (which includes the two bees) is from Jeanine's Art Humming Bee collection. I have paper pieced some of the Centura into the flowers. 

Thanks for popping over to have a look. Feel free to follow me here on my blog, or on FaceBook, Twitter, Instagram or Pinterest. For the videos, pop over to the Hixxy Studio YouTube channel to subscribe. And FB lives are streamed on both the YouTube channel and the Hixxy Crafts FB page. The main items I use can be found on the Hixxy Crafts website - have a look under the Hixxy Studio tab.

Happy crafting,

Cxxx

Sunday 23 January 2022

Pastel Safari!

Hello!! The weekend is almost over - but not quite!! I have a safari themed card - without the safari sunset colours! The colours for this one were suggested by my lovely crafting friend, Karen, when all I could see were sunsets!!


There are two versions of this card - the one with the giraffes was my sample, and the one with elephants is the one I made on the video (click on either photo for the link). For the shiny, sparkly background, I have used Creative Expressions 7x7 Safari Landscape with Cosmic Shimmer Lunar Paste in Moonlight Ocean and Stellar Lemon. The green was created by mixing the two. The elephant and giraffe came from cutting into Amy Designs Wild Animals - Wild Frame. I cut the frame 3 times, and then layered the colours to match the stencil. The sentiment is from Trimcraft First Edition Sentiment dies. 

Thanks for popping over to have a look. Feel free to follow me here on my blog, or on FaceBook, Twitter, Instagram or Pinterest. For the videos, pop over to the Hixxy Studio YouTube channel to subscribe. And FB lives are streamed on both the YouTube channel and the Hixxy Crafts FB page. The main items I use can be found on the Hixxy Crafts website - have a look under the Hixxy Studio tab.

Happy Crafting,

Cxxxx

Saturday 22 January 2022

Leaf Vine

Today's card uses Precious Marieke's Leaf Frame, and Elizabeth Crafts Clematis dies. I cut the frame twice from Centura Pearl Hint of Silver. I used a patterned paper with a purple border underneath. The sentiment is from Trimcrafts First Edition Sentiments set.


Thank you for stopping by my blog. If you would like to see a video demonstration of the card, please click on the photo to take you to the Hixxy Studio YouTube channel.

Happy crafting,
Cxxx

Thursday 20 January 2022

Queen Bee

This Queen Bee card consists of an inked background teamed with a Jeanine's Art Buzzing Bees 3D Push Out. The black die cut is from Elizabeth Crafts Art Journal collection, and is called Honeycomb dots, and the letters are Trimcraft Bunting Alphabet.


The background is a piece of patterned paper (a sort of bright yellow brick wall) that I sprayed with the Distress Oxide sprays in Fossilized Amber and Spice Marmalade. I used the same colour ink pads and IndigoBlu's Queen Bee Mini stamp set, to add more texture to the background.

Thanks for looking, and feel free to click on the picture to see a video of how I created this.

Happy crafting,
Cxxx

Circle of Flowers Twisted Easel

Today I have a twisted easel card to share, with a bit of paper piecing. I used some cream card for the base, and pink for the mats and the die cut. The patterned paper is from a Crafter's Companion pad.

I decided to use a circle for the top part of the easel rather than the normal square like the base, to add some interest. 

Thanks for looking, and if you want more details, feel free to click on the photo to watch the video demonstration.

Happy crafting,

Cxxxx

Wednesday 19 January 2022

Strawberry Trellis

I really loved using this little die set from Jeanine's Art. It's called Strawberry Trellis and is from the Humming Bees collection.


The effect is so fresh and summery with the bright green and red - teamed with background paper from Crafter's Companion. Click on the photo for a video showing how I made it.

Take care and happy crafting,
Cxxx


Tuesday 18 January 2022

Safari Time!!

Today's project is a combination of inking, stencilling and die cutting, all contributing to produce this bright, safari-themed party card.


The background was created using Distress Oxides - Mustard Seed, Rusty Hinge and Festive Berries - onto white stamping card. I then stencilled over it with Black Soot, and the Safari Landscape 7x7 stencil from Creative Expressions. 

The frame at the front is Amy Design Wild Frame from the Wild Animals collection. I have put a piece of vellum behind this to diffuse the background, and added sentiments from Trimcrafts First Editions Sentiment die collection. 

Click on the picture to take you to the video.

Take care - and happy crafting!!
Cxxx

Monday 17 January 2022

At One With Nature

 Today's make is an inky offering, with a little bit of die cutting. I have used AALL and Create's "At One With Nature" stamp set, with Distress Oxides in Cracked Pistachio and Fired Brick.


The background was created using the Oxide pads, blended onto white stamping card. I heat set it before spraying over the top with the Oxide sprays. One that was dry, I stencilled over it - again with the same colours. I made the stencil by cutting a piece of white stamping card with Precious Marieke's Leaf Frame die. Then I stamped over this with the daisy stamp from the AALL and Create set.

The tag, daisy and sentiment were stamped using Spectrum Noir Finesse Waterproof Ink in Flagstone. I inked over the tag and sentiment, but painted the daisy. These were stuck onto the background - and I also used pieces of the card stencil. 

If you want more information, please click on the image to watch the video. 

Happy crafting.
Cxxx
Cxxx


Sunday 16 January 2022

Rose Fence Square - Mini Easel Card

Hello. Hope you have all had a good weekend. I have a mini easel card to share today - it folds down to just over 4" square. 

I have used ivory card, with Precious Marieke's Rose Fence Square from the Romantic Roses collection. It doesn't show up in the picture, but I have also used acetate with Creative Expressions Molten Gold Pixie Sparkle Highlights. You can see it when the light shines through.

To that end, I had to cut the die four times. Once for the base card, two for the top of the card to sandwich the acetate, and one for the base of the card. The little roses and leaves are part of the set.


The two sentiments are from Trimcrafts Sentiments die set. 


Click on the either of the pictures to take you to the video showing exactly how I made the card. 

Thanks - happy crafting!!
Cxxx

Saturday 15 January 2022

White "Queen Bee" Card

Good morning!! Today I have an almost white-on-white card to share. There is a little yellow there for the bee, and to add a little to the background - but it's mostly white.


When I do white-on-white cards, I try to use a variety of textures and tones of white. Here, the base is a straightforward white card, onto which I have matted Centura Pearl Snow White - Hint of Silver and white hammered card. The yellow mats are just white stamping card with Scattered Straw Distress Oxide. I embossed the pearl square with an old Verity Rose embossing folder called Cupcake. The lacy detail is provided using a die called Rose Frame from the Romantic Roses collection by Precious Marieke, cut from white linen card.

And the gorgeous bee is an IndigoBlu mini stamp called "Queen Bee". She is stamped with Spectrum Noir Finesse Waterproof Ink in Flagstone, and the yellow is created using Scattered Straw as before. I have added glossy accents to her wings.

To see the video just click on the picture above.

Take care and happy crafting!
Cxxx

Friday 14 January 2022

Rose Frame

Good  morning! Am off to the Hixxy Studio shortly, but just wanted to pop on to share a card. This is an A5 card base, made using Creative Expressions Periwinkle Foundations card. The patterned paper is from my stash.

The gorgeous frame is Rose Frame from the Romantic Roses collection by Precious Marieke. It's a good size - and very intricate. I have used it to frame the little decoupage image from Jeanine's Art Bzzing Bees 3D Push Out collection.

I have lots more inspiration to share on the Hixxy Studio YouTube Channel - and of course our weekly Facebook Lives on a Friday afternoon at 2pm.

Take care and happy crafting,

Cxxx


Thursday 13 January 2022

Flowers in Umbrella

Sharing a tag today, made using Crafter's Companion White Stamping Card, sprayed with Wilted Violet, Picked Raspberry, Spiced Marmalade and Fossilized Amber Distress Oxide sprays.

The die set I used to create the image is a Thinlets set from Sizzix called "Flowers in Umbrella". There are lots of lovely little dies in this set, and it is absolutely perfect for using up scraps! 

Click on the picture to see a video of how I made this! 

Happy crafting, 

Cxxx


Wednesday 12 January 2022

Stamperia Cream Paste

Good morning!! This feels very much like groundhog day, where I say something along the lines of how long it has been since I last blogged! Lots of things have happened in the past four months - none of which I shall bore you with. And it's not for lack of projects to blog - I have a whole backlog which I will hopefully share at some point.

One of the big changes for me is that I am now working with online craft shop, Hixxy Crafts, to create a whole host of videos - and Facebook Live shows - showing off different products and techniques. All the videos are on the Hixxy Studio YouTube Channel, so feel free to pop along and take a look. 

Let's start with a few projects using something that was new to me - along with a whole host of things that have been in my stash a while. 

The new product (to me) is Stamperia's Cream Paste, which I demonstrated in a Facebook Live last Friday. 

If you have never used this product before, it is a great addition to your mixed media box of tricks. It's extremely light, and dries to be totally flexible. Stamperia also make a whole raft of texture moulds to use the paste in, but there is so much more you can do, including using it with 3D embossing folders, die cutting it and using it with silicone moulds. There are also many ways to colour it. This video shows everything I played around with.

I then created these three projects. The first is a decorated papier mache heart. I used the Cream Paste with Crafter's Companion Floral Fusion 3D Embossing folder. This was painted with black gesso, and gilded with Pebeo King Gold wax, and Imagination Crafts Sherbet Alchemy wax, before cutting with a simple heart die. I applied gesso and wax to the papier mache heart, before applying the die cut heart.


This time, the paste was used with Stamperia Wings To Fly mould, from which I cut the butterfly, and a strip to decorate around the jar. I also used Imagination Crafts Icy White Paste, and some acrylic paint.
The final one was a bit of an experiment when I was prepping for the live show. This one uses the Oriental Garden mould from Stamperia. The background is a piece of rice paper - I generally use blank rice paper to mop up ink from my mat, so have a collection for creating quick backgrounds. I have used a little bit of Distress Oxide around the edges, but the main part of the image is coloured with alcohol ink - and a pipette!! Watch the video to see exactly how it was created.

Now,  I know this post is quite video heavy - and it won't usually be like that. I will try to share projects one at a time. These three just went together quite well, so was easier to share altogether. 

Thanks for looking, and feel free to subscribe to Hixxy Studio YouTube channel for more videos.

Take care,

Cxxxx