About Me

My photo
I'm a retired primary school teacher, who started paper crafting in 2008, when I had a fancy to make my own Christmas cards. Since then, I have tried all sorts of techniques and styles - and I kind of like them all. I have been lucky enough to be on blog teams and large design teams and to do a bit of freelance demonstrating - and I love the challenge of working with different products. My crafting style is very varied - from junk journaling and art journaling, bookbinding and journal making, to quilting and patchwork - and of course I still make cards. This variety keeps me interested - and my crafty stash growing!! I'm always seeking inspiration for new projects.

Tuesday 31 March 2020

When it goes wrong - put a butterfly on...

That old crafter's adage worked for me today - and saved me from feeling pretty rubbish about what I was attempting. This is what I produced, but it is so far from what I set out to do, that it's really quite laughable.


Let's rewind to just before lunch yesterday. I decided to make a list of all the things on my shelves, in my drawers and in my cupboards (and already I know I missed some things - gel press, mica powders...) that I really should play with, have a go with, experiment with. you get the idea.


And when lockdown had seemed imminent a couple of weeks ago, I ordered myself some journals from Pink Pig. The large one has watercolour card in - for an art journal, The next one is lined for jotting ideas and thoughts down. And the little one is for drawing and sketching - I went small with this one as I didn't want to be intimidated by a larger size.


The art journal was the one I wanted to start with, but I didn't really want to ruin other pages, so I cut a piece of mylar to sit behind the page and protect the rest (or that was the idea).
 

For the afternoon's dabble, I decided to have a play with the Spectrum Noir Sparkle Inks. I bought these with the intention of using them on my Christmas cards, and never did, so they have sat in the cupboard for a while.


I got all excited, googled for something different to try with watercolour based products, and found a lovely video clip which showed techniques using salt water, water with bleach, and clingfilm. Great, I thought. And got myself all set up, remembering to take photos for a step by step. And I used some low tack tape to divide the page into three - one for each of the things shown on the clip. So far, so good.


I started with the salt water. The idea was to put a wash of the salt water on the paper, then dot the ink on. I used Amethyst and Garnet from the Glitz and Glamour set. This was reasonably successful - but not quite as great as in the video.

I pushed on with the water with bleach in it. Same idea - make a wash with the water and then dot the ink on. This was supposed to give a much more feathery effect. This was what I got. Total fail.


At this point I was starting to get frustrated, but ploughed on with number 3 - the clingfilm. Plain water is put on the clingfilm, ink dotted on, and then applied to the paper. 


The result - a puddly mess that leaked onto the other two sides as well. Totally annoyed with myself by this point. Instead of a lovely page showing three techniques, it looked like a small child had been let loose on it (no offence to small children intended). So, I went over the whole lot with the salt water.


At this point, it was a case of what can I do to save this. So I dug out my Sara Signature Flutterby Collection (have pretty much all of this as I demo'd it not long after release), Harmony Water Reactive Inks - Plum Pudding, Winter Rose and Silent Night and Chipped Sapphire Distress Oxide.


At this point, photos kind of went by the wayside. I added more of the Pink Garnet Sparkle Ink at the top and bottom and stamped the Botanical Butterfly with Silent Night inkpad. I used water to spread some of the ink, and then filled in with Amethyst and Pink Garnet Sparkle inks. 


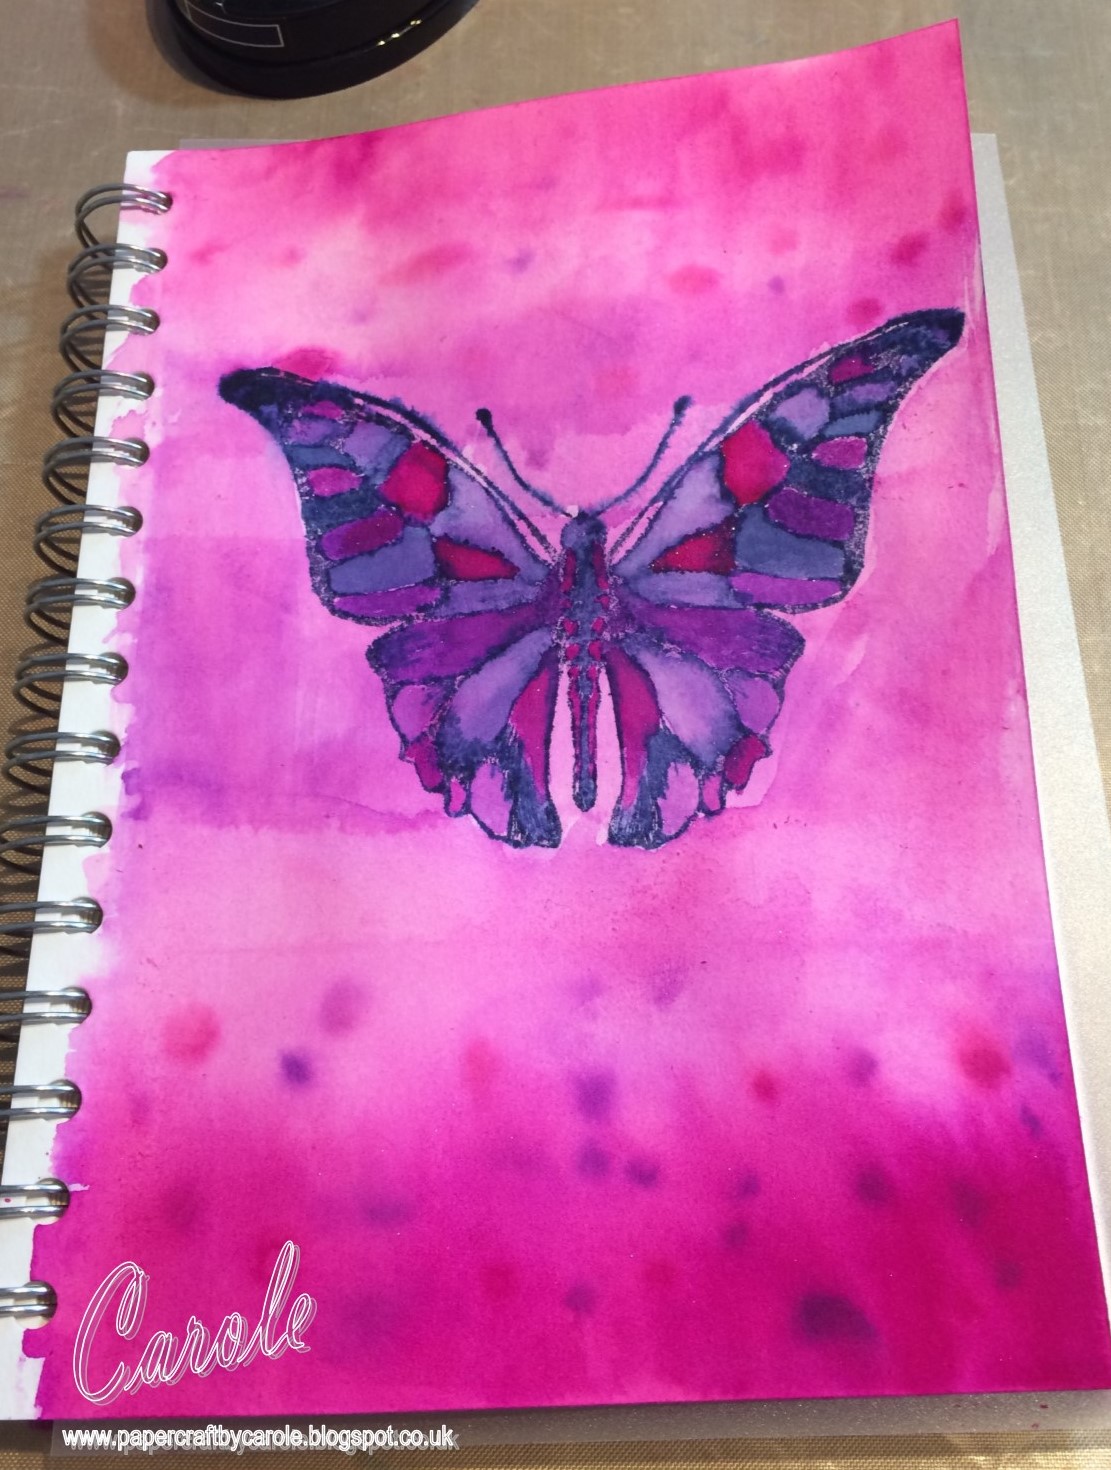
Have to say, it looks better on the above photo than I felt it did yesterday, so I watered down some white gesso and went over it to knock it back. And then I attempted to overstamp the butterfly with Memento - Nautical Blue.


To frame it, I used one of the Scripture stamps with the Winter Rose inkpad and two different stamps from the Textured Elements set with the Plum Pudding and Silent Night.


The sentiment is from the Fly Away set, and I edged the whole thing (tricky when it's spiral bound) with Chipped Sapphire Distress Oxide.


While this is is no way what I had intended when I started, it ended up OK. Oh, and it's almost impossible to keep the next pages clean in a book like this!! 

Lessons learned. Onwards and upwards!!

Take care and stay safe.


Cxxx


Sunday 29 March 2020

A little something to pass the time.


Today being Sunday, I decided to do something just for me and because I can. Back at Christmas time, I was buying a few bits and pieces and picked this up this little MDF Craft Room Door Hanger from The Wooden Shape Company. It measures roughly 19cm by 8.5cm. It's one of those things that has been rattling around in my stash, just waiting for me to have some time. I have done a step by step for anyone who is interested or really has nothing better to do - but feel free to skip it. This is the finished product:

This is how it came - the hanger and all the pieces. As you can see, I didn't use all the embellishments.
I then had a trawl around to see what I could decorate it with, and decided to go with some Imagination Crafts Rice Paper, left over from another project, and some Starlight Paints.


First step was to gesso both sides of the hanger before applying the rice paper using Imagination Crafts Decoupage Plus Satin.


I used lots of little scraps of leftover rice paper to cover the back in a similar way.


It took me ages to find a layout I liked - and even then didn't follow it completely when I assembled it. And I only used some of the colours of paint that I got out - and a couple of the Imagination Crafts Art Stamps.


I used the stamps with Distress Oxide, building up some layers with Antique Linen, Tea Dye and Vintage Photo.


More texture was added using Imagination Crafts Baby Bubbles Stencil and Shabby Chic Texture Paste in Linen. When this was dry, I went over with more Vintage Photo Distress Oxide.


The MDF embellishments were painted with Topaz, Antique Gold, Clotted Cream and Salmon Starlight paints and attached with hot glue. I finished it off - as I always seem to do - with some flat backed pearls and ribbon.


Stay safe and take care,
Cxxx

Saturday 28 March 2020

A week ago...

A week ago, things began to change. I was scrambling to get to grips with how we were going to deal with setting school "work" from home, and watching the new avidly for any updates. A week on, and things are starting to settle into this new and bizarre reality. I have had good days and bad days. I have planned and prepared for my class out there in cyberspace. And I have tried - not always successfully - to switch off from work and from the news, having gone from watching all day every day, to switching it on now and then. I still don't feel in any sort of routine, and I had so many creative things planned for the week - but in the end, I didn't really feel like doing them.

And then, last Sunday was Mothering Sunday. Like a huge part of the population, neither of us could see our Mums, although I had popped in to see mine and drop things off on the Thursday.

Then in the whirlwind of the week, I forgot to share the cards I made. So, here they are.
This one was for my Mum, using Hunkdory Sending you Love - A Gift for you - topper and backing card. 
And this one was for my mother-in-law - using the same Hundory topper and card set.

Am hoping next week will settle more into a routine - and I will be able to do some more creative things.
Stay safe,
Cxxxx

Saturday 21 March 2020

Something to celebrate in these uncertain times!!

Hello all.  Wow - so much has changed in the world since my last post. As a primary school teacher. the last week or so has been incredibly stressful and busy as we anticipated the shutdown and scrambled to sort physical resources and on-line access. On Friday at 3.15pm, I waved goodbye to my class (albeit only 2/3 were in) and I don't know if I will see them as a group in my classroom again. My colleagues are now prepping for the work that will still continue for those children who will still be coming into the building. Although it is no longer teaching per se, they will still be ensuring, as ever, the all-round well being of those children through the remote learning activities set by their individual teachers, through PE sessions and creative arts and DT. It makes me really sad that I won't be there, as I am classed in the vulnerable group. I held out until Friday, but finally admitted that it was time to socially distance. 

It makes me sad that I cannot be there physically, and I have shed a few tears at the prospect of being at home. It doesn't mean I am now on holiday, as I will be in daily contact with my class, setting and checking on-line work, trying to answer any questions, and remotely encouraging all the other creative and physically-active activities - and generally just encouraging them to be their best selves. This is an unprecedented time. 

We have encouraged parents to set a timetable where possible, to help the children keep in a routine. And I have had to heed that too. I have set aside time in the day for work, for exercise (running, cycling and dog walking while I can), gardening (my poor neglected garden will not know what has hit it) and of course for crafting. Hopefully I will be as disciplined as the children!!

Amongst all that chaos, it was my brother-in-law and sister-in-law's wedding anniversary - something positive and definitely worth celebrating. And thankfully the card was already made. So, here it is:


The topper and background card is Hunkydory - A Purrfect Anniversary, with silver mirror card and cream linen card. I used twill ribbon - not my usual as I'd say 95% of my ribbon stash is satin - and some little pearl hearts.

I am sure, now that I will have more time, I will be back sooner rather than later.
Take care of yourselves.
Cxxx

Sunday 8 March 2020

Basting is boring!!

Today, I finally got around to basting my quilts. And, as the title of the post says, I find is boring and sooooo time consuming!! 

I decided to go with cotton sheets for the bottom layers, rather than the fleece. The quilts feel like they will be so much lighter as a result. I still intend to bind the edges of the fleece, so that they can be used for extra warmth in the winter! First step was ironing everything - I hate ironing - and it just took soooo long. But, preparation is everything!!


I then laid out the sheet and put the wadding on the top, pinning it in place around the edges. 

Next, I laid the quilt top over this, and again, pinned around the edge, and cut off the excess around the edges.


But, having had issues with the pins when I first started machine quilting larger pieces, last year I invested in a Micro Stitch "gun". This is one of the best little pieces of kit I have bought in a while, as I can sew the quilt without getting stuck by pins.  

So the last stage of basting was to micro stitch the layers together, smoothing it all out as best I could, while removing all the pins. So I now have both quilts ready for sewing!


Next stage is the stitching. I like this to an extent - it just depends how bulky it gets on the machine!! We'll see how we go!! 
Take care,
Cxxx


Thursday 5 March 2020

Hearts and Easels

So, I am currently fundraising for a new local charity called Helping Yound Minds, aimed at providing a safe space and mental health support for our local youngsters. I initially started out with signing up for some sporting activities and setting up a Go Fund Me page - as I've always managed to raise a reasonable amount in the past. But it's just not happening at the moment, and I'm a bit down about it all. 

And when I'm a bit stressed, I have a tendency to tidy and organise. While doing so, I re-discovered a whole drawer full of old demo bits and pieces - die cut bases and other things prepped for demonstration and never used. And I also realised I have some other stuff - completed samples etc - that are just sitting in boxes. So, am thinking I am going to use all those bits and pieces and my vast stash, along with those already completed pieces, to try and boost my fundraising. 

At the moment, I am just prepping and creating, and don't really know how I'll go about selling stuff, but just doing something to make it happen is good enough for now.

Here are two heart easel cards completed today, and I rather like them. It's been a while since I really created anything - and have to admit I don't miss the time involved, but I am loving the results.


Both use the Crafter's Companion Heart Easel Die for the base, and the larger mat. I also used my X Cut Heart and Scalloped Heart dies, and Crafter's Companion Stitched Edge Hearts.  For the one on the left I used Sara Signature Together Forever Champagne Flute and Graceful Swirls, and for the one on the right I used Sara Signature Vintage Tea Party Cherry Cupcake. All the card and paper is from my stash - a lot of which I no longer have any recollection of where it came from. Ah, well!

Will keep you updated as I add to the collection ready to try and raise some money!! 

Take care,

Cxxx