About Me

My photo
I'm a retired primary school teacher, who started paper crafting in 2008, when I had a fancy to make my own Christmas cards. Since then, I have tried all sorts of techniques and styles - and I kind of like them all. I have been lucky enough to be on blog teams and large design teams and to do a bit of freelance demonstrating - and I love the challenge of working with different products. My crafting style is very varied - from junk journaling and art journaling, bookbinding and journal making, to quilting and patchwork - and of course I still make cards. This variety keeps me interested - and my crafty stash growing!! I'm always seeking inspiration for new projects.

Monday 31 August 2020

A Nordic Napkin Card!

We are into the second week of our M and N challenge. My "N" card is a Napkin fold card made using Crafter's Companion Nordic Christmas CD - with a tiny little Noel in there too!

I have made a napkin fold card before (see here) and have followed the same instructions.  You need to start with a square piece of card - this is 11x11 (cut from a piece of 12x12). I scored at 2 3/4" and 8 1/4". After a quarter turn, this was repeated. The centre of each side (5 1/2") needs to be marked so you can score between these four points to create the diagonals. The diagonals on the corner squares also need scoring. You then fold the diagonals one way and the vertical/horizontals the other way. 


The four large triangles are made by cutting a 5" square of paper into four, along the diagonals. The smaller ones are from a 4 3/4" square similarly cut into 8 pieces. Except I made mistake and used a 4" square! Not a major issue - you just have more of the base card showing.

The topper companion (printed at A5 size) and two of the papers (the brown one has Noel on it), are directly from the CD. The grey wood effect paper was made by cutting, pasting and cropping one of the quick cards from the CD. I also used some of the matching circular embellishments.

The belly band was made using the little topper from the companion sheet, and a strip of card 3 3/8" wide, with more of the papers. 

Don't forget to come an share your stash busting makes!
Happy crafting.

Cxxx

Thursday 27 August 2020

Hedgehogs

I made these cards for my teaching colleagues at the end of last academic year - but have only just got round to sharing. Our class name was Hedgehogs - hence my choice of Hunkydory Pick and Mix topper sheet called Happy Little Hedgehog. I used some other Hunkydory card for mats and layers.


This year, I am in Rabbits - so will need to start looking for relevant toppers! 
Happy crafting,
Cxxx

Flying High

I do get a little jaded with making football cards for the male members of the family - although, to be fair, there are a few other interest like beer (!), cricket and cars. But my stepfather-in-law loves old planes, so this Hunkydory Pick and Mix Topper sheet called "Flying High" was perfect for his card this year. 


I used the red, white and blue theme for the matts and layers,  and then added a piece of old Kanban Cream and Blue Script Duo card. 

Happy crafting.

Cxxx

Wednesday 26 August 2020

Hats off!!

Just popped on to share a couple more of my hat easel cards. Click here for the link to my step by step guide to making these larger than usual hat easels.

The first one uses Centura Pearl Hint of Gold for the base, and burgundy/purple A3 double sided card from the Downton Abbey Classic Collection. The orange is also double sided A3, this time from the Shabby Chic Classic Collection. 

The second one again uses Centura Pearl for the base, and the Shabby Chic orange card. The blue is also from the Shabby Chic Collection - but this time from the Traditional pack.

Enjoy your day - happy crafting!

Cxxx

Monday 24 August 2020

Moonbeam Meadow

A new two week challenge has started at Use Your Craft Stash. We're up to M and N - so this week I have my "M" card. No step by step, as this is a really simple mat and layer card.

I used the Moonbeam Meadow CD - an old one from Crafter's Companion, and found this gorgeous topper with two Mice sat on a Mushroom. The patterned papers are also printed from the CD. I added some Mint green glitter card (CC Luxury card pack - but don't know which one) to go with the pink, and some dark green Matt Mirror card (also CC Luxury card pack). The  roses are from my stash - cheapy ones (£1 for 12 or so), and a few flat backed pearls.

We look forward to seeing your makes.

Happy crafting!! 

Cxxx


Monday 17 August 2020

Love Bug

We're up to K and L with our challenges - and I have gone for L with this week's project. This is a Latch card with Ladybirds, Linen card, a bit of Leaf Green, some embossed Leaves - and some Lines.


I used the tutorial for a Latch card from Beccy's Place. I cut a piece of A4 white Linen card to 7" along the short edge, and scored at 6 3/4" on the long edge. This made a card where the front is smaller than the back. I then scored 3 Lines on the back of the card, starting as close to the edge of the smaller front part as I could. These lines are not for folding, but allow this part of the card to be flexible enough to bend to allow the Latch part to work.

I used one of the smaller square toppers from the Hunkydory Lovely Ladybirds _ Love Bug topper sheet, for the latch. This is attached to the bottom part of the card and overlaps the top part, creating a "latch" to hold the card closed. 


I have embossed Leaves onto the gold card with Crafter's Companion Sugar and Spice Embossing Folder - Delicate Floral. With the larger topper, I left out one of the parts to allow the Linen card to be seen underneath. 

I finished with a bow - using a bit of Leaf green - and added some gems and flowers with Lines!!

Look forward to seeing your creations!
Happy crafting,

Cxxxxx

Monday 10 August 2020

Kimono!!

It's a new challenge over at Use Your Craft Stash, and for the next 2 weeks we are looking for projects that use up your stash, and contain an item/ technique/ colour/ product that starts with K and/or L.

For me it was a no brainer. When the Crafter's Companion Kimono range came out in 2015, I absolutely loved it. I was on the DT at the time, and made samples for TV, and also for the Crafter's Inspiration magazine.

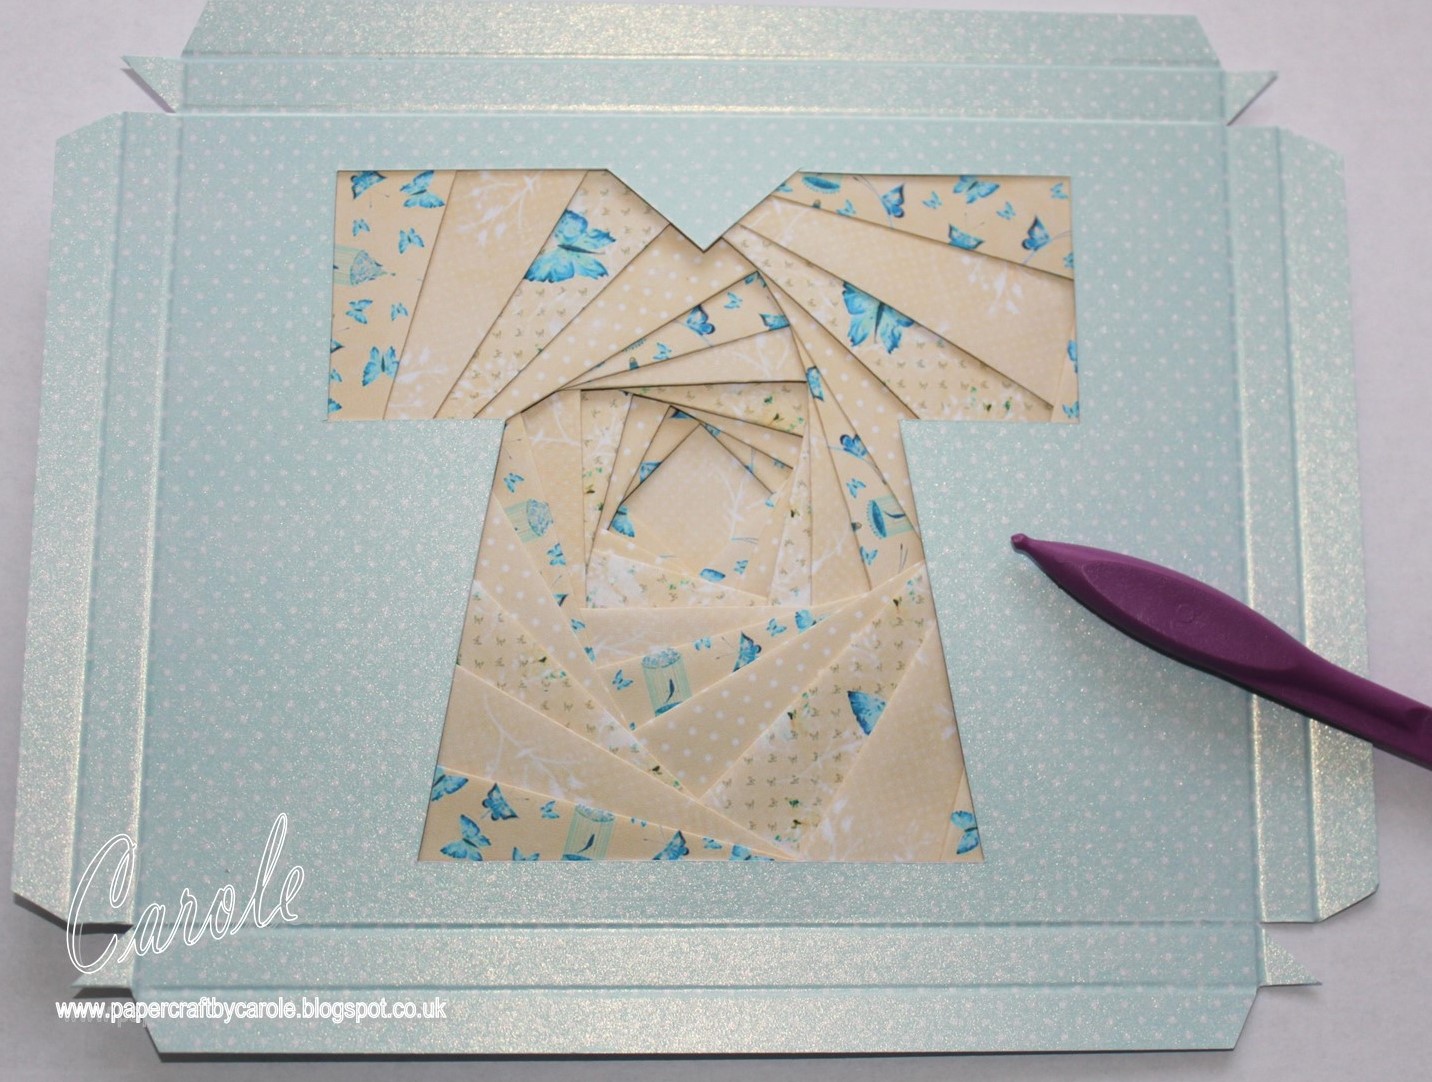
One of the cards I made for the CI7, was an iris folding Kimono card. So, I have recreated it here in different colours. Back then, I used yellow and turquoise, and this time I have used green and pink. But as I am a bit lazy, I have used the step by step photos from way back then.

This came out when CD crafting was really the in thing, and printing onto different surfaces was one of the things I loved. I used the Kimono CD, and printed the spotty co-ordinating paper onto Centura Pearl Snow White Hint of Silver (back then I used turquoise - this time pink). On the back of this, I printed the template I created, and cut out along the bold lines, keeping the end of the piece of card.

 
The iris folding template was printed onto copier paper and the frame secured over the top with low tack tape. I chose four papers from the CD (this time I used these papers but in green rather than yellow).
Using 3cm wide strips, I followed the pattern, ending with covering the hole in the middle.
I then scored the dotted lines, and folded and stuck to create the "box".  On the back of this, I stuck a piece of scrap card.
  
Strips of card and paper were added to create the  kimono sash - using the excess saved right at the beginning. I printed another piece of Centura Pearl with the dotty paper from the CD - last time in yellow, this time in green - mounted another strip like the sash, and then stuck the box on top.
To finish, I used some paper roses, flat back pearls, a fan cut with the Kimono Butterfly Fan die, and a butterfly fussy cut from one of the sheets from the CD.
Remember, you only need to use one thing with the letters K or L, along with something from your stash, and you're ready to enter the challenge. 

Looking forward to seeing what you make. Happy crafting!

Cxxxxx

Saturday 8 August 2020

Monster Hugs

 Our second grandson was one a few weeks ago. I made him this card using Hunkdory Pick and Mix - Monster Hugs.

There's lots of layers of gold mirror card, yellow and orange textured card, and the green animal skin patterned card (from my local market).

Happy crafting.

Cxxx

Monday 3 August 2020

J is for Jasmine

So, we're half way through our I and J challenge over at Use Your Craft Stash on FB. I did "I" last week, so here's my J. A "Just for You" Jar of Jasmine, with Jewels - and a bit of Jade green thrown in for good measure.


I started with the jasmine flowers. I used Crafter's Companion White Flower Forming foam, with dies from Crafter's Companion Classiques Forget Me Knot, Pretty Petal (Crafter's Inspiration 6) and Flowers For All Occasions 2.


I used my Spectrum Aqua Jasmine pen to colour the centre of the flowers, and to colour the white stamens to match.


I embossed a piece of white stamping card with CC 3D Rose Bouquet folder - for the jar! I coloured the leaves with Spectrum Noir pens - LG5, JG1 and JG6 (JG= Jade green).  You can see my little swatch at the bottom of the card. I then mixed Imagination Crafts Alchemy Wax in Peridot, with a bit of water, and painted the stems and swirls.


I used the Jasmine Aqua pen to put a wash over all the flowers and the ribbon, and the Charcoal Aqua pen on the jar.


I painted over the jar with glossy accents to give it a more glassy appearance.


I then stuck the jasmine flowers over the roses on the folder, with leaves cut from a small die that came with the CC Advent calendar a few years ago. I finished it with a big bow and some green jewels!! 


We look forward to seeing all your makes!

Happy crafting.
Cxxx