About Me

My photo
I'm a retired primary school teacher, who started paper crafting in 2008, when I had a fancy to make my own Christmas cards. Since then, I have tried all sorts of techniques and styles - and I kind of like them all. I have been lucky enough to be on blog teams and large design teams and to do a bit of freelance demonstrating - and I love the challenge of working with different products. My crafting style is very varied - from junk journaling and art journaling, bookbinding and journal making, to quilting and patchwork - and of course I still make cards. This variety keeps me interested - and my crafty stash growing!! I'm always seeking inspiration for new projects.

Wednesday 30 November 2022

Lace Butterfly

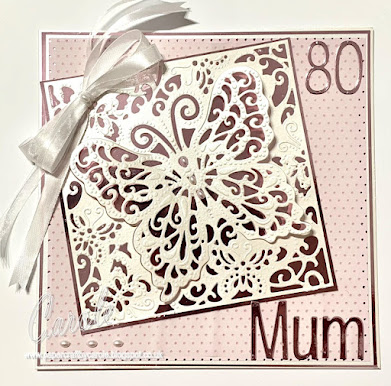
Today I am sharing my lovely Mum's 80th birthday card. She's not one for fuss and bother, but a special birthday calls for one of my special 8x8 boxed cards.

I have used A3 Fresh White Centura Pearl to create the base card and the box. The patterned paper is Craft Sensations 12x12 Floral and Basics Paper. I bought this from The Range - it's my go to place for cheap but gorgeous 12x12 patterned paper pads.

The butterfly is an old 6x6 Crafter's Companion Create-a-card called Lace Butterfly. It's really pretty - and the wings of the butterfly lift up.

The pretty mirror card is from Chloe's Creative Card 8x8 Mirror Card Pad in Sugared Pastels. It teams up perfectly with the patterned paper.

The lettering is Julie Hickey Designs Sweet Pea Alphabet, and the numbers are from an Elizabeth Craft Designs Planner Essentials set called Retro Number Trio. As the name implies, there are 3 different sizes of number dies included.

You can't see it from these pictures, but I always add decoration to the inside of the box. I usually use offcuts left from making the card and box topper. I added a couple of butterflies in there using Trimcraft Butterflies dies.


Thank you for popping by. 

Please feel free to follow me here on my blog, on FaceBookTwitterInstagram or Pinterest.

And I now have a YouTube channel where I hope to add my video content to in the future. Would love it if you could subscribe. 

Happy crafting, 

Cxxxx

Tuesday 29 November 2022

Jeanine's Art - Winter Charme Collection

Today's share includes three projects using elements from Jeanine's Art Winter Charme Collection. This time I chose to make a couple of different styles of boxes, and a white-on-white card. 

So, the first project is a white-on-white diorama card using the Snowflake Nesting dies, and the Landscape die set. I love white-on-white!! 


The second is a flip top box using the Snowflake Nesting die set. 


The third is another box using the Landscape die set. 


Click on the image to see the video demo, and please feel free to follow me here on my blog, or on FaceBookTwitterInstagram or Pinterest.

And I now have a YouTube channel where I hope to add my video content to in the future. Would love it if you could subscribe. 

Happy crafting, 

Cxxxx
Monday 28 November 2022

Creative Expressions - Paper Panda Winter Stag

Time for a bit of Christmas for the next few blogs, starting with another Paper Panda die from Creative Expressions today. It's an older one - but I absolutely love it. It's called Winter Stag, and I used it to create two very different projects.

The first is one that would make a really simple Christmas present. You don't even need to do the inky background, as you can replace that with patterned paper. The box frame is 16.5cm square. The background is a combination of Distress Oxide Sprays in Chipped Sapphire, Faded Jeans and Prize Ribbon; Pixie Burts - Making Waves; and Pixie Sparkles in Blue Wish and Beyond Blue.  A textured white card is also worth using to add interest.


The second project is a window hanger. I used acetate and Shell Pink Alcohol Ink, Villainous Pearl Alcohol Ink and Snow Cap Alcohol Ink Mixative.  


Click on the image to see the video demo, and please feel free to follow me here on my blog, or on FaceBookTwitterInstagram or Pinterest.

And I now have a YouTube channel where I hope to add my video content to in the future. Would love it if you could subscribe. 

Happy crafting, 

Cxxxx

Sunday 27 November 2022

Creative Expressions - Paper Panda Ornate Christmas

More Christmas and more Paper Panda. This time, it's two cards with the same Ornate Christmas die - just different card styles.

The first is a rocker card, using cream card and gold glitter card.


The second is using it to create a more interesting "edge" on the front of the card.


Both the glitter card and the mirror/satin card are from Crafter's Companion Luxury Card Packs. I really love these packs as they give you different finishes that can be used together or separately.

Click on the image to see the video demo, and please feel free to follow me here on my blog, or on FaceBookTwitterInstagram or Pinterest.

And I now have a YouTube channel where I hope to add my video content to in the future. Would love it if you could subscribe. 

Happy crafting, 

Cxxxx

Saturday 26 November 2022

Creative Expressions - Moonlit Owl

Some inky backgrounds today, teamed up with Moonlit Owl by Sue Wilson for Creative Expressions. It's really easy to change the mood of a card by changing the colours. 

For the blue one, I used Speckled Egg, Stormy Sky Chipped Sapphire and Black Soot Distress Oxides, and cut the elements in black card.

On this one, I used Ground Espresso, Gathered Twigs, Carved Pumpkin, Dried Marigold and Fossilized Amber Distress Oxide, and cut the elements from brown cardstock.

Click on the photos to see the video demonstrations. Thank you for popping by. 

Please feel free to follow me here on my blog, on TwitterFaceBookInstagram or Pinterest. And I now have a YouTube channel where I hope to add my video content to in the future. Would love it if you could subscribe. 

Happy crafting, 

Cxxxx

Friday 25 November 2022

Art Journal - Blue & Cool Colours

Another Art Journal play, this time in my Pink Pig Journal. This is one where I may follow a prompt or play with some products. And unlike my Arteza journal, I am not so fussed about the outcome - it's the playing and process that's important with this. 

It's the second attempt at videoing myself and I am still having teething problems. I had an issue with the focus of the camera and paused the video to sort it. Then forgot to start it again. That said, it gives an idea of how I put it together.

To start with, the prompts I have cut up in my box are from Mixed Media Arts. I don't use them too often, so there's plenty to work with. This time I chose Blue and Cool Colours. I don't generally just randomly pick one, as I still struggle with that. When I use them, I need to give myself a feeling of knowing what I can do. 

To go out of my comfort zone I use Everything Art (click here for their courses). I dip into the 100 steps and have signed up for the Care December. Kasia and Jamie give more than just a word prompt. They give you prompts for the techniques and products - and often a video - so I feel a bit more supported. 


I tried to show the products more - but still feel that I need to work on that. And as the video missed some of the process, I will give you a full list further down. And it seems Blogger only allows videos of under 3 minutes - so am going to have to give that some consideration too.

After the video paused, I used Structure paste through the stencil you could see. And then Lunar Paste through the Whitewash stencil. And on the other side, a couple more of the Elizabeth Craft Designs stencils with Chipped Sapphire Distress Oxide. I also did some stencilling on the coloured part of the shell.

The edges of the pages were painted with the Turquoise Cascade and Nearly Navy Inks.


Products Used:
Rice Paper - I use this to clean up ink, and then it provides me with a quick background like this one
White stamping card
Cadence Satin Finish Decoupage Glue
Amy Design Ocean Wonders Shell die set
Cosmic Shimmer Watercolour Ink - Peacock Teal
Cosmic Shimmer Pearlescent Watercolour Ink - Nearly Navy, Turquoise Cascade
Cosmic Shimmer Pixie Powder - Aqua Lagoon
Cosmic Shimmer Pixie Sparkles - Blue Wish
Cosmic Shimmer Lustre Polish - Snow and Ice
Cosmic Shimmer Luna Paste - Moonlight Ocean
Imagination Crafts Sparkle Medium - Midnight Ice
Imagination Crafts Structure Paste
Imagination Crafts Stencils - Whitewash, Chevron + not sure of the other one
Elizabeth Craft Designs Art Journal SO40 Pattern Stencil Pack
AALL & Create Stamp Set - #351 Alphabet Splatter
Distress Oxides - Weathered Wood, Iced Spruce, Mermaid Lagoon, Chipped Sapphire

Thank you for popping by. 

Please feel free to follow me here on my blog, on TwitterFaceBook Instagram or Pinterest.

Happy crafting, 

Cxxxx

Thursday 24 November 2022

Creative Expressions - Bee Happy

Two projects today using the Bee Happy die from Creative Expressions Craft Dies by Paper Panda. If you don't know who Paper Panda is, then check out this link.   

For the first one, I teamed the die up with Creative Expressions 3D Embossing Folder Honeycomb trellis for the textured background, and Card Deco Frame Card Lacy Dots 4K die for the base card. The inky background uses Distress Oxide sprays in Scattered Straw and Spiced Marmalade, along with Cosmic Shimmer Pixie Powder Mango Blaze and Pixie Burst Orange Slice. 

I really love these Card Deco card dies. It just gives something different to the base card - and they are pretty good value for money.


The second card uses the same embossing folder, but this time with patterned paper. I cut into the Bee Happy die cut, to give added interest. 

Click on the image to see the video demo, and please feel free to follow me here on my blog, or on FaceBookTwitterInstagram or Pinterest.

Happy crafting, 

Cxxxx
Wednesday 23 November 2022

Sizzix Thinlets - Tim Holtz Abstract Faces

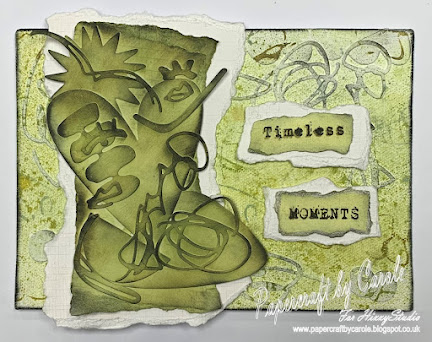
Of all the items I was asked to work with, the Sizzix Thinlets Tim Holtz Abstract Faces set was intially one of the most challenging.

It really took a while to think about what to do. Please have a look at my other post using this set - it uses the set in the sort of way I think it was intended.

That said, as I mentioned in the other post, it is a fabulous set for mixed media to add texture. For this canvas I used Distress Oxide Inks in Bundled Sage, Peeled Paint, Forest Moss and Black Soot, and Distress Oxide Sprays in Bundled Sage and Peeled Paint.

Click on the image to see the video demo, and please feel free to follow me here on my blog, or on FaceBookTwitterInstagram or Pinterest.

Happy crafting, 

Cxxxx

Tuesday 22 November 2022

Yvonne Creations - Sweetheart Collection

Two cards today, using items from another Yvonne Creations collection called Sweetheart.

The first card uses the Floral Panel die. 


I love this second card. I used the Flower Frame die to create a white-on-white Wedding card, along with Julie Hickey Designs Sweet Pea Alphabet.

Click on the image to see the video demo, and please feel free to follow me here on my blog, or on FaceBookTwitterInstagram or Pinterest.

Happy crafting, 

Cxxxx

Monday 21 November 2022

Yvonne Creations - Stylish Flowers Collection

A big dump of photos and projects today - five in total - and are all using the Yvonne Creations Stylish Flowers collection.

The first card is using the Flower Arrangement die from the collection. The base is cut using a very old Crafter's Companion Base Card Die called Stacey.

The second one uses the Bouquet of Flowers die, and I teamed it with Julie Hickey Designs Dinky Circles.

The next one has one of the 3D Push Outs along with the Flower Hoop die.

Another one with a 3D Push Out, this time teamed up with the Garland Edge die.

Finally, this one uses the fab Octagon Flower Card die to cut the base, along with another of the 3D Push Outs.

Click on the image to see the video demo, and please feel free to follow me here on my blog, or on FaceBookTwitterInstagram or Pinterest.

Happy crafting, 

Cxxxx

Sunday 20 November 2022

Creative Expressions - Chrysanthemum Stained Glass Circle

Today's share is another Creative Expressions die and, like yesterday, is from a Sue Wilson collection. I have previously used this die in another project which focussed on paper piecing. Click here for that blog post.   

For this project, I wanted to see if I could create something that resembled a stained glass piece, since that's the name of the collection. I used Cosmic Shimmer Watercolour Inks and Glossy Accents.


Click on the image to see the video demo, and please feel free to follow me here on my blog, or on FaceBookTwitterInstagram or Pinterest.

Happy crafting, 

Cxxxx

Saturday 19 November 2022

Creative Expressions - Peony Floral Panel

Two cards to share today, using the lovely Peony Floral Panel. Sue Wilson from Creative Expressions has a whole load of these floral panels in her collection, and they can all be mixed and matched.

On this first card, I have created an inky background with Distress Sprays. I also used the dies to create masks to ink through. I cut out with one of the panels and cut in with the other.


The second project is a pocket card and tag. The little card opens and there is a pocket in the front for the bookmark. No inking this time, just patterned papers.


Click on the image to see the video demo, and please feel free to follow me here on my blog, or on FaceBookTwitterInstagram or Pinterest.

Happy crafting, 

Cxxxx


Friday 18 November 2022

It's Not Who You Are That Holds You Back .....

Had a play in my art journal yesterday. And also had a play at creating a video/reel of it. I don't think I did too badly for a first attempt.

I have four different journals - some have more in than others. This one is one I tend to do double page spreads with a quote and an image. It's just something I like to do - and the quote is usually relevant to how I am feeling at the time. And I think this is where I am at the moment. Having recently retired from a long teaching career - a job which is all consuming but gives you a purpose and identity - I am currently struggling to know exactly what I am. Looking for what I want to do now seems to throw up an endless list of what I am not. 

This is the finished project - not entirely the way I initially envisaged it - but I always enjoy the process. And this is one journal where I want to like the end product. I have another where I have experimented or followed prompts, and in that one there is a lot that I don't like - but that helps me to sometimes just let go of the end product and focus on the process. 

Here is the speeded up and edited video, having removed all the faffing and prevaricating.


Products used:
Arteza 14cm x 14cm Sketchbook
Distress Oxides: Picked Raspberry, Ripe Persimmon, Fossilized Amber
Distress Mica Stains: Winterberry, Flickering Candle, Jack O' Lantern
Distress Archival: Vintage Photo
Stamps: Tim Holtz Stampers Anonymous Just Thoughts (very old set); AALL & Create #662 One Of A Kind; Imagination Crafts Texture Stamps (from two different sets - both old)
Stencils: AALL & Create #147 Coffee Stain; #38 Cracked Walls 2
Tim Holtz Stamping Platform
Tim Holtz Stamping Blocks
Blending Brushes - cheap ones from Amazon
Cream card from stash

Thank you for popping by. 

Please feel free to follow me here on my blog, on TwitterFaceBook Instagram or Pinterest.

Happy crafting, 

Cxxxx

Thursday 17 November 2022

AALL & Create - #327 Ribbit Ribbit

I am relatively new to AALL & Create stamps. Am probably more drawn to those created by Tracy Evans and Bipasha, but love how all the designers have their own styles.

This stamps set is by Tracy Evans, and is called Ribbit Ribbit. I have another project with this stamp set which I have blogged previously. Click here for a look, as I have used different elements from the stamp set on that one than I have here.


I created the background by first spraying using Distress Oxide Sprays in Picked Raspberry, Wilted Violet and Mermaid Lagoon. I then used some of the smaller stamps from the set to add more texture using the same colours in the ink pads. The Lotza Diamondz stencil was then used on top. 

The main stamp and the wording were stamped with Spectrum Noir Finesse Waterproof Dye Ink Pad in Pebble.

Click on the image to see the video demo, and please feel free to follow me here on my blog, or on FaceBookTwitterInstagram or Pinterest.

Happy crafting, 

Cxxxx

Wednesday 16 November 2022

Elizabeth Craft Designs - Garden Bouquet

I love flowers and am lucky to own an array of older Elizabeth Craft Designs flower dies.  Yes, they are not the latest dies, but in this day and age where our budgets are squeezed, look at what you already have in your stash. If you have been crafting for a while, chances are that you have something you can use. This card uses 3 different dies from their Garden Notes collection: 1190 Bouquet Stems and Branches; 1638 Crocus; 1590 Grecian Windflower.

These dies are created to allow for good representations of the real flowers. However, don't be put off by that. Use your dies how you want to, as I have in this card. You wouldn't recognise that these "should be" crocuses and windflowers.

I have also used patterned paper for the flowers rather than colouring them, but you could equally create an inky background and cut them or cut them from white and colour them. So many possibilities. I love the Bouquet Stems and Branches. Elizabeth Craft Designs made several of these type of dies. 

Click on the image to see the video demo, and please feel free to follow me here on my blog, or on FaceBookTwitterInstagram or Pinterest.

Happy crafting, 

Cxxxx

Tuesday 15 November 2022

Eizabeth Craft Designs - 1478 Garden Scene

Today's share contains a couple of cards using Elizabeth Craft Designs - 1478 Garden Scene die. This is very much like a "Create a Card" type die. These are great for creating quick cards, as the work is pretty much done for you.

I chose to use two different techniques. The first one is an inked background using Mermaid Lagoon and Cracked Pistachio Distress Oxides and Sprays. The sentiment is from Julie Hickey Designs - Everyday Sentiments.  I love the Tim Holtz Distress Range - particularly the Oxides and the Oxide sprays. 

The second one is the quickest way to use this type of die, where patterned papers make the background. Again, the sentiment is from Julie Hickey Designs - Everyday Sentiments. 

Click on the images to see the video demos, and please feel free to follow me here on my blog, or on FaceBookTwitterInstagram or Pinterest.

Happy crafting, 

Cxxxx


Monday 14 November 2022

Elizabeth Craft Designs - Garden Party

Well, it's been almost 6 months since I last blogged and shared anything crafty on social media. And that is for a whole host of reasons.

Up until the end of June, I was fortunate to have the opportunity to create a lot of video content with a whole range of products and techniques. I have shared some of this previously, but still have a massive amount to share. My intention is to begin to blog the rest of this from now onwards. 

Once this came to an end, I kind of breathed a sigh of relief at having time to step back a bit. Don't get me wrong, I thoroughly enjoyed the 9 months I had, but it was good to take a step back. I have also not really been crafting since then - apart from friends and family and am now starting on my Christmas cards. I have spent the past four and a half months focussing on other things I enjoy - predominantly my garden, but also cooking, preserving and baking.

I am now at a point where I feel that I want to start playing again. I spent some time sorting through my craft stash and re-discovered a whole load of things I forgot I had, and it's time to start using it! Having been on Design Teams and been a demonstrator, your stash builds without you really being aware of how much you have. Once I have shared all the things already created and filmed, I am thinking of potentially having a go creating some content independently. Not sure how - or if - this will happen, but it's bubbling around in my head.

Anyway, my intention is to share the 60+ projects and videos that I haven't yet shared, grouping them together where I have created different projects with the same item.

So, am starting with some Elizabeth Craft Designs. These are created using a set of stamps called Garden Party. 

Both were stamped with Versafine Clair - Nocturne and embossed with clear embossing powder. 

For this one, I used Cosmic Shimmer Watercolour Ink to colour the image.

And for this one, I used Faber Castell Goldfaber Aqua pencils. 


The patterned papers and card are from my stash - as are any dies used to cut the layers.

Click on the images to see the video demos, and please feel free to follow me here on my blog, or on FaceBookTwitterInstagram or Pinterest.

Thanks for popping by. Happy crafting,

Cxxxx