About Me

My photo
I'm a retired primary school teacher, who started paper crafting in 2008, when I had a fancy to make my own Christmas cards. Since then, I have tried all sorts of techniques and styles - and I kind of like them all. I have been lucky enough to be on blog teams and large design teams and to do a bit of freelance demonstrating - and I love the challenge of working with different products. My crafting style is very varied - from junk journaling and art journaling, bookbinding and journal making, to quilting and patchwork - and of course I still make cards. This variety keeps me interested - and my crafty stash growing!! I'm always seeking inspiration for new projects.

Tuesday 28 April 2020

Things With Wings

Where has that last week gone. Despite lockdown, I seem to be so busy with a never ending list of things to do!!  Far too much baking and eating in there!! Anyway, this week's theme at Use Your Craft Stash is Things with Wings. Quite a broad theme covering anything from birds and bugs to fairies. 

I dug out a really old X Cut Large Owl die. I've had it years and probably only used it twice before.


I have also been trying to use scraps of card and paper rather than cutting into new sheets (although heaven knows, I have enough new sheets), so I dug around and pulled out some colours I like the idea of.


I went for pink, cream and brown - and pulled out what I thought went together.


I cut the pieces for the owl, in predominantly brown card, with just a bit of the patterned card left over from a Hunkydory kit.

I wanted to have some flowers on the front, and decided to use a new die - yes I know, we're supposed to be using stash up - but this is one I really wanted for using with flower forming foam.  So, I cut the three sizes of flower from a mixture of cream and pink card, and the Hunkdory patterned card, and an offcut of Crafter's Companion A3 card - I think it was Shabby Chic.

As you can see from the end photograph, everything looks quite grungy, rather than the clean colours of the scraps, and that's because I inked it all with Gathered Twigs Distress Ink. 

Having dug out my box of Cut and Dry - and I discovered yet more unused and forgotten stash in the form of Distress Mica Sprays!! Oops!!


I think I was a bit heavy handed (as usual) with the ink - but am happy with the grungy look.

The flowers dies are roses (Sara Signature Garden of Love) so I folded one of the smallest size into a bud for the centre.


Finally, I assembled it all  and added some large pearls for the eyes, and decorated the edges with more pearls.


Take care and stay safe, 
Cxxx

Sunday 19 April 2020

Rainbows!

This week's theme at Use Your Craft Stash is Rainbows - quite apt at the moment. This is my finished piece.


Wasn't sure what I was going to do at first, but then I thought about my Brushos that have only ever had one outing in all the time I've had them. 


I did have a rootle around on the Internet, and decided to start with a rainbow across a piece of watercolour card.  I got another piece of card and marked it into 6 sections - one for each of the colours. I sprinkled each colour at a time and sprayed it. 


Once it was dry, I stuck it onto a piece of greyboard to flatten it out. I then stamped around the edge with Imagination Crafts Art Stamps (from various Texture sets) and Smokey Gray Versafine.


I wanted to mount this onto a canvas, so decided to paint that with a rainbow too. I marked out the sections diagonally and used Imagination Crafts Starlight Paints.


I felt it was a bit too bright for what I wanted, so I went over the whole thing with a thin layer of Gesso, and then stamped around the edges as before.


Originally, I was going to stamp a sentiment onto the watercolour card, but felt it was too large for what I wanted, so I created another, smaller piece. This time, I put all the colours on in one go and sprayed over the whole piece.


This was stuck onto more greyboard, and the edges stamped as before. The sentiment is from Visible Image - Stay Strong, stamped with Onyx Black Versafine.


Both of the Brusho pieces were mounted on black card, and all three were edged with Onyx Black Versafine before assembling. The final touch was to add some gems (the suggestion of one of my good crafty friends). These ones have been in my stash for ever!


Come and join us at Use Your Craft Stash on Facebook, and share your rainbows. 

Stay safe everyone!! 
Cxxxx

Wednesday 15 April 2020

Flowers!

Way back on March 10th - before the world changed beyond recognition - I unearthed my flower forming kit that I bought from Crafter's Companion in September last year. The plan was to make some flowers for some cards that I am planning on making later in the year. I did make a start - and also unearthed some Foamiran which I added to the mix - and completed a couple of flowers, but then they ended up on the back burner as other things took over. 

It was over a week ago, when I finally sat down to finish them, and it was an interesting experience, as I developed my own technique and found what I was happy with.


The first thing I did - as lots of the videos that I watched suggest - was to cut my flowers and ink them.  I used a variety of dies including Sheena Douglass Rosy Outlook Perfect Partners, Crafter's Companion Essentials - Flowers for all Occasions Sets 1-4, and Sara Signature Shabby Chic Classic Lily. As the picture shows, I inked them using Distress Oxide. This turned out to be a complete waste of time. It didn't show up, and came off on the iron when heating. I think it's best reserved for white foam.


I decided to start with the Rosy Outlook flowers cut from red Foamiran and opted for the cup style flower.  This is where you heat the foam, it curls up and you then use the foam and ball tool to shape it into a cup - the shape it naturally seems to want to make. I think that this die might have been a bit big for this, but this was my first attempt and I was learning as I was going.


I found by trial and error that it was easier to make the holes before you heated the foam - but again, this was my first time, and I was following things from the videos.


The first time I used the wire around the stamens, I twisted it on so it stayed attached to the flower, but as I progressed, I found that just looping it worked, and the wire could be re-used. I ended up having two pieces on the go allowing me to get on with things while hot glue was cooling.


I found that, for me, after pulling the stamens through the first layer of the flower, it worked best to put a blob of hot glue onto the back of the flower. This allowed me to ensure that the stamen was fixed before attaching the next layer. I found, at the start, that I was pulling them through. These are the first three flowers I made - the ones that I made lots of mistakes on, and that I wasn't overly happy with. Although, on reflection, they look fine.


So, three weeks later, and having watched more videos, I wanted to try other things. So, using the same die cuts and foam as before, this time I heated the flower, then folded each petal in half and rolled it in my fingers. This gave a more scrunched look, and I liked the result. 


This is the point at which I worked out to just loop the wire around the stamens, and that adding glue at the back of the first layer helped to stop it slipping through. I also put hot glue on the back of the last layer and allowed it to set before removing the wire.


I have been using a really old travel iron for heating my flower, and have found that holding it on with the ball tool works best for me. With these purple flowers, I did the opposite to making a cup by turning it over before using the foam and ball too to shape it.


For these yellow and orange flowers, I used a combination of cup shaped and the other shape (no idea if it has a name). I did the same for the cream and orange ones.


And finally, I tackled the lily. I was wishing I hadn't used this die as I was not sure how it would go together. But, I pushed on and decided to try the tool that comes with the Crafter's Companion kit to ruffle up the ends of the petals. I heated the flower, folded it so the petals were on top of each other, then folded them in half. I then ran the finger tool over the ends of the petals, on top of the board.


The resulting flowers are better than I first anticipated, but I really don't like this colour of the Foamiran.


So, lots of lessons learnt. It's a long process, but it is worth it in the end.

Take care, stay safe.

Cxxx


Monday 13 April 2020

Use Your Craft Stash - Bird Box

Hello! Been a few days without blogging over the Easter weekend. Was so beautiful, and I spent most of it in the gardening tackling the ivy situation.  So, it seems quite apt that this weeks theme for Use Your Craft Stash is Gardens and Gardening. We are looking for creations of any kind that have a garden theme - and that means not just flowers. We want to see trowels, pots, seeds, bird houses, watering cans, wellies etc.

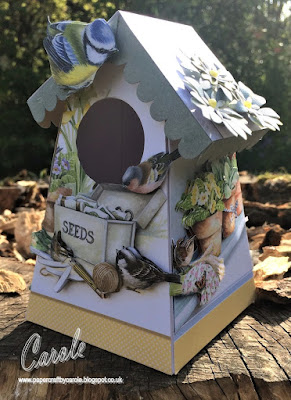
I have really gone into my stash for this one. Many years ago - I don't even remember when - Hunkydory had a Little Tweets collection, which included some pop out and make 3D bird cages and bird houses. I don't know that I ever used either (although I have vague recollections of cutting up one of the bird cages to use flat on a card).  Anyway, I thought it would be fun to use one of the bird houses as the base for my creation. These photos show views of all the sides.


The Birdy Box was really easy to make - especially as I still had the instructions with it. 


To decorate the sides, I used several different sheets from Hunkydory's Little Book of Garden Treasures which I have had for well over a year. I used the box itself as the template for cutting the pieces. 


I then used additional copies of the sheets to fussy cut layers for each side.


And then stuck the sides together. 


I then turned to the roof - at which point, I realised that the large blue tit was going to be in the way of putting the roof on - so I had to remove it and attach it to the roof instead.


The wood effect paper is printed from Crafter's Companion Monthly Downloads - May 2018 - Spring Floral. The edges were inked with Weather Wood Distress Oxide.


I wanted a few flowers to add to the roof, so headed to my flower stash. Lots of choice of bought flowers - both cheap and expensive - paper and fabric. And others that I have cut out for projects and never used. 


And it was amongst these I found some blue and yellow die cuts perfect for layering for this project.


These were stuck onto the roof, and onto one side of the box.  I really enjoyed making this - and am looking forward to seeing what others come up with from their stash.


I hope you are all staying safe. Take care,

Cxxx