About Me

My photo
I'm a retired primary school teacher, who started paper crafting in 2008, when I had a fancy to make my own Christmas cards. Since then, I have tried all sorts of techniques and styles - and I kind of like them all. I have been lucky enough to be on blog teams and large design teams and to do a bit of freelance demonstrating - and I love the challenge of working with different products. My crafting style is very varied - from junk journaling and art journaling, bookbinding and journal making, to quilting and patchwork - and of course I still make cards. This variety keeps me interested - and my crafty stash growing!! I'm always seeking inspiration for new projects.

Sunday 28 June 2020

E is for Extremely Tricky!

So, we're at the start of another 2 week challenge. And of course we are now at E/F. Same as before - you can make anything you want and use anything you want from your stash - providing at least one thing starts with an E or an F.

I like to take each letter individually and see what I can dig out from my stash, but I have to admit that E was a tricky letter for me. That said, I finally found my inspiration and managed to create my project for this week's inspiration - and Easel card with an Envelobox.


One of the things I found most tricky was trying to find colours. Originally, I was against using Emerald, but in the end I dug through my ink pad collection to see if I could find any inspiration for colours starting with E. And this is what I found - Emerald and Elderberry - Green and Purple - and I actually quite liked it. To be fair, I didn't use the ink pads (except for the sentiment) but it gave me a starting point.


I really wanted to use my e-Brush - an airbrush brought out by Craftwell about 5 years ago that works with Spectrum Noir pens. So I then had to colour match with my pens. I used JG3 (Emerald/Green) and LV2 (Elderberry/Purple). While I was looking through, I also picked out a couple of lighter colours to go with them - LG1 (a pale green) and CR2 (a light pink).

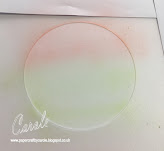
I had a piece of Mylar into which I cut a circle (easier to do if you have multimedia type dies). I used scrap paper to mask off the area around. I started with the LG1 and sprayed the bottom part of the circle, and then CR2 to do the top.


I then used a stencil over the top. This one is a mini stencil by Imagination Crafts that was in a Crafter's Inspiration Magazine. It's a double so I wasn't too worried about it being coloured by the ink. And to be fair, it will still work in the same way. So, over the top of the circle and stencil, I sprayed JG3 and LV2.


And the result was really quite lovely. 


I also airbrushed a piece of card using the lighter colours to use as a background.


This topper was then used on an easel card. This was cut using Crafter's Companion Circle Easel card die set. The purple mat was Embossed with an old embossing folder from Crafter's Companion - Embossalcious Everday 6x6 Floral Frenzy. The green fancy mat was cut from Core'dinations using the dies that came with the Easel card set.


For the envelobox, I followed the instructions for a 5.5" x 5.5" card, so started with a 9" square, and scored at G and levels 1 and 2 on each side.


I decorated the top of the box in the same way as the easel card. I also added some extra mats and layers, and (although not a lot shows) I found a piece of card in my old demo stash that was inked in the right colours (quite by accident) - I am presuming it would have been with Spectrum Noir Harmony Water Reactive Ink in Plum Pudding and Holly Leaf. I used an Edge'able (Jardin) to cut in either side. it just peeks out below the circle.


So there it is - my Emerald and Elderberry circle Easel card with Envelobox, with E-Brushed topper,  Embossing and Edge'ables - and a few pearls for Embellishments!!


Happy crafting!
Cxxx

Birthday Tea

It was my lovely sister-in-law's birthday a few days ago. I made her this card using Hunkydory Pick and Mix - A Tea-licious Day.  


Behind the topper, I used Crafter's Companion 5x5 Tea Party Create a Card, cut in pale blye card. The other matts and layers are matt gold card, pink dots from Sara Signature Little Angel, and some pink Core'dinations. The flower is Sara Signature English Country Garden Lazy Daisy and Grand Floral.

I also dug out some Card Candy, and added a few pearls. 

Will be back in the next couple of days with the new challenge over at Use Your Craft Stash.

Happy crafting!
Cxxxx

Tuesday 23 June 2020

Downton Abbey Revisited!

When the C/D Challenge came out at Use Your Craft Stash, I had a few ideas floating around, but decided to go with Downton Abbey as my theme. I remember when this was first launched, as I was on the CC DT at the time. I also remember doing a magazine article for it too - although I may be wrong there.

So, this is what I made:


It's a Dutch Fold card with a Dowton Abbey Theme. I went back to the CDs that were released with this - so that get's another D for Digital crafting. CD1 has all the Above Stairs bits, CD2 has the Below Stairs, and CD3 has a range of card ideas with instructions - one of which is actually a Dutch Fold - but I didn't follow those instructions, as I decided to make it out of one piece of A3 Centura Pearl Card.


I scored along the long side, at 10 and 3/4". I turned and scored at 3" from each side. 
  

Next, I marked out where I needed to cut down to at 5 3/8" from the bottom on both sides, and then cut out the pieces that were not needed. I had originally intended to use the whole piece of A3, but when I stood it up, I felt the bottom was too big, so cut 2 1/2" off. It seems to have better proportions that way.


It's been a while since I've done some Digital crafting, and I remember now how much mess I make when I'm doing it!! I used a Card Companion from CD2 as a backer for the topper - and put it into Publisher and resized it for what I needed. I did the same with the topper which I took from the Metal Charm section of CD1. The backing papers are also made digitally. The Dark Grey and the Dove Grey are colour matched to the Card Companion, and the yellow - believe it or not - is Daffodil. I used the RGB numbers for Daffodil, and then put it at about 80% transparency.


I found some Downton Abbey Doilies which I used to mount the topper, and edged the Daffodil yellow card with Hickory Smoke Distress Ink. The circles are all cut with Crafter's Companion Stitched Edge circles, and the square Card Companions with the Square version.

I also used a lot of Dies from the Downton Abbey collection. On the outside I used Elegant Border - the stripy paper is from CD2 - Mr Carson Designer Papers - and Grand Decorative Bow.

On the inside I used another paper doily, and several more dies - Champagne Saucer, Perfume Atomiser and Half Doily. I also used a Downton Abbey 5x7 Embossing Folder called Thistle. The crown is from the Icons set.


So, that's it - a Downton Abbey Dutch Fold Card.


Take care,
Cxxxx

Friday 12 June 2020

C is for .... Christmas!!

In the crafting world. Christmas is just getting underway, with all the big companies releasing their Christmas 2020 ranges. So, as we are on C/D for the next couple of weeks, it seemed rude not to take advantage of the C to make a Christmas project.


I intended to make a Christmas card, and was thinking Crimson and Cream, so I dug out my Christmas boxes with all my Christmas stash, and found these Crimson Crackers already cut and with the tape attached and decided to go with that. They are cut using a Tonic die, and I used to sell boxes of 6 of these as tree decorations. 


So, the first job was to roll them up into crackers. I remember why these hadn't been done, as they are of a thicker card than is advisable for rolling, but I managed to get it done. 


I then had a look for something to decorate them, and came up with these circle toppers from Crafter's Companion Colorista Christmas. To be a suitable size, they were really small.


I coloured them with Spectrum Noir ColourBlend pencils - Daisy and Cherry Red from the Florals tin, and Viridian from the Naturals.


I cut them out and mounted them on circles cut with Crafter's Companion Stitched Edge dies and Spellbinders scalloped circles. I used thin Crimson ribbon to tie them up. When I used to sell them, I would add a proper snap and a hat into them - but decided to leave these out and make them purely decorative.


They then needed a box, so I used Centura Pearl Ivory card (which is essentially Cream), embossed some Crimson card with the same Spellbinders double sided Dainty Dots embossing folder as the crackers. I found a Colourist topper with a Candle, and coloured it with the same pencils as before.


Et voila - a boxed set of Christmas Tree Crackers. 


Have now got to start thinking about D. 

Take care and stay safe,
Cxxx

Tuesday 9 June 2020

B is for .....

So, we're into the second week of our A or B theme challenge at Use Your Craft Stash. While you can use any technique, colour, card fold, product starting with A and/or B, I chose mostly A for my first inspiration last week, so have gone with the B's this week.

I have a Brown and Beige Baby themed, Bendy front card with a Bear and Buttons, and a Box with a Bow for it to go in. 


For the base of the card, I used Crafter's Companion A3 Double Sided Printed card - Elegance. And for the box, I used Decadance.  Beccy's Place has instructions for this in her Card Fold Tutorials section. I didn't use her measurements, as I wanted it larger. So I started with a piece 15" x 8", and scored at 5" and 10". The higher bendy part is about 4" in height, and the smaller one is about 2".


I cut the edges with Crafter's Companion Die'sire Edge'able Rococo die. I have it in two sizes - from being on the DT back then - and one of the sizes was exclusive to whichever channel they were on at that time - but I can' remember which.  Whatever, this is the smaller of the two dies.


To create the Bendy front, the two sides then fold over and fix using tabs and slots. I backed this with Brown card, and added a piece of card to create a stand at the back. 

The Baby themed topper with the Bear, is an old Kanban one. I added Brown Buttons, and a Bow.


For the Box, I used the Big Score and a sheet of the A3 printed card, this time from the Decadance pack, with more Brown card and some Beige Centura Pearl from the Pastels pack. I embossed this with Spellbinders double sided A4 embossing folder called Dainty Dots. I finished it with a bow.

Remember, you have until Sunday afternoon to share your creations with us at Use Your Craft Stash.

Take care, and stay safe,

Cxxx

Friday 5 June 2020

All about the A's

Afternoon. I am quite late with my Use Your Craft Stash Post this week. There are two reasons for this. One is that we have decided to try a two weekly theme rather than one, but the main reason is that I had an extreme crafty block with this one.

We have chosen the theme "A or B" which means you can use anything from your stash that starts with A and/or B, choose a card fold or mixed media technique that starts with A and/or B, choose a theme that starts with A and/or B..... the list goes on. All you need to do, is use your old craft stash. 

And in addition, we will draw a winner at random, and they will receive a little prize, as well as being the group's banner for the next fortnight.

So, my block was this. I have some Angelia Fibres and I thought they would be perfect for this challenge. But not matter how I tried, I just couldn't do anything that I was happy with. And I came to a complete and total halt. Normally, my things are ready by Sunday, to post on Monday - but this one didn't come together until Wednesday, when I finally decided to let go of the Angelina Fibres. I am really happy with what I have created - it's a list of A's with a few B's thrown in for good measure!

So, here is my A-Frame card with an rectangle aperture. I have used Aqua Tints, Alcohol Inks and Acetate, with Black card and a few little Butterflies! 

I cut a piece of A3 Centura Pearl card lengthwise, and scored in half. I cut the piece out the botttom to make is stand like an A-Frame. I'd never heard of this before, but I found it (and a whole lot of other card folds) on Beccy's Place Blog. I also cut another piece of Centura, with a rectangle aperture.


I wanted to create a background using Aqua Tints. I have had these (all of them) since they came out, and the gold really hasn't kept well. It is no longer liquid, but a thick paste, hence the kebab stick in it as opposed to a pipette.


I put the aquatints onto the card, and smooshed with a paper towel. The gold didn't really want to smoosh - and had to be smeared more than blended. Still, it turned out fine.


The acetate is Hunkydory - Dusk to Dawn Luxury Foiled Acetate. On the
back I added some Alcohol ink.


When I came to put the acetate on the Aqua Tint background, it was a bit too bright, so I put a piece of vellum with Butterflies in between. 


I considered adding some embellishments , but in the end I decided to leave it as it is.

So, we look forward to seeing your entries - and remember, you have all next week as well as the weekend to get them in.

Take care, and stay safe,
Cxxx