About Me

My photo
I'm a retired primary school teacher, who started paper crafting in 2008, when I had a fancy to make my own Christmas cards. Since then, I have tried all sorts of techniques and styles - and I kind of like them all. I have been lucky enough to be on blog teams and large design teams and to do a bit of freelance demonstrating - and I love the challenge of working with different products. My crafting style is very varied - from junk journaling and art journaling, bookbinding and journal making, to quilting and patchwork - and of course I still make cards. This variety keeps me interested - and my crafty stash growing!! I'm always seeking inspiration for new projects.

Thursday 31 March 2022

Easter Basket

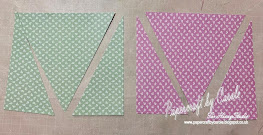
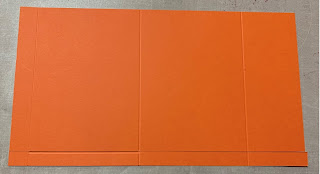
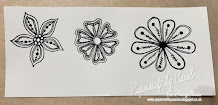
 We are fast approaching Easter, and I have a few projects to share with you. The first is this twisted Easel card in lovely pastel colours, using Elizabeth Craft Designs Easter Basket. Click on the picture for the link to the video demo.


I also used a sentiment from Karen Burniston's Easter Charms set.

Thanks for popping by, and I hope I have given you a little inspiration. Feel free to follow me here on my blog, or on FaceBookTwitterInstagram or Pinterest. For lots of video demonstrations, pop over to the Hixxy Studio YouTube channel to subscribe. The main items I use can be found on the Hixxy Crafts website - have a look under the Hixxy Studio tab.

Happy crafting,

Cxx

Tuesday 29 March 2022

Happy Dog!

Today I have a couple of projects using Crafty Individual's Happy Dog stamp. Click on the photos of the finished samples to take you to the Hixxy Studio YouTube Channel, and the video demos of each.


For the card, I used Spectrum Noir Harmony Water Reactive Inks - the Cool Neutrals and Dusky Shades 3-packs, and Smoked Pearl to create a background. I used elements from AALL & Create's "Deep Focus" for the stamping.


The image is stamped with Spectrum Noir Finesse Waterproof Ink in Flagstone. I coloured it with the same inks as above, mixed with a little Frosted Pearl Pixie Sparkle Highlights.


For the plaque, I painted the image with Speckled Egg, Broken China, Pumice Stone and Ground Espresso Distress Oxides. The paper is from a Crafter's Companion Nature's Garden Forest Friends 12x12 pad. 


Thanks for popping by, and I hope I have given you a little inspiration. Feel free to follow me here on my blog, or on FaceBookTwitterInstagram or Pinterest. For lots of video demonstrations, pop over to the Hixxy Studio YouTube channel to subscribe. The main items I use can be found on the Hixxy Crafts website - have a look under the Hixxy Studio tab.

Happy crafting,

Cxx

Sunday 27 March 2022

Petal Fold Card

Good morning! I have a lovely little petal fold card to share today. I got the idea from Beccy's Place, and have followed the same sizes as she used. Pop on over to see how to make the base. 


To decorate the inside, I used Julie Hickey Designs - Designer Series - All About The Girls by Hazel Eaton.  I stamped the main image from the set in Kitsch Flamingo, and embossed. I used stitched circle dies from Crafter's Companion to cut out the outer decoration ring, and the inner sentiment ring, to use separately on the card.


I used a combination of the sentiments, and the fern stamp to add further detail. 

Thanks for popping by, and I hope I have given you a little inspiration. Feel free to follow me here on my blog, or on FaceBookTwitterInstagram or Pinterest. For lots of video demonstrations, pop over to the Hixxy Studio YouTube channel to subscribe. The main items I use can be found on the Hixxy Crafts website - have a look under the Hixxy Studio tab.

Happy crafting,

Cxx

Friday 25 March 2022

Spring Foliage Card

Hello. Have a quick share today. This is an 8x8 card made using a combination of Creative Expressions Forget-Me-Not frame 3D Embossing Folder, and Julie Hickey Designs Floral Foliage Stamps.

I used white embossing powder with the stamp, as I didn't want a "hard line". 


I used Faber-Castell Goldfaber watercolour pencils (tin of 12) to colour the foliage, and Lucky Clover and Twisted Citron Distress Oxides to ink the edges of the frame.

The lettering is Julie Hickey Designs Sweet Pea Alphabet.

Thanks for popping by, and I hope I have given you a little inspiration. Feel free to follow me here on my blog, or on FaceBookTwitterInstagram or Pinterest. For all the videos, pop over to the Hixxy Studio YouTube channel to subscribe. And FB lives are streamed on both the YouTube channel and the Hixxy Crafts FB page. The main items I use can be found on the Hixxy Crafts website - have a look under the Hixxy Studio tab.

Happy crafting,

Cxx


Saturday 19 March 2022

Happy Cockapoo!

Today I have two makes with the gorgeous "Happy Cockapoo" stamp from Crafty Individuals. 

The first is a decoupage card, and the second is a take on a "See No Evil ...." card. There are videos for both - just click on the photos.


Decoupage card
The stamp has some quite defined white areas around the face which make this perfect for decoupage. And the design of this with the zentangle, means you can play with colours! 


See No Evil, Hear No Evil, Speak No Evil
I used my X-Cut Circle punches to create the glasses and the headphones.


And this is how I created the bone, and then cut into the muzzle of the dog for it to sit in.


Thanks for popping by, and I hope I have given you a little inspiration. Feel free to follow me here on my blog, or on FaceBookTwitterInstagram or Pinterest. For all the videos, pop over to the Hixxy Studio YouTube channel to subscribe. And FB lives are streamed on both the YouTube channel and the Hixxy Crafts FB page. The main items I use can be found on the Hixxy Crafts website - have a look under the Hixxy Studio tab.

Happy crafting,

Cxx

Friday 18 March 2022

Fern Card

A quick share today, of a card I made using Julie Hickey Designs - Designer Series by Hazel Eaton - More For the Girls.

 
I have absolutely no idea what this style of card is called - but it's easy and effective. Simply cut off two triangles from the front of the card as shown below. 


Then cut your paper for the front - and do the same. I used two colours for a contrast. You will need to trim this a bit before sticking on.


I used the Fern and the sentiments from the More For the Girls set from Hazel Eaton - stamped in black and embossed with clear. 


Thanks for popping by, and I hope I have given you a little inspiration. Feel free to follow me here on my blog, or on FaceBookTwitterInstagram or Pinterest. For all the videos, pop over to the Hixxy Studio YouTube channel to subscribe. And FB lives are streamed on both the YouTube channel and the Hixxy Crafts FB page. The main items I use can be found on the Hixxy Crafts website - have a look under the Hixxy Studio tab.

Happy Crafting,
Cxxx

Sunday 13 March 2022

Flower Pot Card

Today I have a flower pot card to share. I have used the Floral Fantasy and Floral Foliage stamp sets from Julie Hickey Designs.  


The card base is Kraft - 5" x the length of A4, scored in half (5 7/8").  And another piece for the top of the flower pot - 5" x 2 1/2". 


On the base card, mark 1/2" from each edge, at the bottom. Cut from the top (the fold) to these marks to create the shape of the pot.


cut decorative paper to fit over both pieces of card, and stamped the foliage onto the paper, so that it would show beneath the flowers. I coloured the foliage with Peeled Paint and Forest Moss Distress Oxides. The flowers were stamped three times onto stamping card, and coloured with Scattered Straw, Fossilized Amber and Mustard Seed.


After fussy cutting the flowers, I arranged the flowers and added a sentiment from the set. 


Thanks for popping by, and I hope I have given you a little inspiration. Feel free to follow me here on my blog, or on FaceBookTwitterInstagram or Pinterest. For all the videos, pop over to the Hixxy Studio YouTube channel to subscribe. And FB lives are streamed on both the YouTube channel and the Hixxy Crafts FB page. The main items I use can be found on the Hixxy Crafts website - have a look under the Hixxy Studio tab.

Happy crafting,

Cxxx

Saturday 12 March 2022

Sparkly Pocket Card

Hello! Am continuing my shares of projects using Julie Hickey Stamps. Today, I have a pocket card with an added tag! I have coloured it all with Cosmic Shimmer Pearlescent Watercolour Inks for added shimmer. Click on the photo below to see the video demo.


The base card is  6 1/2" x the length of A4. Mark on a line 1/2" from the long edge. 


Score at 2 3/8" from one end, and 3/4" and 5" from the other end. Also, score along the 1/2" line in the place where the flap will be - as shown below.


Cut off the bottom, along the 1/2" line, leaving the tab, then fold and burnish all the scored lines.


Attach a piece of card - 4 1/4" x 6" - to the flap on the right to form the back of the card, then glue the tabs and stick to create the pocket on the front.


I stamped the main image from the Floral Fantasy set onto stamping card with Versafine Clair - Nocturne, and embossing with clear powder. I used Cosmic Shimmer Pearlescent Watercolour inks to colour: Ray of Sunshine, Golden Sunrise, Flamingo Pink, Fiery Sunset, Holly Green and Turquoise. I also used Juicy Orange and Peacock Teal - both of which are not pearlescent.


I did the same with the individual flowers. I deliberately went over the edges, to reduce white edges when I fussy cut them out.


The base tag is 6 1/2" x 3 1/2", with each layer being 1/4" smaller than the previous. 


The stamp on the front is from the Floral Fantasy set - designed to fit in that little aperture. The Happy Mother's Day comes from Julie Hickey's Everyday Sentiment stamps and the lettering is Julie Hickey's Sweet Pea Alphabet set. 


I just love the sparkle the inks provide!!


Thanks for popping by, and I hope I have given you a little inspiration. Feel free to follow me here on my blog, or on FaceBookTwitterInstagram or Pinterest. For all the videos, pop over to the Hixxy Studio YouTube channel to subscribe. And FB lives are streamed on both the YouTube channel and the Hixxy Crafts FB page. The main items I use can be found on the Hixxy Crafts website - have a look under the Hixxy Studio tab.

Happy crafting,

Cxxx

Friday 11 March 2022

Farm Landscape card

Hello! I was given this cute little die set to play with from Precious Marieke. It's from the Cuddling On The Farm collection, and is called Farm Landscape.

I have gone for natural tones - but it could really jazzed up for a child's card. The dies cut out the front piece with the rooster and fence, the barn and the sky with the mountain silhouette. I have cut this in blue and white and paper pieced the clouds back in. 


I also cut the front piece again in green and snipped into it to have some grass in front of the fence. I mounted some card behind the barns, and cut  piece of green by hand to create the illusion of fields behind the barns - before you reach the mountains. I added a frame over the top to cover the edges.

Feel free to click on the photo to see the video demonstration.

Thanks for popping by, and I hope I have given you a little inspiration. Feel free to follow me here on my blog, or on FaceBook, Twitter, Instagram or Pinterest. For all the videos, pop over to the Hixxy Studio YouTube channel to subscribe. And FB lives are streamed on both the YouTube channel and the Hixxy Crafts FB page. The main items I use can be found on the Hixxy Crafts website - have a look under the Hixxy Studio tab.

Happy crafting!!

Cxxx