
This little box has a big impact because of the rose on the box. I used Rich Red Foundations card from Creative Expressions, and also Ivory Foundations for decorating the top. Click on the picture to take you to the video of this project.

The base of the box is made from an 8 1/4" square of card, scored on the Box Base side of your scoring board at 1 5/8" all round.
The lid is made from a 6 3/4" square of card, scored on the Box Lid side of your scoring board at 7/8" all round.

For the top of the box, I used Precious Marieke: Cuddling on the Farm - Chicken Wire Frame. I cut the die twice out of the Ivory card. One is used as it is. The other I cut into four pieces - halfway along each edge. I arranged these so that the corners created the points of the diamond shape that you can see. I also cut it out of the red card, but only needed the inside part that is cut out. There is also a smaller die which is used to cut the little ivory mat.
I drew around the die on red card to create the mat for the frame, and I used a piece of patterned paper to just separate that from the red of the box.
To make the rose, I used Elizabeth Craft Designs: Garden Notes - English Rose. There are two leaf dies that I didn't use, along with the two 3-petal dies, four single petal dies (my picture only show two of them), and a larger petal die that makes the centre.
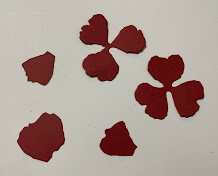

The petals need to be pinched in at the bottom, then curled over at the top.


The three petal dies need an embossing tool running over the petals, and then the tops are curled over. The centre petal is rolled, with the end folded back, and the top curled over.
Stick the 3-petal pieces together - I used two of each, and then put glue in the middle (I used 3D glue gel) to stick the centre part in. I added more glue in around the centre and added all the petals - I used several of each.

I then quilled (I use that term loosely, as I am no quiller) some little leaf shapes to arrange around the rose. I cut thin pieces of the same paper I used on the top of the box - cutting it down the length of the A4 sheet. Using a quilling tool, I rolled them up and put them in the size 3 hole on my board (this was a magazine freebie many years ago). I then flattened one side of the coil, and fixed it with glue.
Thanks for popping by, and I hope I have given you a little inspiration. Feel free to follow me here on my blog, or on FaceBook, Twitter, Instagram or Pinterest. For all the videos, pop over to the Hixxy Studio YouTube channel to subscribe. And FB lives are streamed on both the YouTube channel and the Hixxy Crafts FB page. The main items I use can be found on the Hixxy Crafts website - have a look under the Hixxy Studio tab.
Happy crafting!!
Cxxxx
No comments:
Post a Comment
Thank you so much for visiting my blog and leaving a comment!! I really appreciate it!! Cxx