About Me

My photo
I'm a retired primary school teacher, who started paper crafting in 2008, when I had a fancy to make my own Christmas cards. Since then, I have tried all sorts of techniques and styles - and I kind of like them all. I have been lucky enough to be on blog teams and large design teams and to do a bit of freelance demonstrating - and I love the challenge of working with different products. My crafting style is very varied - from junk journaling and art journaling, bookbinding and journal making, to quilting and patchwork - and of course I still make cards. This variety keeps me interested - and my crafty stash growing!! I'm always seeking inspiration for new projects.
Showing posts with label #mixedmedia. Show all posts

Friday, 16 December 2022

Create Art - Inspire - Art Journal Page

A break from the Christmas makes!! Today's share is an A5 art journal page created on Daler Rowney Mixed Media Paper. Click on the pictures to see the YouTube video of my process.


The pocket and tags are Elizabeth Craft Designs 744: Planner Essentials 26 - Planner Pocket 4 - Tag and Toppers, while the words are from both that set and from their Art Journal 1782 Butterfly Pocket Insert set. 


Full List of Products Used:
Elizabeth Craft Designs 744: Planner Essentials 26 - Planner Pocket 4 - Tag and Toppers;
Elizabeth Craft Designs -  Art Journal 1782 Butterfly Pocket Insert set;
Elizabeth Craft Designs - Planner Essentials - Reinforcements 2
Daler Rowney Mixed Media Paper;
Distress Inks/Oxides/Oxide Sprays - Evergreen Bough, Picked Raspberry, Scattered Straw, Spiced Marmalade;
Distress Spray Stain - Picket Fence;
Cosmic Shimmer Pearlescent Watercolour Ink - Flamingo Pink, Golden Sunrise, Ray of Sunshine, Holly Green;
Julie Hickey Designs Clear Stamps - Garden Blooms, Floral Buttons;
AALL & Create Clear Stamps - #362 Splodge, #351 Alphabet Splatter;
AALL & Create Stencil - #125 Lotza Semicirclz
Elizabeth Craft Designs Art Journal S040 Pattern Stencil Pack
Spectrum Noir Finesse Waterproof Ink - Pebble

Thanks for popping by. If you feel inspired, I would love if you would follow me on any of the social media platforms - I am there under Papercraft By Carole and/or @pcbcarole.

Happy crafting,
Cxxxx


Friday, 2 December 2022

Mixed Media A4 Tag

Was looking through my stash and came across a pack of Stamps Away Stamp and Ink Board Large Tags. I must have had them years, so thought it would be fun to have a play and see what I could do with them. Click on any of the pictures to watch my You Tube video showing my process, and feel free to subscribe while you are there. 


I thought this sentiment fitted well with the wording on the "clock" which is Time Brings Flowers. 


List of supplies used:
Stamps Away Ink and Stamp Board Large Tag
Stamperia Rice Paper DFSAA4446 - Little Bird on Branch
Stamperia Rice Paper DFSAA4447 - Round Clocks
Greyboard - circles cut with Crafter's Companion Debbie Shore Metal dies - Circles
Imagination Crafts Satin Finish Decoupage Glue
Imagination Crafts Transparent Relief Paste
Imagination Crafts Structure Paste
Sara Signature Enchanted Christmas -Forest Vines Stencil
AALL & Create Stencil #38 Cracked Walls 2
Imagination Crafts A4 Stencil - Crackled Feather.
Elizabeth Craft Designs - 1639 Garden Notes English Rose
Daler Rowney Mixed Media Paper
Distress Oxides: Spun Sugar, Crushed Olive, Bundled Sage, Victorian Velvet, Saltwater Taffy
Distress Oxide Sprays: Bundled Sage, Peeled Paint
Distress Spray Stain: Picket Fence
Stampers Anonymous - Tim Holtz Collection - Just Thoughts
Distress Ink: Ground Espresso
Embellishments from stash: cotton lace, paper roses and flowers, clear embellishments

Thanks for popping by and happy crafting,

Cxxx

Wednesday, 23 November 2022

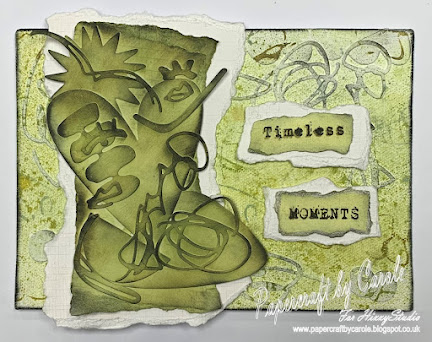
Sizzix Thinlets - Tim Holtz Abstract Faces

Of all the items I was asked to work with, the Sizzix Thinlets Tim Holtz Abstract Faces set was intially one of the most challenging.

It really took a while to think about what to do. Please have a look at my other post using this set - it uses the set in the sort of way I think it was intended.

That said, as I mentioned in the other post, it is a fabulous set for mixed media to add texture. For this canvas I used Distress Oxide Inks in Bundled Sage, Peeled Paint, Forest Moss and Black Soot, and Distress Oxide Sprays in Bundled Sage and Peeled Paint.

Click on the image to see the video demo, and please feel free to follow me here on my blog, or on FaceBookTwitterInstagram or Pinterest.

Happy crafting, 

Cxxxx

Wednesday, 26 January 2022

Seaside Canvas

Last week, I demonstrated this canvas on the FB live for Hixxy Studio. The full video is on the YouTube channel (click on the final picture for the link), but I have a few pictures of the stages to share here. I have recycled an old box canvas for this project - you can just make out the stripes underneath the layer of white gesso.

For the sea, I used white tissue paper and decoupage glue to create some texture like the waves.

For the sand, I used Imagination Crafts Icy White Paste because it has a grainy texture.

I used acrylic paints mixed with Gesso to paint both parts of the canvas.


I used Amy Design Maritime Fishing Net die to cut out the mesh from funky foam. I used white as it is easier to add colour to - with acrylic paint. I tore this up to add to the top of the canvas. To adhere it, I used transparent texture paste.


More paste was used to add the twine. You will see in the finished picture that I tweaked it and pulled it around once the picture was on. 


The photo was mounted onto a piece of card torn from a box. I ripped the edges of the card to expose the corrugated parts. And finally, I added shells.

Feel free to follow me here on my blog, or on FaceBook, Twitter, Instagram or Pinterest. For all the videos, pop over to the Hixxy Studio YouTube channel to subscribe. And FB lives are streamed on both the YouTube channel and the Hixxy Crafts FB page. The main items I use can be found on the Hixxy Crafts website - have a look under the Hixxy Studio tab.

Happy crafting,

Cxxxx

Wednesday, 12 January 2022

Stamperia Cream Paste

Good morning!! This feels very much like groundhog day, where I say something along the lines of how long it has been since I last blogged! Lots of things have happened in the past four months - none of which I shall bore you with. And it's not for lack of projects to blog - I have a whole backlog which I will hopefully share at some point.

One of the big changes for me is that I am now working with online craft shop, Hixxy Crafts, to create a whole host of videos - and Facebook Live shows - showing off different products and techniques. All the videos are on the Hixxy Studio YouTube Channel, so feel free to pop along and take a look. 

Let's start with a few projects using something that was new to me - along with a whole host of things that have been in my stash a while. 

The new product (to me) is Stamperia's Cream Paste, which I demonstrated in a Facebook Live last Friday. 

If you have never used this product before, it is a great addition to your mixed media box of tricks. It's extremely light, and dries to be totally flexible. Stamperia also make a whole raft of texture moulds to use the paste in, but there is so much more you can do, including using it with 3D embossing folders, die cutting it and using it with silicone moulds. There are also many ways to colour it. This video shows everything I played around with.

I then created these three projects. The first is a decorated papier mache heart. I used the Cream Paste with Crafter's Companion Floral Fusion 3D Embossing folder. This was painted with black gesso, and gilded with Pebeo King Gold wax, and Imagination Crafts Sherbet Alchemy wax, before cutting with a simple heart die. I applied gesso and wax to the papier mache heart, before applying the die cut heart.


This time, the paste was used with Stamperia Wings To Fly mould, from which I cut the butterfly, and a strip to decorate around the jar. I also used Imagination Crafts Icy White Paste, and some acrylic paint.
The final one was a bit of an experiment when I was prepping for the live show. This one uses the Oriental Garden mould from Stamperia. The background is a piece of rice paper - I generally use blank rice paper to mop up ink from my mat, so have a collection for creating quick backgrounds. I have used a little bit of Distress Oxide around the edges, but the main part of the image is coloured with alcohol ink - and a pipette!! Watch the video to see exactly how it was created.

Now,  I know this post is quite video heavy - and it won't usually be like that. I will try to share projects one at a time. These three just went together quite well, so was easier to share altogether. 

Thanks for looking, and feel free to subscribe to Hixxy Studio YouTube channel for more videos.

Take care,

Cxxxx

Monday, 18 May 2020

Anything Goes!

Monday morning, and another new challenge over at Use Your Craft Stash on FB! We've gone for and Anything Goes theme this week - so..... Anything Goes. Whatever crafty project you are making with your old stash, join us and enter the challenge- just remember to add your photo to the album and tell us what stash you've used. Here's my inspiration for the week.

At first, I was thinking "We don't have a theme! I don't know what to do!", but then though, what do I really want to play with from my stash? Two things came to mind - rice papers and my melt pot. So
I used them to create the canvas.


The rice paper is an A4 one from Stamperia called Rose Garden with Fence, and I've used a 10x12 canvas.


As the canvas is larger than the paper, I used a palette knife to splodge white gesso and Imagination Crafts Menthol Starlight paint, onto the canvas. Then, rather than using a brush, I used the knife to spread it across the canvas. The paper was then stuck down with IC Satin Decoupage Plus.


The next step was to make some embellishments using the Melt Pot. I found the receipt in with the instruction book, telling me I bought this back in 2013, and I bought all the stuff to go with it - I have loads of large tubs of UTEE and some small ones too. I have the large tub of clear. I have the beeswax with a separate pan, the texture treads, inks designed to colour UTEE and a few moulds. But I am obviously out of practice as I managed to get the stuff on me twice - and that is very painful.

I never throw the unused UTEE out - and consequently I have a collection of things I never used, or ends of batches that I pour into little silicone moulds to set and keep for later. I wanted green leaves for the canvas, so gathered all the green and light coloured pieces from my scraps boxes, chucked them in the pot, and poured it into the moulds. There was a lot left over, so that has been saved for another day.


I didn't have much pink, so used the little bit I had, and mixed it with white, blue raspberry and clear UTEE. The little balls are UTEE Flex. The UTEE can be quite brittle when set, so this helps to stop it shattering if dropped.


Once made, the top can become matt from being in the mould. You can heat with a heat gun which slightly melts it and makes it glossy, but I decided to drag something else out the cupboard - my Cosmic Shimmer Mica Powders - which I dusted over the top. I used Golden Pear and Pearlescent.


And then, as always happens with me and mixed media, I forgot to take any more photos. But the next steps were stencilling the corner details on using Sheena Create a Flower A Leaf of Graph Paper stencil and IC Shabby Chic Relief Paste in Sage and Ashy Rose. I dusted these with Mica Powder too.  A little bit of stamping with an IC art stamp and Distress Oxides in Bundled Sage and Worn Lipstick added a little more to the background (but would have been better if done before the stencilling. And then I attached the embellishments with Finnabair Art Basics Heavy Body Gel, as they are quite heavy in relation to the canvas.


And there you have it. We hope to see all your amazing creations this week. 

Cxxx

I have entered this into: 

Friday, 2 November 2018

Voila!!

Did you manage to catch the launch show of the Parisian themed Imagination Crafts One Day Special? Some great demos and fab samples from the team.


This is another of my samples, using one of the rice papers, Magi-Cutz, the script from Les Ciseaux stencil with Gold Relief Paste and of course Starlights in Banana Yellow, Hot Pink and Rich Gold.  Artsy Stones add a little bit of texture.

Sue will be back at 8pm tonight and again at 9am, 1pm and 5pm tomorrow.
Take care,
Cxxxx

Thursday, 1 November 2018

Simply Scissors

Another day - another sample for Sue's shows on Hochanda starting this Friday at 6pm.


For this canvas, I started by painting the 10x12 canvas with white gesso, and Silver Gold, Amethyst and Dark Orchid Starlights. I added buttons to the corners of the canvas with Transparent Relief Paste, and painted over them with the gesso and Starlights.

I then applied Platinum Relief Paste through the stencil for the scissors, Linen and Lavender Shabby Chic Relief Paste for the flowers, and Dark Orchid Relief Past for the script and jewels. This took a bit of masking off, but the effort was worth it.

A background stencil and Platinum Relief Paste added the texture down the sides.

Will be back tomorrow with another.

Take care,
Cxxxx 

Wednesday, 10 October 2018

Vintage Mirror

Mandy-Jane is back on your screens in under an hour with more of the Imagination Crafts goodies. I spotted my mirror on display in the earlier show, so thought I should share it.

Back in the days of Sheena's Paint Fusion, I bought enough of those black Ikea mirrors to last me a lifetime! I still have a good half dozen in my box. So, I thought I would use one for another of my samples.
I didn't take many photos of this one - so no real step by step to show, but I can explain what I did.

I painted the whole mirror first with White Gesso, then again with Mediterranean Sky Starlight mixed with the gesso.

I then dry brushed some Silver Gold and Dark Orchid Starlights over the top to add a distressed, aged look. The little girl is from one of the A3 Rice Papers on the show, with Champagne Sparkle Medium stenciled over and some Versafine Vintage Sepia stamped around. I also added Magi-Cutz Flourishes and Artsy Stones.
Make sure you tune in at 4pm to see the show.
Cxxx

Journal Cover

Am back with another sample made for Mandy-Jane's shows today at 12pm and 4pm. This time I have taken one of the Journals and altered the back and front covers.
I forgot to take the step by step photos for this - but I can hopefully remember what I did. So, firstly, I remove the front and back cover by gently prying apart the binder. I did take photos of this so I would have a guide as to how to put them back on - but you don't need to see them.
The next step I did was to decide on the rice papers for the covers - these are the insides of both the front and back.
And these were for the front and back - although at the last minute I swapped them over! 

I mixed Bright Maroon Starlight paint with White Gesso, and painted both the inside and outside of both covers. I added the rice papers to each part.

For the inside, I used the Swirls stencils firstly with Black Starlight, and then with Platinum Texture Paste. 


For the outside, I used the Inky Script stencil with the Linen Shabby Chic Relief Paste. 

I finished by adding some Diamond Starlight Wax around the edges before returning the covers to the pages.
Cxxx

Monday, 8 October 2018

Butterfly and Keys

Another make for Mandy's shows on Wednesday on Hochanda.
No step by step pics for this one as I forgot to take them. But this is what I did.

I used Aqua and Sand Starlight paints across the middle of the canvas, making sure it was large enough so as not to be covered by the mask.

I then used the Butterfly and Keys mask over the top with Structure Paste.

In the top left and bottom right corners, I used Transparent Relief Paste through the Baby Bubbles stencil. In the top right and bottom left I added Artsy Stones with some of the Cogs and Flourishes Magi Cutz painted with the Starlights.

The whole canvas was edged with Aqua Starlight.

Back soon,
Cxxxx

Saturday, 6 October 2018

Little Red Beetle

Evening!! Am really proud to share with you my first sample for Imagination Crafts. The lovely Mandy-Jane Taylor will be on your screens on Wednesday 10th October at 12pm and 4pm with lots of gorgeous Imagination Crafts products.

I absolutely love this red beetle from one of the rice papers, and just had to team it up with the Magi-Cutz cogs.
I started with white gesso on the canvas which I had spritzed with water first to help it spread more easily.
After another spritz, I brushed some Misty Green Starlight paint around the edges. 
I then added some Pink Sorbet Starlight around where the car would go.
Next I used the Butterfly and Keys Mask with Red Mixed Media Spray. To avoid it spraying where I didn't want, I used some wax paper. Not sure I'd do that again as it left a very hard edge.
To make sure that the ink didn't move when I added other things, I spread a thin layer of Translucent Relief Paste over the top. When this was dry, I added the rice paper.
Using Smoky Gray Versafine, I added some texture to the edges of the canvas and the rice paper.
Sage Green Shabby Chic Relief Paste was added through the Baby Bubble Stencil.
The Magi-Cutz Cogs were painted with the Starlights and attached with Transparent Relief Paste. A few Artsy Stones were added and the little circles are punched from card painted with Misty Green Starlight, and sprayed with Red Mixed Media Spray.

Will have a few more samples to share over the next few days.

Cxxx

Wednesday, 19 September 2018

Wooden Heart

Here's something that's really quick to make - and looks so effective. I picked up the wooden heart for a couple of pounds in The Range, and the letter tag in Hobbycraft for a quid.
I used Rice Paper 418 as it provided a nice background with no focal image.
I turned the paper over, drew around the heart and then used water to outline it, so I could tear the heart shape out. This was then stuck onto the heart. 
I covered the wooden letter tag with Rich Gold Starlight, using a stencil brush.
I applied Chocolate Shabby Chic Texture Paste through the Inky Script stencil.
And also added it to a paper rose.
Flat backed pearls were added to the tag.... 

... and the heart.
And finally the tag and the flower were attached to the heart. As I said, not overly complicated - but very effective. 

Cxxxx