About Me

My photo
I'm a retired primary school teacher, who started paper crafting in 2008, when I had a fancy to make my own Christmas cards. Since then, I have tried all sorts of techniques and styles - and I kind of like them all. I have been lucky enough to be on blog teams and large design teams and to do a bit of freelance demonstrating - and I love the challenge of working with different products. My crafting style is very varied - from junk journaling and art journaling, bookbinding and journal making, to quilting and patchwork - and of course I still make cards. This variety keeps me interested - and my crafty stash growing!! I'm always seeking inspiration for new projects.

Wednesday, 8 January 2014

Layer Happy!! Embossing Mad!!

My brother-in-law likes cycling. So this year, I though I would use that theme for his birthday card. I had a cycling topper from a Kanban kit - and being green and white(ish) it also fitted well with his love of Yeovil football club.  
I made the base card from a piece from my stash, and embossed it with one side of the Dainty Dots Grand Embossabilities. The layers are made from another piece of the green card, silver/grey Bazzill, white Bazzill and the beige is DCWV (I think).   

As you can see, I have used a lot of layers (8 in total). I don't know why. I just got a bit carried away. I also embossed the green layers - one, with the other side of the Dainty Dots folder, and two others with either side of the the Garden Lattice Embossabilities. Mad, I know - but I just wanted different textures.

The letters are cut using XCut Abracadabra alphabet die. I don't often use this die, as it is difficult to get through the machine - but I though it best reflected the words that are on the topper. I finished off with a few buttons from the new Do Crafts Sew Lovely range.

One of my new year's resolutions is to increase the number of followers on my blog. If you've chanced upon me - for whatever reason - please consider following me. I would be very grateful.

I would like to enter this into the following:
Creative Craft Challenges2 - Anything Goes
Through the Craftroom Door - Anything Goes
The Crazy Challenge - Cards for Men

See you soon.
Cxxx

Monday, 6 January 2014

CCM+ 107 - Bear With Me

Welcome to the first Crafty Cardmakers blog of 2014. It's all change this year for us. Lin has shaken things up a bit - and rejigged everything. Firstly, the blog has a fresh new look for our new start!  Secondly, the name has changed - we are now Crafty Cardmakers and More (you'll see why in a mo). And there are now three teams - two teams will work on the usual challenges in the same format as before - so cards, scrapbooking, etc etc. And a third will be responsible for a monthly mixed media challenge - no cards on this one. I am on one of the card teams - and the mixed media team. We are all looking forward to moving forward with the challenge blog this year.

We also welcome some new sponsors this year. This fortnight we have Flourish with a Bling. They are an Australia company and have loads of great blingy things on their website - and are offering a fantastic $15 gift voucher!

So - what are we asking of you on this first challenge? To 'Bear With Me'! Feebsy is hosting this time round and would like to see your creations which have a teddy bear or more realistic image of a bear as the focal point. Any type of bear will do - polar bear, grizzly bear, teddy bear etc.

I was a little stumped at first - until I remembered this gorgeous (and large) Hunkydory topper that I had in my stash. It is from an old Autumn collection (possibly 2011) - and as one of my resolutions is to use what I have this year, and try not to buy too much - then this really fitted the bill. I know that some crafters call this type of card 'pick and stick'. I don't like that term, as usually what comes with it is the implication that there is no crafting involved in using a printed topper like this. Some say 'they are great if you don't have much time' - and yes, they can certainly be a saviour for last minute cards. But they are also so much more. I suppose it's what you choose to do with them that counts - and I, for one, love using them!
As the topper was huge, I opted for an 8x8 card. I love the orange and yellow colour combination and decided to echo that through the card. The yellow card with leaves on, is the base card that came with the topper. The orange and greeny/yellow are from my extensive stash (one is from the local market - the other I think is Bazzill). Having played around with the layout, I settled on this vertical split. The decorative edge is cut with one of the inserts from Spellbinders Classic Petal Edgeabilities. The floral flourishes are also Spellbinders. I embossed the orange card with Grand MBossabilities Dainty Dots. The whole things was finished with ribbon from my stash - and gems from an Anita's Gemstone Wheel. 

In keeping with my New Year's resolution, I didn't buy anything new to use on this card. Luckily Santa was very good with his presents this year - a shed-load of Promarkers and a fair few new embossing folders. So I do have plenty of new things to play with!! 

Pop on over to Crafty Cardmakers and More to see what the rest of the Fairies (oh yes - that's what our new team is called - I am also an Elf when we do mixed media - and there are a few Pixies around too!!) have created!!

One of my new year's resolutions is to increase the number of followers on my blog. If you've chanced upon me - for whatever reason - please consider following me. I would be very grateful.

I would like to enter this into:
Suzy Bee's Bloomin' Challenge - Anything Goes

Card Makin Mamas - Anything Goes


See you soon.
Cxxx

Saturday, 4 January 2014

Happy New Year - Resolutions!!

Happy New Year one and all! Hope you have had a positive start to the New Year - and that this will continue throughout! My New Year started with a 5K Park Run - in the rain! Was very wet and muddy!! 
I am not a great runner - have always pootled around Race for Life each year - it's never been a passion of mine. However, since I have lost a bit of weight, I have found running (or shuffling faster than a walking pace!) is a great way to keep the weight off. I am not very fast - but at Park Run it's the participation that counts. Check it out - there's sure to be a Park Run local to you!!

On to things crafty, I have made a few resolutions this year. 
1 - I want to try to blog at least once a week. 
2- I am going to try NOT to buy new things unless they are for a commission or a special present that I am making. 
3- And I want to boost my number of blog followers up to the 100 mark. 

The first one is just a matter of me getting on and doing it! The second - sounds great in theory (considering the amount of stash I have) - but we'll see how it goes in practice. I could fall at the first hurdle, as am going to a workshop with Hels Sheridan next Saturday and just know there will be stuff I want!! The third one is more tricky. I am going to have to put some thought into it. I just feel that things have stagnated on my blog - hopefully posting more will be a start. Any suggestions are more than welcome!!  

So, with the first of my resolutions in mind, I have been trawling through all my photos, and have come up with quite a few that I never got round to sharing last year, so am going to start with one of those today.

This one is a Thank You card. I stamped the sentiment onto plain brown card with Perfect Medium, using Do Crafts Papermania Typography THANK YOU stamp. This was then embossed with gold embossing powder. I cut the image out with a Spellbinders Romantic Rectangle Die. I matted this onto a piece of pearl gold card - rounding the corners with my XCut corner punch. I love this card! I get it from my local market - it's a very muted gold - not brassy!! 
The decorative brown circle was cut using Spellbinders Splendid Circle die, mounted onto a gold circle. More matting and layering, a piece of ribbon from my stash, and three flowers (Spellbinders Bitty Blossoms) finished it off.
So, my first post for 2014 is complete!! Hopefully the first of many!!

I would like to enter this into:
Crafty Catz - 'Thank You' challenge.

Moving Along With The Times - Thank You
Cxxx

Monday, 9 December 2013

CCM #106 - Winter Fun (NOT Christmas or New Year)

Hello - this will be quite a quick post today as I am busy, busy, busy!! This will be our last challenge until after Christmas and Marie would like to see a Winter Fun themed card. Please DO NOT submit Christmas or New Year cards. 


Our sponsors are The Paper Shelter with a $20 gift certificate. And Sir Stampalot - pop over to CCM blog to see the gorgeous Magnolia stamp on offer from them! 


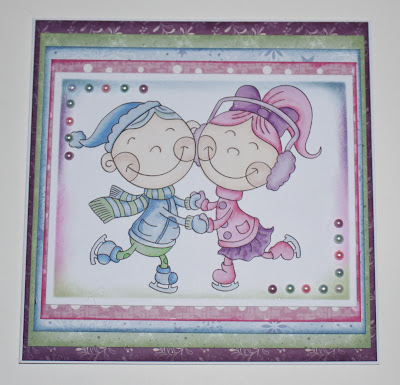
I have used a digi stamp from our sponsors - The Paper Shelter - called 'Ice Skating Friends'. I loved the palette of their coloured version - so tried to replicate this with my Promarkers.  

The boy: China Blue, Cobalt Blue, Frozen Lake; Grass, Apple, Fresh Meadow.
The girl: Plum, Amethyst, Lavender; Pink Lobster, Rose Pink, Pink Carnation.
Skin: Dusky Pink, Almond, Ivory. 

After cutting out the image with a Spellbinders rectangle die, I inked the edges with the same four main colours using DI's (Dusty Concord, Bundled Sage, Faded Jeans and Picked Raspberry). I then used Kanban card to matt and layer, and again, echo the four colours - each of these were edged with the corresponding DI. I finished off with matching pearls in the four corners.

Pop over to Crafty Cardmakers to see what the rest of the DT have been up to.
Cxx

Monday, 11 November 2013

CCM #104 - Paper Piecing

This week's challenge is from Viv, who want us to use Paper Piecing on our projects. We are sponsored this time by Saturated Canary who are offering 2 of their fabulous digi stamps. And also be Woodware. Pop over to the CCM blog to see a picture of their prize.

For my project, I chose to use 'Ruffles the Clown' from Saturated Canary.

I began by choosing the papers - all from my scraps box. I have had the Brenda Pinnick papers for years - part of a huge scrapboooking kit I bought. And I used a couple of old Papermania papers too.

Next, I printed the image onto Joanna Sheen Elegance card, and also onto each of the papers. 
It was then a case of choosing which papers to use where. I'm not the world's best fussy cutter - but most of it wasn't too fiddly. Before sticking the paper pieces onto the card, I coloured the skin with Ivory, Almond and Blush Promarkers - with Pastel Pink for the lips. The hair was a combination of Tawny Owl, Cocoa, Henna and Walnut. I put the pieces through my Xyron sticker maker and fixed them to the image.

I decided to keep the rest of the card very simple - and just used more of the papers to matt and layer the image onto a Craftwork Cards scalloped white base.

Pop on over to the Crafty Cardmakers Blog to check out all the other DT inspiration. We look forward to seeing your creations.

Cxxx

Monday, 28 October 2013

CCM #103 - Monochromatic Purple


Our theme this fortnight is Purple. Fiona would like to see projects that are all (or nearly all) purple - skin and hair colours are also allowed.  Our sponsors are Di's Digistamps who are offering a $10 gift voucher, and Hobby Art who are offering some gorgeous stamps. Pop over to the Crafty Cardmakers blog to check them out!

For this challenge I have made a card that was commissioned by a friend for her partner's Mum. I was asked for something floral and purple - so it seemed a perfect card for this challenge.

My base card is an 8" square white card. You can't see it as I totally covered it. The dark purple shimmery card is from a local market - it's really beautiful. I embossed this with Crafter's Companion Embossalicious 8x8 Chantilly Corner folder. I then used it to cover the base card completely.   

The scalloped square is cut from the C&C pastel textured effect card pad, which I then embossed with the Embossalicious 6x6 Swirl Corner folder. From the dark purple, I cut a mat using the largest of the Spellbinders Lace Doily Motif dies. The smaller, lighter mat is also from that set of dies.

I cut the letters for 'MUM' using my XCut Rome Alphabet die, while the numbers came from a very old Brenda Pinnick scrapbooking kit I bought from QVC eons ago. They were both coloured with my Lilac Promarker. 
The large, fabric flowers are something else that has been in my stash for a long time. They might have come from WHSmith, but I wouldn't swear to it. The smaller roses were a bargain from The Range. To finish it off I have used 3 Creative Expressions pearl hat pins, and the tiny pearls are Kanban.

Hopefully they will be happy with the card - I think it turned out quite well.

See you soon!
Cxxx

Monday, 14 October 2013

CCM #102 - Shabby Chic!


Time for another challenge from Crafty Cardmakers. This time, Betty has chosen 'Shabby Chic' for her theme. She would like to see any project - scrapbook page, altered art, card - that is 'shabby chic'! Ours sponsors this time are Milk Coffee who are offering a prize of 5 digis from their store. And also Sir Stampalot.

I have chosen an image from Milk Coffee to use this week. I'm still getting used to my Promarkers, so have taken to doing little colour swatches before I start colouring in an image - just so I can check that they work together.
Hopefully you can read my writing and see which colours I ended up using. I cut her out using Spellbinders Marvellous squares. I have to say, this has not been one of my most favourite purchases because I felt you lost the detail on the outside of the largest die as it cut inside it. So, this time, after cutting the image out, and inking with Victorian Velvet DI, I then drew around the edge of the die, cut the decorative edging out, and re-attached it to the image.
I decided to create my own background. I started with a piece of thick card (it came as part of some packaging), and painted it with Eco Green Mulch paint. I covered this over with Orchid - using a very dry brush, which allowed the brown to still show through at the edges.
Using a spatula, I scraped white paint over the top of this making sure the pink showed through.
I then took a craft knife to the edges to distress them a bit, and remove a bit of the white around the edges.
I wrapped wide lace around the side, then added pink satin ribbon, and a thin decorative white one over the top. This was stuck onto a Craftwork Cards base card.  
The finishing touches include a large bow using the same lace, two Creative Expressions hat pins, a pearl and crystal embellishment from my local craft shop, and some pearls from my stash.

Make sure you pop on over to the Crafty Cardmakers blog to check out what they have been up to! Then get busy and post your creations!

I would like to enter this into:
A Creative Romance - Pink
CMC Copic Challenge Group - Anything Goes
Inkspirational - Anything Goes

Cxxx