About Me

My photo
I'm a retired primary school teacher, who started paper crafting in 2008, when I had a fancy to make my own Christmas cards. Since then, I have tried all sorts of techniques and styles - and I kind of like them all. I have been lucky enough to be on blog teams and large design teams and to do a bit of freelance demonstrating - and I love the challenge of working with different products. My crafting style is very varied - from junk journaling and art journaling, bookbinding and journal making, to quilting and patchwork - and of course I still make cards. This variety keeps me interested - and my crafty stash growing!! I'm always seeking inspiration for new projects.

Sunday, 29 July 2018

Bright and Beautiful - and a little quirky!!

Morning! Hope you are all well. The rain has finally arrived here - very welcome for the garden - and for just freshening up the air!!

The lovely Sue Baker is on Hochanda at 6pm with a fabulous new launch of some gorgeous texture pastes. Haven't got my hands on them yet, but thought I'd share another of the makes I did for my DT application. This was is VERY bright and a little quirky - and very different from my altered vase - but I kind of like it!!


What I used:
Starlight Paints - Hot Pink, Mediterranean Sky
Mixed Media Ink Sprays - Fuchsia, Light Blue, White, Sunshine
Stencil - 25cm x 10cm - Baby BubblesSmall canvas
Magi-blend solution
Gesso
Buttons
Prima Art Basics - Heavy Body Gel
Bottle tops and other embellishments from my stash
Pebeo Deco Matt - Naples Yellow, Lemon
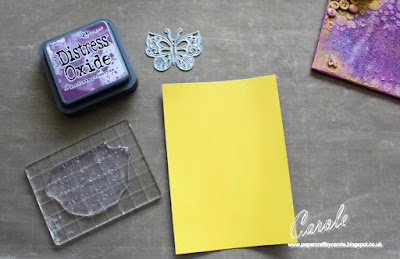
Distress Oxide - Seedless Preserves
Visible Image sentiment stamp

I started by mixing the Starlights with white gesso for the background.
After applying the paint, I spritzed with water for a smoother finish.
For the next part I used an old cardboard box so that the spray didn't go everywhere. 
I then sprayed the canvas with Mixed Media Inks - Fuchsia, Light Blue and White. 
And stood the canvas up in the box so it dripped down. 
I dry brushed a bit more of the gesso mix over the top to lighten it up. 

 Then sprayed again with the White spray, before blotting with kitchen towel.
Structure paste was applied through the stencil, and I didn't need to colour this - it seemed to absorb the colours from the canvas - probably because I was too impatient to wait for it to dry properly.


Next step was to add the embellishments - I used heavy body gel to make sure they wouldn't move. I filled a couple with the gel too, so that other embellishments would sit on top rather than sinking in.  

I went over these with white gesso.
And as I didn't have a yellow Starlight paint, I mixed the Sunshine spray with gesso. 
Using Magi-Blend and the Fuchsia and Mediterranean Blue Starlights , I mixed a purple spray which I spritzed over the whole canvas.
At this point, I wasn't happy with the yellow - so had to dig into my stash and use Pebeo Deco Matt paints to liven up the canvas. 

I painted the same paint onto a piece of white card, and used this to create the butterfly, and to stamp the sentiment. 


The finished canvas is very in your face - but I think it fits the sentiment!!

Don't forget to tune in to see Sue on Hochanda at 6pm and 8am today - and also for 9am, 1pm and 5pm tomorrow. 

Take care,
Cxxxx

Wednesday, 25 July 2018

A little announcement!

Well, the time has come to announce that I have been chosen to join the new Imagination Crafts Design Team.

Am super excited to join the team, and can't wait to get playing! In the meantime, this is one of the pieces that I made for my application to the team.
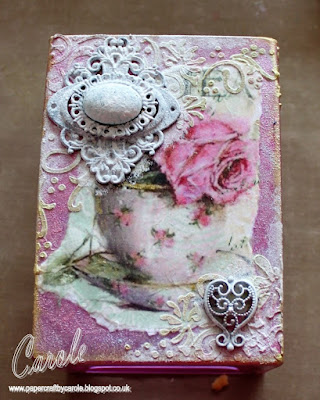
It's an altered vase and will eventually be for a friend, but she's not on social media, so I should get away with sharing it now.

I used:
Starlight Paints - Fuchsia, Mint, Clotted Cream
Rice Paper 339
15cm x 15cm Stencil - Honeysuckle
Structure Paste
Starlight Wax - White Gold
Fabric Decoupage Glue
Mixed Media Spray - Light Blue, Sunshine, Dark Brown
White Gesso
Embellishments and flowers from my stash

I dabbing Fuchsia paint on the vase - two coats, baked in the oven in between. 
 I then added a layer which was a combination of Fuchsia, Mint and Clotted Cream.
On the front of the vase, I glued the teacup rice paper image which had been stuck onto white card first. Other parts of the paper were added to the other sides, but not with white card as I wanted them to be more in the background.
I then used structure paste through the stencil, on all four sides of the vase.   


A mixture of the three media sprays with white Gesso was applied over the stencilled parts.


I then rubbed a little White Gold Starlight wax over the top. 
After a last bake, I added the large embellishments, then gessoed over them, before adding more colour. Heart embellishments were added to the sides in the same way.

I finally added the flowers to the front with a edging of wax. 
I decided on more flowers at the end, to cover a little more of the large embellishment at the top.

Am really looking forward to sharing more Imagination Crafts makes in the future.
Take care,
Cxxx

Monday, 23 July 2018

A Little Blue

More playing with Imagination Crafts products - and an outing for my Gel Press - to create this blue card. 

The list of the things I've used is:

Sheena White Stamping Card
Core'dinations Card - Blue
6x6 Gel Press
7x7 Mega Mount (Clarity Stamp)
Imagination Crafts:
Starlight Paints - Heather, Mint, Clotted Cream, Mediterranean Sky
Starlight Wax - Dark Orchid
Stencil - 6x6 - Grungy Ledger
Rice Paper 198
Art Stamps - Distress Set 1
Magi Bond Decoupage Glue

I started by painting Heather, Mint and Clotted Cream Starlight paints onto Sheena White Stamping Card.
I spritzed over with water and smoothed the paint out.  
This was then run through my Gemini with the Grungy Ledger stencil, 
 And Dark Orchid Starlight Wax applied over the top with a bit of cut and dry.

The next step was to apply the paint to the gel plate. This time I used Mediterranean Sky instead of the Mint. 
I got a bit carried away with the paint and put too much down, so had to work in off onto some paper. 
Once I had it at a reasonable level, I then used the script stamp to remove the paint from the plate. 
I then pressed this onto another piece of Stamping Card, and used it to cut a frame (as ever I managed to miss out a few steps!!
 I edged the stencilled piece with more Dark Orchid wax, and mounted it onto the card (made from more stamping card.
I cut more frames out of stamping card and blue Core'dinations card, and mounted them over the stencilled piece.
 The image is a cut from the Rice Paper, and attached to the card using Magi Bond decoupage glue. It was then mounted on blue and white card. The whole things was finished with a bow.
Back with more later.
Cxxx