About Me

My photo
I'm a retired primary school teacher, who started paper crafting in 2008, when I had a fancy to make my own Christmas cards. Since then, I have tried all sorts of techniques and styles - and I kind of like them all. I have been lucky enough to be on blog teams and large design teams and to do a bit of freelance demonstrating - and I love the challenge of working with different products. My crafting style is very varied - from junk journaling and art journaling, bookbinding and journal making, to quilting and patchwork - and of course I still make cards. This variety keeps me interested - and my crafty stash growing!! I'm always seeking inspiration for new projects.

Thursday, 26 January 2012

Silvery Hearts - Another Twist!!

Have had a very productive day today. I made headway with some boring paperwork (I'm making myself work on it for one hour a day - any more and I would lose the will to live). I rifled through my stash and made a couple of quick cards. In keeping with my health kick, I walked to the post office (I usually jump in the car!), did a couple of hours in the garden before the rain came, then leapt around my living room trying desperately to keep in time with the zumba wii thingy!! And what am I doing now? Eating Thornton's Continental chocolates!! I'm my own worst enemy!!  

Anyway, for those of you who've seen my previous post, you'll know that silver hearts were the very much in evidence in my card for the "Use Beads" Challenge. Well, around the same time, I was asked to make a silver wedding anniversary card - and also asked to use hearts!! 

The main image of this 6" square card had been created using Dreamweaver Metallic Silver Embossing Paste and the Heart Flourish Stencil. The hearts are all cut using X-Cut Heart Nesting Dies, and the square mats are nesties!! I embossed the larger white square with the medium dotty 'That Special Touch' mask, and the smaller square and larger white heart with the small dotty mask. The white card is just from my stash, whilst the silver pearl is from a large sheet bought at the Range.


The 25 was cut using an old set of lower case X-Cut Dies which also have numbers with them.The finishing touches comprised white organza ribbon and a little spray of clear beads and pearls purchased from my local craft shop.

To make the matching box, I used the same silver pearl card, and echoed the design from the card. 


I would like to enter this into the following challenges:

DRS Designs - Hearts
Cupcake Craft Challenges - All You Need Is Love
There She Goes - Love is in the Air

Cxxx

Monday, 23 January 2012

Crafty Cardmakers #60 - Use Beads

This week's challenge is hosted by Jack, and all she's asking you to do is "Use Beads"!! You can make your whole project from beads - or use them as embellishments on something you make!! Just make sure that the beads are there for everyone to see!!

The sponsors for this week are The Stamp Man who are offering a £10 voucher which can be spent online, instore or at any of the shows they are attending.


And Di's Digi Downloads who have a $10 voucher up for grabs!!


I really loved the idea of this challenge when I first saw it, and for some reason, the first thing that came to mind was to use the fibres that have been sitting in my stash for ever as a background for the beads. So that was where I started - with a handful of Opal Haze Crystillina and Silver Iris Angelina Fibres. I sandwiched them between some greaseproof paper and my iron had one of it's few outings out of the cupboard!! (I hate ironing with a passion!!)

I then used the largest of my XCut nesting heart dies to cut the shapes. To be honest it took several runs through my Cuttlebug for a good enough impression - and even then needed a little help with my trusty little scissors!! My intention had been to sew the beads on but it soon became clear that the fused fibres would not stand up to a needle going through it multiple times, and also that my patience wouldn't stand it either.

So I ended up sticking the fibre hearts to card for reinforcement, and used clear drying glue to attach the beads.


Now you may be wondering why I've gone for the arty style photography. Well - two reasons. Firstly I'm playing with a "new" camera (as in new to me, but previously owned by my other half) and decided to see what I could do with it. But also found that the straight on shots of the card did not do it justice.

The card is 8" square and it's really hard to see, but is covered with a sheet of white angel hair paper (think it was Papermania but can't be 100% sure). The larger of the two mats consists of silver pearl paper and white card embossed with That Special Touch Small Polka Dots mask. The edges have been die cut with an insert from the Spellbinders Classic Bracket Edgeabilities Set, the waste from which was used in the four corners of the card.

The smaller, vertical mat is silver pearl and white card embossed with That Special Touch Doodle Daisies mask. The edge of this one was die cut with one of the inserts from the Spellbinders Classic Postage Stamp Edgeabilities Set - and the waste used inside the hearts on the larger mat. And of course I had to use a little bit of white organza ribbon.


And so to the beads!!! They are part of a big cheap pack that I bought ages ago when I first started crafting - and have sat in my stash ever since. The white ones are like pearls and the clear ones have silver shot through the middle. I used them to edge the hearts, and for additional embellishment along both the die cut edges and the top and bottom of the card. Overall, I was pleased with the effect.

Go over to the Crafty Cardmakers Blog to be inspired by the work of the rest of the Design Team!! And then dig out those beads and get crafting - not forgetting to share your work with us over on the blog!! Happy Beading!!

I would also like to enter this card in the following challenges:
Pan Pastel UK  - Use 2 of Something - in this case the hearts
Stampalot Challenge - Monochromatic - silver (and white)
Corrosive Challenges - I {Heart} You
The Hybrid Chick Card Caravan - Punches/Dies  (the hearts and the decorative edges)
and also
Penny Black & More January Challenge - Love & Hearts 
Cxxx

Friday, 20 January 2012

A little bit of Fusion!!

Well, am just about keeping to the one blog a week resolution!! The rest of the resolutions are still going - just about - but it's becoming more difficult!! There's so much lovely crafting stuff out there just begging me to buy it. But so far have resisted.

I've been working on the website a bit this week - trying to upload new things. The site has been going for over a year now - and it really hasn't taken off. Partly due to being very busy last year with other things - and also a lack of knowledge as to what to do to make it more successful. For now, I will get it sorted and up and running again, and then think about where to go with it. It's funny really, as this blog started as my way of recording the development of the website - and now it's really become very secondary. Maybe that's part of the problem - I've not concentrated on it enough. Anyway, enough of the philosophising (is that even a word??)!!


It's been a while since I've posted anything Paint Fusion - and as some of you will know, I do rather like this style. This candle was for a commision. It's in the style of Sheena Douglass' Paint Fusion - and uses her stamps for the leaves. But the roses are not part of the range. You may remember that back in July another friend asked for a set of coasters with particular flowers - one of which was the rose (check it out here). I struggled with it at the time, but when I revisited it this time, I found it easier (partly because of the notes I made before).

The problem this time was the request for white roses!! In order to achieve some sort of definition on a white candle, I used hints of green within the rose. It took several applications in order to obtain the whiteness against the candle - but it was worth it!!

To go with the candle, I made a set of coasters.


For both the coasters and candle I used Eco-Green Paints - Zucchini and Lime for the leaves, and White for the roses with hints of Lime. The coasters are finished with Bundled Sage Distress Ink, and a swoosh of Iridescent Spray and Sparkle.

Well, better get back to sorting the website - although I will be doing some crafty stuff as well - life would be just too boring otherwise.

Cxxx

Sunday, 15 January 2012

Baby Shower!!!

It's a bit frosty out there this morning, so while I wait for it to warm up before going for a VERY short jog - (yes I am still managing to keep up with that part of my resolutions) and then getting into the garden to sort a few things out, I thought I'd share a recent make!!

A while ago I made a Baby Shower book for a friend who was having twins. I was recently asked to make another one - this time for a baby boy. Wanting something blueish, I had a rummage through my stash and couldn't find quite what what I was after in terms of papers, so had a look at what I had on CD. Nothing inspired me there either, but then I had a look at some freebie papers I downloaded eons ago - really sorry, I can't remember where from, and can't work it out from the file names - I must remember in future to add something to the file name so I know!!


And that's where I found the great striped and circle papers, from which I came up with the blue and orange colour scheme! The blue and orange cardstock pieces are both Bazzil, and the little icons are from a border strip found in a cheapie baby boy scrapbooking kit from the Range. They were cut out with one of the smallest squares from my nesties, and matted onto little scalloped squares of the blue.

The letter are cut from the orange cardstock using X-Cut Rome Die-Licious Alphabet Dies. I have all three of the different Die-Licious Alphabet DIes and find them absolutely invaluable!! And to ensure they adhere well, I always use my little Xyron X150 Create-a-sticker with permanent adhesive!!

The book itself is made from two pieces of A5 chipboard, painted with Eco Green Acrylic Paint - this one is called Lake. The paper is cut slightly smaller, and I have used a 120gsm weight so that it will be able to take the weight of any photos.

To punch the holes I used my Zutter Bind It All, and a 3/4" silver binding wire holds it together. I chose this to be slightly oversize, to allow room for the photos etc to be put in and for the cover still to sit properly. I keep a set of templates of all the sizes of notebooks I make, with a guide for cutting the paper the right size for the cover, and also the settings for punching the holes. It makes life so much easier when I come to make anything new!!  It's all finished off with Spray and Shine to give it a protective coating.

I would like to enter this into the following challenges:
Crafty Calender Challenge - January's Challenge - New News!

Craft Your Days Away - Challenge #36 - New Beginnings!

Little Claire's - Challenge #17 - Anything But A Card!

Secret Crafter - Saturday Challenge - Anything Goes With Blue

Delicious Doodles - Challenge #10 - All things New

Well, that's all for now - off for that run now!! Well, at least the sun's shining!!

See you soon,

Cxxx


Monday, 9 January 2012

Crafty Cardmakers Challenge #59 - No Floral Embellishments

Our first challenge of the New Year is hosted by Fiona!! For this challenge you can use floral backing papers, an image with flowers as part of it or even a flower as the main image, but NO floral embellishments. That means no flowers or anything flower shaped (buttons, gems etc).

We are sponsored this week by One Stop Card Crafts who are offering a £10 voucher.


And by Digi Doodle Shop, who have a $10 gift certificate for their store 


For my card I have used one of the Digi Doodle Shop's digi stamps - the Lady Bug!! This image just jumped out and me - and although I continue to protest that I don't really do cute, the cheekiness of this image really appealed to me!!


I printed the image onto watercolour paper, and left it overnight before painting. For the most part, I used my old faithful Windsor and Newton watercolour tin, but I did decide to use Cosmic Shimmer Skin watercolour paint for the face and legs of the lady bug!! It doesn't really come across in the photo, but it adds a lovely shimmer!! I loved the fact that it turned out to be mostly red and green, so echoed that by simply matting and layering (all of course cut with nesties!!). The large green scalloped square is Bazzil, while the red is a slightly shiny hammered effect that I got from a little craft place locally.

To liven it all up, I used glaze on the lady bug, and rubbed glitter glue over the toadstools. And as flowers were out as embellishments, I went for some red rhinestones


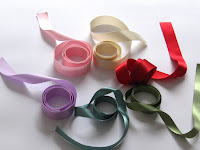
The green ribbon is from a lovely little shop called Pinks Embroidery. I won a voucher in a raffle, and as I'm not into embroidery, I decided to splurge the lot on ribbon. The lady in there was lovely - and ended up giving me a gorgeous offcut as an extra because she said she was impressed with my enthusiasm for all things ribbon. My nieces came in handy to hold the reels as I made my choices - and the littlest one was in heaven as she loves the feel of silky things. The lady even encouraged her to feel the textures on the ones with patterns. There isn't an on-line shop, but the products are listed on the website and she will provide things by mail order.

For those of you that aren't of the ribbon persuasion, you may not understand my love of it - but if you do, you will appreciate the following sharing of my haul:


Anyway, enough of my ramblings. Pop on over the the Crafty Cardmakers blog to see the wonderful inspiration from other members of the Design Team - then get crafting and share your creations with us!!

See you soon!!

Cxx

Saturday, 7 January 2012

New Year's Resolutions!!

I am notoriously bad with New Year's Resolutions!! Every year I intend to lose weight and get fit. Mmmmm - just the fact that I said "every year" should give you the idea that I never do. I said it last year, then at the end of January I was handed a letter at work warning me that I could be made redundant. That threw just about everything out of whack!! One year on, and I am learning to enjoy my extended leisure time!! I am doing supply teaching which is keeping some money coming in, but I do have a lot of time on my hands. My previous job was very active, so the resolution of losing weight and getting fit is even more required this year!!

So another resolution this year is to try harder to turn my crafting obsession into something that I could potentially make money from. I have been selling my cards to friends, family and at the odd school fete and the like for several years. I even have a website!! But I've not really made much of a go of it!! I do not expect to become rich, but if my hobby could become totally self funding then that would be a bonus.

Some of the money I made from Christmas sales I have used to buy some essential supplies (lots of sticky tape, glue etc), but I have also decided to try not to buy anything that isn't essential for commisions or specific cards that I have in mind. I have soooooo much stuff from kits that I have purchased in the past that I should be able to make a ridiculously large number of cards without buying anything else.

I also have a bit of blog follower envy!! When I look at the blogs of other people - especially the rest of the design team - they all have 100+ followers!! I have 28 (very much appreciated and loved) followers!! I resolve to attempt to increase by blog followers to 100 by the end of the year!! If it happens, I will have to think of something suitable to do!! But we'll cross that bridge!!!

And don't even get me started on Twitter - my OH has 240 (!!!) followers to my 45. What's really funny is that on my stepdaughters Twitter profile it says "My Dad knows more about Twitter than I do". So a target of 100 is on the cards here!! To be honest, I could have a lot more followers if I hadn't blocked all the spammers and weirdos that have followed me!!

Ooooo and all you crafty ladies, if you haven't already discovered HandmadeRyan - check him out!! He's also on Twitter!!!  

Anyway, to something more crafty - my sister has a passion for purple. So, when it came to making a birthday card for her birthday last month, I reached again for my Hunkydory Amethyst Butterfly Jewels. As the topper was square, I started with a 6" square card blank. I used a piece of the lovely co-ordinating card, mounted onto silver mirror card with a strip of white organza ribbon.

The topper and sentiment were mounted onto foam tape, before attaching to the card. I then used several clear gems on the butterfly, before glazing the gem border.


Oh, and one final resolution - I am going to try to blog at least once a week this year - and earn those followers the hard way!!!

Cxx

PS - Please don't hold it against me if I don't hold to any/all of these resolutions. Consider them a statement of intent, not a contractual agreement!!!

Thursday, 5 January 2012

New Year - New DT Members!!

Happy New Year!! Hope everyone had a good Christmas and New Year. Sorry I've been fairly bad on the blogging front recently. Put it down to a combination of illness and trying to keep up with my crafting and work commitments. Maybe my crafting New Year resolution should be to blog at least once a week. Well - we'll see how I go!!

Am looking forward to trying something different craftwise this year - I have treated myself to a sewing machine in the sales, so am going to see what I can do with it. Could be a complete disaster, but I'll keep you up to date!!

Anyway, after the recent Crafty Cardmakers Design Team Call,  we now have some new members on the team!! 

AJ

Welcome to them all - and I'm looking forward to working with each and every one. Pop over to their blogs to see what they have been up to recently!! I promise I will get them all linked onto my blog roll on the sidebar soon!!

We are also saying goodbye to Jenni, who is off to work on building her digi stamp business!! Wishing you all the best Jenni!

Crafty Cardmakers will be back on Monday 9th January with our first challenge of the year!! Look forward to seeing all your entries. And don't forget there's still a little time to enter the "Use it three times" challenge.

See you soon.

Cxx