About Me

My photo
I'm a retired primary school teacher, who started paper crafting in 2008, when I had a fancy to make my own Christmas cards. Since then, I have tried all sorts of techniques and styles - and I kind of like them all. I have been lucky enough to be on blog teams and large design teams and to do a bit of freelance demonstrating - and I love the challenge of working with different products. My crafting style is very varied - from junk journaling and art journaling, bookbinding and journal making, to quilting and patchwork - and of course I still make cards. This variety keeps me interested - and my crafty stash growing!! I'm always seeking inspiration for new projects.

Monday, 27 July 2015

CCM&M - #144 - Anything but a card!

Morning - it's been a while since I've blogged!! A combination of being busy - and when I wasn't busy I had no energy!! So have done little crafting - and less blogging!! 

Anyway, today is the launch of a new Challenge over at Crafty Cardmakers and More. And I am hosting this fortnight. The theme is - Anything But a Card - so tags, boxes, altered/upcycled items, home decor - basically anything that isn't a card!!

I decided to use the opportunity to make something useful! I've been meaning to make a new desk tidy since Christmas - but just haven't had either the time or the inclination to get on and do it! Back in November 2011, we had a "Recycle" challenge - and for that one I made my first desk tidy - as shown below!!

Over the past nearly four years, it has been very well used, and become a bit grubby and bashed. So it was time for a new one - shown below!!
I started with an old snack container, and an assortment of pieces of cardboard tubes - bits left from cutting 34 totem pole size tubes for a school project!!! 
I laid out the tools I wanted to put in the container - including my scissors, knives, embossing tools and files - then cut the pieces if necessary. 
I used Eco-Green Acrylic paints (Lilac, Orchid, Black, Pomegranate, Eggplant, Tomato) to paint the tubes  - I didn't want them all the same colour.
The tubes for the scissors needed to be open at the bottom so that they would just hang through.
The other needed a bottom to prevent the bits falling through. All I did was to glue them to a thick piece of card. After the glue was dry, I then cut them out.
I covered the container with 2 pieces of DoCrafts paper (I think it was Boofle). 
Next, I wrapped round some Bazzill Bling card, and another border of the paper.
I kept the decoration simple with different pieces of Washi tape (think they were all from The Range).
I painted some of the inside with Orchid paint, and then added more Bazzill card around the top of the inside to provide a better surface for sticking the tubes - and also the seal in the ends of the Washi Tape.
I then used more wet glue to attach the tubes where I wanted them. I have plenty of room to add more tubes later if I find I need more storage!!  

So now I have a nice new desk tidy - with room for expansion!!

Make sure you pop over to the Crafty Cardmakers and More Blog to check out the rest of the inspiration from the team. And I look forward to your creations!

Back soon (I hope!!)
Cxxx 

Monday, 13 July 2015

Crafty Cardmakers & More - #143 Water

Good afternoon! It's time for another challenge at Crafty Cardmakers and More. And this fortnight our theme is water.You may choose rain, a lake, the ocean - or underneath the water. Or maybe even a bath!! 

I have created something a little different for this challenge - and made a digital scrapbook layout. I love the idea of scrapbooking but find I never really have time to do it justice - but I really love using Serif Craft Artist.
I also really love that the summer is here - and I can get out onto the water and have a bit of fun!! So, I have used a couple of photographs of me on my paddleboard - and one of me recently learning to windsurf!! The frames, from the Henna digikit, are ones that you can just drag the photo into, and they are automatically fitted in.

The blue background is from the Digi Tangle kit, as is the beige piece across the middle (materials section). I overlaid both with patterns from the Digiboss Essentials kit. The blue hessian strip is an embellishment from Sew Lovely, the lace from British Street Party, the brown ribbon from All That Glitters and the blue dotty one, from Cherish.

For decoration, I used swirls from Swirls, the little whirlpool effect and the rays are from Holiday Photobook, and the bird and pearls are from Eccentric Carousel. And the little bit of journalling is on a piece from This Carefree Day.

Now it might seem like I have a lot of digikits - well I have a few, but to be honest many of them are from the Free section. There are only a couple I have bought. It's just a case of mixing and matching what you want - and you can always change the colour of a lot of the embellishments to match your layout.

So, be sure to pop over to the Crafty Cardmakers and More blog to check out all the inspiration from the rest of the team. And we look forward to seeing your creations.

I would like to enter this into:
Crafting When We Can - #98 Summer Fun
Craft for the Craic - Summer Time
Crafty Catz - #287 Summer Time

Cxxx


Wednesday, 8 July 2015

A "Quick Card"!!

So, did you manage to catch the Nordic Christmas collection shows? There was some fab work from all the DT. This is my last sample.
You may have heard Fiona mention the Super Quick Cards on the CD. Well, I've used one of them here - and it shows that, if you want to, you can make them a lot more complicated than just printing and folding. The base card is A4 - made from A3 Centura Pearl. I then used one of the Super Quick Cards, cut and pasted the back portion containing the grey wood design - and created the A4 backing paper. 

I used the front part of another Super Quick card for the image, with a couple of the co-ordinating papers from the CD. I also used hearts and holly from the Embellishment section, with some red Core'dinations, ribbon and pearls.

Hope you enjoyed all the shows!!
Cxxx

Bags of Nordic Christmas goodness!!

Morning - am sat watching Fiona on Ideal World - and the gorgeous Sally Jacks is loving my gift bag. So I thought I ought to share it with you.
This started as just a plain Kraft bag and I used one of the Topper Companions from the CD. I also used the dark blue and green co-ordinating papers. Now, I love the wood effect on some of the toppers - and wanted to make a backing paper from it. So, I took Super Quick Card 2 from the CD, and, using the computer, cut the back half off and pasted it twice to make an A4 paper!!  It's not that clear from the photo, but it's the lighter blue paper that I've matt and layered with.

The sentiments are from Santa's Helper stamp set, and I used one part to make a tag - and the other for the sentiment at the bottom. From the embellishment section, I used the stocking and bunting - and throughout I have used Kraft card for matting and layering. 

Will hopefully be back later to share the last of my samples. 
Enjoy your day!
Cxxx

Tuesday, 7 July 2015

Another quick Nordic sneak peek!!

Evening, tonight sees the launch of Crafter's Companion Nordic Christmas Collection on Ideal World!! And I've got another sneak peek for you!!
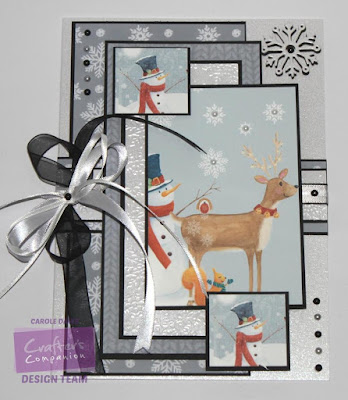
The A5 base card is made from a piece of Centura Pearl Hint of Silver. The main image is from the Topper section of the CD, while the two smaller ones are from the Embellishments. I used the colouriser to create the two grey papers, and embossed another piece of Centura Pearl with my Embossalicious A4 Let it Snow folder. I matted everything with some Matt Black card, and used my Die'sire Snowflake die for a bit of embellishing! I finished it off with ribbon and pearls. 

Be sure to tune in to catch the launch with the lovely Fiona!!
Cxxx

More Nordic Christmas

Morning! Back with another sneak peek from the fab new Crafter's Companion Nordic Christmas Collection. 
The base card for this is made from A4 Matt Black card. I scored one piece at 8" and folded it. Then attached another piece of A4 to the flap - and then trimmed. The image for this card is one of the 3D Toppers. The image is created to look three dimensional - but I couldn't resist printing a second copy and doing a bit of decoupage. I used a couple of the papers from the CD to matt and layer with more Matt Black card. 

I then used lots of elements from the Embellishments section to echo the elements on the topper - a stocking, bunting and candy cane - and I used my Die'sire Holly die with one of the papers. The 'Happy Christmas' is from the Sentiments section - and again, I printed a second copy so I could decoupage it!!
Don't forget to tune into Ideal World at 9pm to see Fiona launch this fab new collection!

Cxxxx

Monday, 6 July 2015

It's Christmas!!

Well, sort of!! Tonight sees the launch of the Pick of the Week on Ideal World - and the launch of the lovely Crafter's Companion Nordic Christmas Collection which includes a CD, stamps and embossing folders. 

I have used the CD to create this side-stepper card.
The base is made from A4 Kraft card and the measurements shown below are in cm. The black lines are scoring and the red are cutting. The dotted ones are to show the measurements. You will need to trim a little piece of at the bottom - it will be obvious once it is folded.
The image is from the Shaped Cards section, and, after cutting out the centre section, I have made it so that it bows out. I embossed a piece of acetate with my Embossalicious A4 Let it Snow folder, and placed this behind the image. The knitted background is a paper from the CD, with a Die'sire Snowflake to embellish.

I matted and layered the matching paper to the front and sides of the stepper. The white pieces on top are Kraft card painted with gesso, embossed with Let It Snow, and then sanded back. The snowflake embellishment was also cut from this. The message is from the Sentiment section. I printed it a couple of times to decoupage the holly to give it some depth. The baubles are from the Embellishment section.
I printed an A5 landscape insert from the Design Set section of the CD - and then cut into it so that the pieces all fitted onto the inside of the stepper.

Watch out for all the sneaky peeks that will be popping up over the next couple of days - and set record for Tuesday at 9pm on Ideal World.

Cxxx

Sunday, 5 July 2015

The Mirror Crack'd - #11 - Canvas


This month, our challenge at The Mirror Crack'd is to create a Canvas, and the lovely Sue B is hosting this month.

I decided to combine printable canvas with a more traditional canvas panel, and took inspiration from my garden which is in full bloom at the moment.
I started by painting the panel with Pebeo black gesso. This stuff is great and doesn't need a second coat.
I then combined a few photos taken in my garden - roses, a petunia, and this gorgeous black pansy!! And then I printed it onto A4 printable canvas. I embossed a piece of Crafter's Companion Matt Black card with Embossalicious A4 Delicate Floral, and created a frame for the picture.
Using Sheena's 7x7 Graphic Equiliser stencil, I dabbed Luminarte Silks Pink Azalea, and Pebeo Deco Matt Pearl in Red, Blue and Yellow, onto the corners of the canvas using a make up sponge. I then mixed some of the black gesso with texture paste and went over the colour with Sheena's Grid stencils.
I used the same paints to paint in the debossed side of the piece left over from making the frame - and I did the same with the frame.
I also highlighted some parts of the flowers with the paints - and went over with the texture paste and Grid stencil.

Using the gesso, I covered some string, and then dabbed on more of the coloured paint.
And I used this to create a kind of trail around the canvas - stuck on with Collall Tacky Glue.
The wooden butterflies (from The Range) were also given the pain treatment, before being added to the canvas.
And there you have it - the finished canvas to remind me of the gorgeous colours that my garden can produce.

Make sure you pop over to The Mirror Crack'd blog to check out the fantastic inspiration from the rest of the team.

I would like to enter this into:
Crafty Friends Challenge - #9 Anything Goes
Suzy Bee's Bloomin' Challenge Blog -#87 Anything Goes - Floral twist

Back soon,
Cxxx

Wednesday, 1 July 2015

Crafter's Inspiration 7

Morning - just a quick post today to share some photos of the projects I made for Crafter's Inspiration 7. I have to say, the photos in the magazine are MUCH better than the ones I took - but then I'm no professional. All my projects were made using the Kimono part of the free CD.

Here they are:
This first one is a box - and this one also makes use of the embossing folder from the magazine.
The second one is a wall hanging - kind of a faux scroll effect with a few tassels thrown in for good measure.
And the last one is an iris folding card. 

All the details and links are in the latest Crafter's Inspiration 7 magazine - along with tonnes more inpsiration from the team - a few rather nice freebies!!

Cxxxx