About Me

My photo
I'm a retired primary school teacher, who started paper crafting in 2008, when I had a fancy to make my own Christmas cards. Since then, I have tried all sorts of techniques and styles - and I kind of like them all. I have been lucky enough to be on blog teams and large design teams and to do a bit of freelance demonstrating - and I love the challenge of working with different products. My crafting style is very varied - from junk journaling and art journaling, bookbinding and journal making, to quilting and patchwork - and of course I still make cards. This variety keeps me interested - and my crafty stash growing!! I'm always seeking inspiration for new projects.

Monday, 10 December 2012

Challenge 81 - Inspired by a Song

Sorry for the delay in publishing this post - but better late than never. Over at Crafty Cardmakers this time, we have a challenge that is inspired by a song. It has to be said that even some members of the Design Team were challenged by this. The song is called 'Time in a Bottle' - and for full details of this, the challenge itself and the prizes on offer, please pop over to the Crafty Cardmakers blog. This challenge will run until 7th January - so plenty of time to get your thinking caps on - and be creative.


We are sponsored by our very own Kim who is offering the selection of goodies shown below. And also by Milk Coffee Digital Stamps.


I chose to focus on two lines from the song:
If I had a box just for wishes
And dreams that had never come true

I love working with boxes, and used the larger of the three Papermania Bare Blanks Nesting Boxes for this project.


I have decoupaged boxes before - with a variety of materials - but this time decided to try out the Decopatch papers I had seen in The Range. Lots of them are animal prints as many of the blanks are of animals, but I found this gorgeously vibrant pink, orange and gold patterned paper and decided that was the one for this project.

In the past I have used watered down PVA glue but this time I used Decopatch Glossy Glue. The good thing about this medium is that it dries much quicker than PVA which allows you to work much more quickly as you are not having to wait for a side to dry before carrying on. I used the Decopatch paper on the outside of the box, and ordinary tissue paper on the inside. The advantage of the tissue paper is that, once it is wet, it will mould very easily into the corners of the box.

To decorate the top, I cut four small Romantic Rectangles from Bazzill cardstock using my Spellbinders dies. I then cut off the legs of some gold, pink and orange brads, and fixed them on with silicone glue. The finishing touch was the metal photo corners. All of these were from my stash. As I decant it all into plastic storage boxes, I have no idea where the brads or photo corners came from originally!!

The song continues:
The box would be empty
Except for the memory
Of how they were answered by you

I'm not really sure how I feel about that. I agree that many of mine were answered when I met my husband, but I think we all have wishes and dreams aside from the type that can be fulfilled by having another person in your life. And although we all go through tough times I like to hold on to the hope that, however low I feel at times, the wishes and dreams I still have, will one day come to something. Otherwise - what is the point? 

On that note, may I wish you all a very Merry Christmas both from myself and the Crafty Cardmakers team!! I look forward to seeing all your entries - pop over the Crafty Cardmakers blog for more inspiration. They are all fantastic projects - and go to show just how diverse a team we are!!

I would like to enter this into the following challenges:
Challenges 4 Everybody - Anything Goes

Cxxx

Monday, 26 November 2012

Challenge #80 - Christmas Photo Inspiration


Our Challenge this fortnight, hosted by Fiona, is a photo inspiration challenge. Make a card or project inspired by the following photo. You can take inspiration from any part of it really, from the actual image or from the colours.

We are sponsored again by

$10 GIFT VOUCHER

and also by


$15 Gift Certificate to the Crop Stop Store 

I chose to take the colours of the photo for my inspiration. I love the turquoise - but what caught my eye was the gold on the chairs. So I used those two as my main colours whilst bringing in a little white too.


Whilst looking for new ornaments for my tree, I came upon this turquoise sparkly snowflake ornament - and I knew that I wanted it for this project. It is rather large so I used an 8" square card - but it is rather light and doesn't make the card 'front-heavy'


I kept the glittery feel with white glitter card. I have a tonne of glitter card - I used to love using it all the time - but haven't done so recently - so there was plenty there for me to get stuck into. I used it to cut two Spellbinders Lace Doily motifs. These were laid on top of each other - one as a square and the other as a diamond. This provided the background for the snowflake. I also used the white for the scalloped square.

The gold card is from my local market - it's fairly lightweight card, but I love the fact that it is matt instead of shiny. I cut the small square for the snowflake using a nestie, and the large square was edged with the Classic Scallop Edgeability, and an insert from Decorative Inserts 6. 

The turquoise card is from the Create & Craft Pastel Textured Cardstock pad - I have both the brights and pastel and love them both!!  It was edged with an insert from the Classic Ric Rac set.

The wide ribbon and matching bow are from my stash - bought in Lidl several years ago. And the pearls are from Diamond Occasion - I have all sorts of colours of pearls from them!!

Take a look over on the Crafty Cardmakers website as there is loads more inspiration there from the rest of the fabulous Design Team.

Take care

Cxxxx 


Monday, 12 November 2012

Challenge #79 - More Than One Punch or Die Cut

Our challenge this time is hosted by BettyC and she would like you to use more than 1 punch or die cut. You can have a combination such as 1 punch and 1 diecut as that equals two, or two punches, two diecuts. You can use more if you wish as long as there is at least two in combination or two of either on your creation.


We are sponsored by Hobby Art with this fabulous prize of two stamp sheets. And by Milk Coffee Digital Stamps who are offering 5 digital stamps.


This week's challenge was right up my street as I love die cutting with my Spellbinders. I had thought my creation would be an elaborate affair. But when it came to it, I actually went for something much more simple and restrained.


The base card just under 6" square and is from Craftwork Cards. The two mats are My Mind's Eye Lost and Found Papers - the largest cut with a simple square die - and the smaller with a scalloped square die. The pattern in the scalloped square was cut using one of the inserts from the Classic Triple Scallop Edgeabilties set. 

The flowers are cut from red card using the two largest dies from the Bitty Blossom set, and the letters with the X Cut DieLicious Rome Alphabet die. 

The finishing touch was a little bit of sparkle in the border with Cosmic Shimmer Aqua Twinkles. Overall, a really rather restrained card for me!! 

Pop over to the Crafty Cardmakers blog for more inspiration!!

Take Care,


Cxxx

Monday, 15 October 2012

Challenge 77 - Autumn or Autumn Colours !!


This week's challenge is set by the lovely Josephine who says 'There are always so many Hallowe'en challenges around! So instead of creating a Hallowe'en card I would like to see something that depicts the Season of Autumn, or maybe Harvest Festival, Guy Fawkes, Diwali or some other festival that happens in the Autumn. If your theme is a lesser-known festival, please tell us about it in your post! But remember, this is not a Hallowe'en challenge!'

We are sponsored this week by Milk Coffee Digital Stamps.

Well, it's been a while since I've been here on Blogger - pretty much a whole month!! I would so love to have more crafting time, but planning and marking has pretty much taken over my life in my temporary teaching post!! Ofsted is looming - and an air of urgency has entered every aspect of school (and home) life!! 

So, it was nice to sit down on Sunday morning and craft. To be honest, it also meant I could get my husband's anniversary card made at the same time. We will have been married 8 years on Tuesday, and we had a beautifully sunny autumn day for our wedding - with all the leaves looking so vibrant. The colours of the card match the colour theme of our wedding - burgundys, yellows and oranges - so this challenge seemed a perfect way to create his card.


I started by creating a heart template on the computer, and printing it onto 300gsm card. I then cut it out, folded it and inked it using Antique Linen, Wild Honey, Rusty Hinge, Aged Mahogany, Brushed Corduroy and Vintage Photo DI's. I didn't want a blended look, so literally splodged the foam onto the card - both back and front.


I then gathered together all my foliage dies - they are all Spellbinders and from a variety of sets including Foliage 1, and Spiral Blossoms. I also rummaged through my scraps box to use up smaller pieces of card - rather than cutting into anything new. I embossed them all for texture, and inked some whilst still in the dies.

These were randomly stuck onto the card to create a 3D textured effect - just like piles of leaves on the floor!! 


The finishing touch was the little plaque (cut using Spellbinders scalloped long oval) which I printed on my computer, and inked with Aged Mahogany whilst still in the die. !!


I am pretty pleased with how this turned out.

I would like to enter this into the following challenges:
Challenge Up Your Life - Autumn/ Halloween
Sarah Hurley Challenge Blog - Autumn

Hopefully be back soon.

Cxxx

Monday, 17 September 2012

Crafty Cardmakers Challenge 75 - Stitching & Lace

This week's host is our wonderful leader, Lin!! She would like to see stitching on your projects this time - hand, machine or faux, along with lace - this must be real NOT faux!!

We are sponsored by the wonderful Hobby Art stamps who are offering this wonderful set of stamps, and say: 
"As a family business we're a friendly, helpful, bunch at Hobby Art.  All our stamps are designed by us and manufactured in Britain. Look at the gallery on my blog - jennymayes.com - for lots of card ideas using the Hobby Art range. We're pleased to sponsor the Crafty Cardmakers Challenge and look forward to seeing the entries. Good luck everyone.  Jenny and all. X"


I have to admit that this one has been tough for me!! Not because of the subject - but because life seems to have just taken over. I have a teaching job for this term which came at short notice, along with all the planning and other things that come with it. I started on Monday having had a week's notice - and that week I was camping near Dartmoor so was not exactly conducive to planning and preparation for teaching. I literally came back on Sunday and went straight in on Monday. The picture is me on the zip wire over the Eden Project whilst on holiday - great fun!! My husband doesn't like heights so he took the photos from his vantage point safely on the ground. 
Anyway, all my plans for this challenge were put on hold whilst I frantically tried to get my head around what was happening. In the end I had to get up extra early on Saturday morning in order to find some time to do this. But, it did take my mind off everything else - and while it's not quite what I originally had in mind, I think it turned out OK.


At the end of my holiday, we did a slight detour to visit Crafty Devils in Barnstaple, and there I bought my new Sizzix Quilting dies. The 3" square (2.5" when finished), and the triangles which make a 3" square when sewn together. In this case, I didn't join them, just used them more like applique to make a background.


I sewed the two burgundy triangles onto a piece of the green floral quilting material (from a charm pack I bought - I think this one is from Pelenna Patchwork) using a decorative stitch on my machine. I used cream thread so that it showed up. I then stitched the square on top of this using burgundy thread (again so that it would show up). 

It was then stuck onto a piece of thick card to give it some rigidity. This, in turn, was mounted onto burgundy card, and green Bazzill. I covered an 8" card blank with burgundgy card, and stuck the mat onto it. I found the lace at a country fair craft stall - it came with the pearls already attached (probably why it caught my eye as I love pearls).

The glittery flowers have been in my box so long I cannot remember where I got them from, while the fabric one was from WH Smith (strange but true)!! 

Pop over the the Crafty Cardmakers blog to see what everyone else has been up to - and to welcome our new DT members! They have all created some stunning projects to inspire you!!

Will try to blog again soon - but won't promise anything.

Cxxx

Monday, 3 September 2012

CCM Challenge 74 - Winged Things


This week, our lovely host is Marie, who would like you to include something with wings!! It could be a fairy, angel, insect, bird - or anything else that has wings.


We are sponsored this week by Di's Digi Downloads, and also by The Stampman who are offering a £10 gift voucher for their store.

When this challenge was set, I was determined not to use butterflies - but have to admit that I couldn't really get inspired by anything else. In the end, I dug out my DCWV Safari Chic pad (the one that has been sitting around for 2 years waiting for me to scrapbook my Safari Holiday from 3 years ago!!) as I knew it had this gorgeous butterfly design!! 

I used the design to determine the colours for the rest of the card. The textured mats are all Bazzill, with the green patterned paper coming from a Brenda Pinnick pad I've had for years (so many sheets - I'm not sure I'll ever get through it!) 

I used the butterfly insert from the Spellbinders Edgeabilities Decorative Inserts Set 6 to cut the border on the light coloured mat. The leaves and flower are from the Carnation Creations set. I embossed them and inked through the die - Rusty Hinge DI for the flower, and Forest Moss DI for the foliage - to link with the orange and darker green of the design. 

The butterfly is from the Wings of Hope set. Because the butterfly paper is one sided, I stuck it back to back with the Brenda Pinnick paper, before cutting it as I didn't want the white showing. The other two layers of the butterfly are from the Bazzill card. 


I didn't want to use ribbon, so decided to colour some cream raffia with Rusty Hinge DI. Can't decide if I like it or not!! I filled the centre of the flower with gems from my Anita's Gemstone Wheel - both 2mm and 3mm. The little butterflies on the raffia and stem are the waste from the border. 

Don't forget to pop on over to Crafty Cardmakers to check out the great inspiration from the rest of the Design Team!! Then get your crafty stash out and link up your creation on the blog!! 

Cxxxx

Wednesday, 29 August 2012

What a Nitwit!!

It's my friend's daughter's 5th birthday next week, and I have to admit I was a little lacking in inspiration. My first attempt was great - but when I came back to it, it just seemed too grown up for a 5 year old. So, back to the drawing board!! I keep a box of odds and ends which I hope will come in useful at some point - and it was in there that I found the lamb left over from a Nitwits die cut sheet, along with the little heart I've placed on the sun, and the 'medal' too.


So, I then needed something for the background, and quite fancied having the lamb leaping up from grass!! So I dug in my CD-Rom box and found a freebie from Complete Cardmaking (probably from 2010) which had some Nitwits backing paper and other elements on!! So, I combined the fluffy cloud background for the sky with the green dotty one for the grass - along with the sunshine and grass from the elements. The orange stripe is also from the CD as is the yellow from which I have cut the letters and number.

I inked the edges of the bottom half with Shabby Shutters DI, and the top half with Scattered Straw DI. The lamb has some glitter glue to give it sparkle and texture, whilst its hooves and the heart have been glazed with Anita's 3D Clear Gloss Finish.

A fairly straightforward card - but still effective - and definately suitable for a 5 year old!!

I would like to enter this into the following challenges:

Everybody Art Challenge - Anything Goes
Fashionista Challenge - A Card For a Child
Craft Your Days Away - Anything Goes

Don't forget, you still have time to enter the Seaside Postcard Challenge at Crafty Cardmakers - pop over for some inspiration!!

Cxxx

Monday, 20 August 2012

Crafty Cardmakers Challenge #73 - Oh I Do Like To Be Beside the Seaside!!

This week's challenge is set by the lovely Yvonne!! She would like to see postcards (6"x4") showing a beach scene. There must be some beach and sea in the background to the focal image.


We are sponsored this week by Digi Doodle Shop, who are offering a $10 gift certificate for their shop, and by One Stop Card Crafts who have a £10 gift voucher for their store.


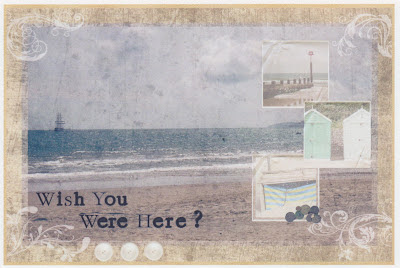
So, I decided to do something completely different this week, and go completely digital using Serif Craft Artist. I've had a very limited play before, but I couldn't remember a whole lot so had to play around quite a bit before I finally achieved what I wanted


The sandy background is from the free Daisy Trail Holiday Photobook digikit. The other digikits I used elements from were Swirling MemoriesPlayground and British Street Party. I took the photos a while ago - this is them in their original state:


I knew that the software would fit my photos to the size of the frame - but I have to admit that it took me a while to realise I had to add the photos to the list at the side in order to do this!! The large frame is from Swirling Memories, and I really like the way that it gives the photo a much more aged look. The frame for the smaller three photos is from British Street Party. I sized the frame first and copy and pasted it, then dropped the photos in. The little group of buttons is from Swirling Memories, and the large button at the bottom is from Playground.

I created the caption using the Swirling Memories alphabet, and decided to make it a question - as while this is my idea of a great place to be - it may not be everyone's. So, do you "Wish you were here?"

Remember we are still looking for Design Team members, so pop over to the Crafty Cardmakers Blog to check out what the other DT members have been up to, then get your entry in, putting DT after your name if you would like to be considered.

I would like to enter this into the following challenges:

Craft Your Days Away - Anything Goes
The Squirrel and the Fox - The Sea
Crafts 4 Eternity - Splish, Splash, Splosh
SJ Crafts - Summer Time

See you soon!!
Cxxx

Wednesday, 15 August 2012

Football Crazy!!

I realised today, that it's been over a week since I last blogged. It's not for the lack of crafting either - I have several creations ready to blog - I just haven't got round to it. I am blaming technology - I have acquired myself an IPad which (as I am home most of the day) seems to now be on constantly. As I am using it to check emails, Twitter and Facebook, I have not turned my laptop on for a while. I've discovered quite a few apps too - I've got the Kindle app (no books yet, mind you), one for the weather, obviously C&C and QVC to get my crafty fix, and several others including My Fitness Pal which is turning out to be the most useful in my continuing bid to keep myself fit and healthy. 

I kept telling myself "I'll blog tomorrow!", but it didn't really happen!! So, this evening, I decided to make the effort, switch it on, and get on and blog!!

This one is for my friend's son, who will be 9 later this month. He's very into sport - and particularly likes football, so a footie themed card it is!!


It's nothing fancy - quite a straightforward card for me (and no Spellbinders in sight!) The base card is Craftwork Cards size 6, and the red and blue mats are Bazzil. The 3 footie themed toppers are from an old Kanban sheet that I found languishing at the bottom of my box of crafting items for male cards - obviously just waiting for this occasion! The patterned backing card is also Kanban - and was also something I'd forgotten about! I cut the letters using my X-Cut Die-Licious Roma Alphabet Die, and the numbers are using an old X-Cut set of dies.  

I would like to enter this into the following challenge:

Use Your Stuff - Let's Hear It For The Boys

Don't forget there is still time to get your Olympic Sports themed cards into Crafty Cardmakers Challenge. And we have a DT call too - just add DT after your name when you enter the challenge!!

Cxxx

Monday, 6 August 2012

Challenge #72 - Olympic Spirit


So, after a little break, we are back up and running (pardon the pun) at Crafty Cardmakers!! In honour of the Olympics, we would like you to create a sporting themed card - it can be any sport you like - but it would be great if it was an Olympic sport (Summer or Winter).

We are sponsored for this challenge by Di's Digi Downloads, who are offering a $10 gift voucher. 
And also by Hobby Art who have this to say: As a family business we're a friendly, helpful, bunch at Hobby Art. All our stamps are designed by us and manufactured in Britain. Look at the gallery on my blog - jennymayes.com- for lots of card ideas using the Hobby Art range. We're pleased to sponsor the Crafty Cardmakers Challenge and look forward to seeing the entries. Good luck everyone. Jenny and all. X
They are offering these two great stamp sets!! 


I have to admit, that I wasn't really sure what to do for this. Eventually, though, I decided to go for a Taekwondo themed card - mainly because I already had a Craft Robo template - part of Beanpole Books 'Runner Bean' Sports templates


I started with taupe card from Creative Expressions, and cut the figure as a topper with a border. I then cut it again in white pearl card, so I could use part of it for the white dobok. The belt I cut separately from brown card.


I backed the topper onto a piece of Paper Cellar 6x6 paper from the Victorian Classic pad. I love the way the figure is framed by the large circle. 

The card for the brown base is from my local market, and I cut the front bottom edge with Spellbinders Classic Scallop Edgeability. I layered a piece of the white pearl on top of the taupe - the dotty pattern on the white is from Decorative Inserts 4. I used more of the decorative paper on top of the white, and also above the white. The cream satin and brown organza ribbons are Celebrations (from The Range). I finished it off with a few pearls, and a sentiment that I think was left over from a Kanban kit.

Please pop over to the Crafty Cardmakers Blog for more inspiration, where we are also having a DT Call - just add DT after your name when you enter the challenge!! Couldn't be easier!!

I am really pleased with how this turned out, and would like to enter it into the following:
The Squirrel & The Fox - Make it Sporty
Craft Your Days Away - Olympic Dreams
SJ Crafts Shop Blog - Olympics
Cxxx

Tuesday, 31 July 2012

Crafting with Kits (and it's my 100th blog post!!)

So, I have reached my 100th blog post!! In the land of Blog, I am sure it is not that significant, but for me and my little blog, it most definitely is!! I did wonder what I was going to Blog about - but last week, I spent a lot of time gardening in the gorgeous sunshine (don't worry I'm not blogging about gardening) and whilst I was pulling up weeds, I did a lot of thinking about something that has been getting me a little annoyed recently. 

Let me explain. When I started crafting, I didn't really know what I was doing - I bought a Do Crafts Christmas goody bag as I wanted to make my own Christmas cards and it snowballed from there. I bought a lot of 3D stickers and the like and then discovered crafting on both QVC and Create & Craft and began to buy kits with toppers and card stock from the likes of Hunkydory and Kanban. They were a total revelation and really opened up the possibilities for me.

Hunkydory - Lace Bouquet Topper 

I have never been a great stamper - and probably never will. I work with digi stamps for the Crafty Cardmakers blog, and do quite enjoy it, but I don't have a vast stamp collection and have never bought any of the markers out there - I prefer my (very) old watercolour tin and my Distress Ink collection!!  

Hunkydory - Butterfly Jewels Topper

To be perfectly honest, I love crafting with Kanban and Hunkydory toppers. I love the fact that I have a piece of co-ordinating cardstock to either make the base card from, or just to use for co-ordinating my layers. I enjoy rummaging through my stash to find co-ordinating card and paper - and then working out which of my vast collection of Spellbinders would complement the design - and finally deciding on the way to embellish them. 

Hunkydory - Button Cute! Topper - Free Gift with Magazine Issue 6

So, what is it  that is annoying me? Well, I am fed up of the way this type of crafting is often dismissed as lacking creativity. The term 'pick and stick' is used in quite a derogatory way and really does not do justice to what you can do with the toppers. Yes, you can just 'pick and stick' but there is so much more scope there if you want to develop it further. I hear people often 'apologising' for using kits - for when they need a 'quick' card, and particularly around Christmas when people say they use them because they couldn't possibly make the volume of cards otherwise. As if these are the ONLY reasons that card kits could possibly be accepted. 

I know it's not for everyone (where would we be if we all liked the same things), but I am a little fed up of being made to feel that, because I may use a pre-printed topper, my creations are somehow inferior!! 

Hunkydory - Lace Bouquet Topper

Well, I am not going to apologise for using kits (or justify why) - suffice to say that I LOVE THEM! The four cards shown here are recent makes using various Hunkydory Kits. I recently bought a Kanban Christmas Blockbuster - and have been watching the Olympics whilst popping out the die cuts and matching them with cardstock!! Won't be starting making them yet (a little too early for me) - but I know they are all there just waiting. 

You may have heard me refer to my 'Lucky Dip' box in past posts. This is where all the toppers from the kits I have bought sit in plastic wallets with co-ordinating card stock, base card and envelope. Whenever I have time to craft just for the hell of it (ie no looming birthdays, anniversaries or commissions) I pop my hand into the box and see what I pull out!! 

Don't get me wrong - I love playing with different techniques too. I have my alchohol inks, gilding flakes (just invested in Flitterglu so looking forward to playing with that), embossing paste, mica powders and masks, embossing folders, dies - the list is endless (and I am also making small forays into the world of sewing/quilting). But I will always love crafting with kits!! 

Will be back soon!!!

Cxxx

Thursday, 26 July 2012

Getting Sentimental!!

You may have noticed from the last couple of posts that I have been getting into using sentiment stamps with no images. Well, here's another one. This card was made for Lin (our esteemed leader over at Crafty Cardmakers - who is offline at the moment due to moving house). It has been a busy time for her, and I sent her this card to let her know I was thinking of her.


The main stamp and the speech bubble are Papermania Typography, and I used my Dovecraft alphabet stamps for the name - all stamped with Dusty Concord DI. The sentiment is stamped on Creative Expressions Coconut White card, cut with a Spellbinders Romantic Rectangle, and inked whilst still in the die.The purple and lilac are Bazzill, with the darker mat also being a Romantic Rectangle. The largest background mat has been edged with Spellbinders Edgeabilities Classic Triple Scallop, and one of the decorative inserts from set 4, with a strip of the darker card stuck behind. The flower is from the Carnation Creations dies. A strip of lace and a few pearls finished it all off. 

Hopefully, Lin will be back on-line soon! But I'm not going to complain, as it does mean she's given us a bit of time off from the challenge blog! 

I would like to enter this into the following challenges:
Charizma Cards - Monochrome
Do You Stack Up - For a Friend

Cxxx

Friday, 20 July 2012

School's Out for Summer!!

The week has finally come to an end - and school has finished. It's quite a significant end of school year, this time - it marks the end of my first year back in the classroom after 7 years in outdoor education; my niece has finished primary school; and my Mum has retired from her job as a school secretary/admin/finance officer after 33 years!! My niece and Mum happen to be leaving the same school - so at the leaver's service today, Mum was surprised with a poem dedicated to her, read by my niece (her granddaughter). I wasn't there, but I understand it was pretty emotional. 

Here is the card I made for Mum's retirement.


I used an 8" square textured cream card base (have had it in my stash for ages - and can't remember where I got it), cream card from Creative Expresssions Neutral Pack, and burgundy card from my local market. As ever, the dies used are Spellbinders

For the edges of the large burgundy mat, I used Edgeabilities Classic Triple Scallop, with the inserts from the Classic Petal set. I also used the burgundy for the Lace Doily Motif. From the cream, I cut a Scalloped Square and used another die from the Lace Doily set.


The flowers are all Bitty Blossoms - large and medium - and I raised the sentiment and mats on foam strips to give them height.

The sentiment is Papermania Typography, stamped and coloured in Aged Mahogony DI. It was a little 'redder' than I really wanted, but I had nothing else anywhere near the colour. I sprayed the sentiment with gold Spray and Sparkle - still can't decide if it was a good idea or not. I finished it all off with flat backed pearls. Have just bought a load from Diamond Occasion in various colours - I think they are great value for money!! 

I would like to enter this into:
Samuel Taylors Crafts - Die Cutting
Fab n Funky Challenges - Make your own flowers

Cxx