About Me

My photo
I'm a retired primary school teacher, who started paper crafting in 2008, when I had a fancy to make my own Christmas cards. Since then, I have tried all sorts of techniques and styles - and I kind of like them all. I have been lucky enough to be on blog teams and large design teams and to do a bit of freelance demonstrating - and I love the challenge of working with different products. My crafting style is very varied - from junk journaling and art journaling, bookbinding and journal making, to quilting and patchwork - and of course I still make cards. This variety keeps me interested - and my crafty stash growing!! I'm always seeking inspiration for new projects.
Showing posts with label #circles. Show all posts

Friday, 13 May 2022

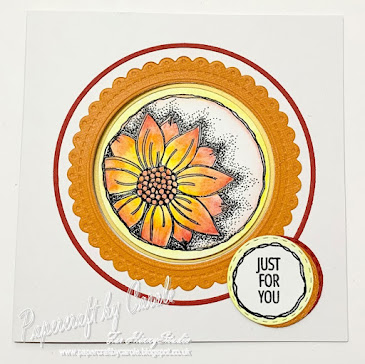
Aperture Card

This is a little aperture card created using Julie Hickey Designs Floral Buttons Stamp set and Dinky Circles die set. I coloured the image with Faber Castell Goldfaber Aqua pencils.

Click on the picture to see the video demonstration.


Thanks for popping by, and I hope I have given you a little inspiration. Feel free to follow me here on my blog, or on FaceBookTwitterInstagram or Pinterest. For lots more video demonstrations, pop over to the Hixxy Studio YouTube channel to subscribe. The main items I use can be found on the Hixxy Crafts website - have a look under the Hixxy Studio tab.

Happy crafting,

Cxx

Friday, 8 April 2022

Dinky Circles

Today's share uses the Dinky Circle dies from Julie Hickey Designs. The flower is from the set, and I used Craft Artist - Flower Forming Foam - Pink and Purple. The sentiment is from the Floral Buttons set, and I used Crafter's Companion Stitched Circles to cut it out. Click on the picture to take you to the video demonstration.


Thanks for popping by, and I hope I have given you a little inspiration. Feel free to follow me here on my blog, or on FaceBookTwitterInstagram or Pinterest. For lots of video demonstrations, pop over to the Hixxy Studio YouTube channel to subscribe. The main items I use can be found on the Hixxy Crafts website - have a look under the Hixxy Studio tab.

Happy crafting,

Cxxx

Wednesday, 6 April 2022

Circles Everywhere!!

 Today's share is a card made using some lovely Julie Hickey Designs products. The stamps are Floral Buttons, and I have also used the Dinky Circles die set.


The button stamps themselves are cut by hand and not with dies, as this follows the free-hand way in which they are drawn. The mats and layers are using one of the Dinky Circles.

For the background, I used Scattered Straw, Bundled Sage and Weathered Wood Distress Oxides and Oxide Sprays, along with the the tiny stamps from the set, and a stencil I made using the flower from the Dinky Circles.

Thanks for popping by, and I hope I have given you a little inspiration. Feel free to follow me here on my blog, or on FaceBookTwitterInstagram or Pinterest. For lots of video demonstrations, pop over to the Hixxy Studio YouTube channel to subscribe. The main items I use can be found on the Hixxy Crafts website - have a look under the Hixxy Studio tab.


Happy crafting,

Cxx

Wednesday, 1 July 2020

Hats - Go Large!

There's always fads and fashions and trends in any area - and one of the most recent in the craft world was the hat easel. I resisted for a while, but then decided to have a go myself. I found some instructions on Positively Papercraft - with two different posts sharing instructions and videos for construction and for two different hat boxes.

I decided that I wanted to go much bigger than this, so I have adapted the sizes  - but pretty much followed the assembly. I didn't bother with the fancy boxes - but did make a box to deliver it in - more details later. I really relied heavily on my Spellbinders circle and scalloped circle dies - both the ordinary set and the Grand set - which I have had in my stash for a very long time. The measurements that I mention are in relation to these dies. 


To make this (at this size - which is just over 7"), you will need 2 sheets of A3 card for the easel base. I used Centura Pearl card from the Pastels pack. I used one sheet and cut a long strip off - 15 1/2" x 2 1/2" - you will need this later. The rest of this piece of card was scored and folded at 8 1/4" and then the base was cut with the largest Spellbinder circle die that I have - 7 1/4".  Once cut,  one side of the easel was cored a 3 5/8".

Please note: some of the photos are of another hat easel I made as I didn't take many photos while making this.


The strip that was cut needs to be scored at 1/2" and 2", and then notches cut into it as shown below.


This will form the sides of the hat, and is attached to a circle of 4 3/4" diameter as shown below.


It's then all about assembly. I started by decorating the hat top as I found this easier to do before sticking in onto the large circle. I used strips of patterned paper 1 1/4" wide to go around the hat top, and then went round with ribbon. I added a 4 1/4" circle in a patterned paper to the very top


You need another 7 1/4" circle for the top of the easel card - which serves as the brim of the hat. On this one I added a 7 3/8" scalloped circle in green, a 6 1/4" circle in orange, a 5 3/4" circle in the patterned paper, and a 5 1/8" scalloped circle in the original Centura Pearl. Onto this, you glue the hat top.

For the easel base, I used the same size circles and scallops as above, but added another green 4 5/8" scalloped circle. In other ones I have made, I have added another 3 3/4" circle on the top of that - but didn't do that here.


For the sentiment/stopper, I used a green 2 3/4" circle, an orange 2 5/8" scalloped circle and the sentiment was stamped onto a 2 3/8" circle of the Centura Pearl. For other ones I have made, I started with a 3 1/8" scalloped circle of the original card I made the base from.  The sentiment was stamped in Stazon - Cactus Green and sentiment is from an old Crafter's Companion Sentimentals stamp set.


I then decorated the hat brim with bow in the same ribbon as I used before, and then some flowers I made using Flower Forming foam (see my post here).


I did make a very simple box for this. I used two 12x12 sheets of Core'dinations card and used my Big Score to score at 2 1/4" all the way round. I have made 5 of these in total, and I will share the other designs as and when I give them to the recipients throughout the year - one is not until December - but the next one is only a few weeks away. 

Happy crafting!
Cxxxx

Monday, 4 May 2020

Circles and Furry Things

Morning. It's another new week. I've just kind of bumbled through this past one, with plenty of baking and tidying keeping me occupied in the not so nice weather.

And a new week means a new challenge over at Use Your Craft Stash. This week it's Furry Critters and/or circles. So any animal with fur or just use circles - whichever is easier. And of course, we would love to see any type of craft within the theme. 


I chose to use this Darkroom Door Eclectic Stamp called Sitting Dog. It was a gift from a good crafty friend of mine, and I'm ashamed to say that I've never used it before.  And to stamp it, I dug out another piece of stash which wasn't even out of the bag - this Crafter's Companion Stamping Mat.  I stamped the image using Gathered Twigs Distress Ink onto Neenah Classic Crest Card.


I marked out the circle I would be cutting out, so as I didn't bother colouring too big an area. I used water to move the Distresss Ink and added a little more detail by going back in with the ink on a brush. The tongue was coloured with Watermelon Aqua Pencil (Crafter's Companion) from the Florals tin.


The background was created using Charcoal Brown Aqua Pencil from the Essentials Tin, and Tumbled Glass Distress Ink. To keep with the theme, I mounted it onto circles of card - all from my scraps box.  The large piece of brown card at the back has an aperture cut into it (where you can see the white) and was embossed using Crafter's Companion Textures Distress 8x8 folder.


We look forward to seeing what you come up with this week. 

Take care,
Cxxx