
About Me

My photo
I'm a retired primary school teacher, who started paper crafting in 2008, when I had a fancy to make my own Christmas cards. Since then, I have tried all sorts of techniques and styles - and I kind of like them all. I have been lucky enough to be on blog teams and large design teams and to do a bit of freelance demonstrating - and I love the challenge of working with different products. My crafting style is very varied - from junk journaling and art journaling, bookbinding and journal making, to quilting and patchwork - and of course I still make cards. This variety keeps me interested - and my crafty stash growing!! I'm always seeking inspiration for new projects.
Showing posts with label #pocketcard. Show all posts

Saturday, 12 March 2022

Sparkly Pocket Card

Hello! Am continuing my shares of projects using Julie Hickey Stamps. Today, I have a pocket card with an added tag! I have coloured it all with Cosmic Shimmer Pearlescent Watercolour Inks for added shimmer. Click on the photo below to see the video demo.


The base card is  6 1/2" x the length of A4. Mark on a line 1/2" from the long edge. 


Score at 2 3/8" from one end, and 3/4" and 5" from the other end. Also, score along the 1/2" line in the place where the flap will be - as shown below.
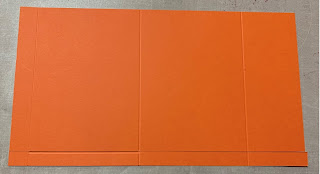

Cut off the bottom, along the 1/2" line, leaving the tab, then fold and burnish all the scored lines.


Attach a piece of card - 4 1/4" x 6" - to the flap on the right to form the back of the card, then glue the tabs and stick to create the pocket on the front.


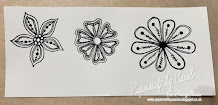
I stamped the main image from the Floral Fantasy set onto stamping card with Versafine Clair - Nocturne, and embossing with clear powder. I used Cosmic Shimmer Pearlescent Watercolour inks to colour: Ray of Sunshine, Golden Sunrise, Flamingo Pink, Fiery Sunset, Holly Green and Turquoise. I also used Juicy Orange and Peacock Teal - both of which are not pearlescent.


I did the same with the individual flowers. I deliberately went over the edges, to reduce white edges when I fussy cut them out.
 

The base tag is 6 1/2" x 3 1/2", with each layer being 1/4" smaller than the previous. 


The stamp on the front is from the Floral Fantasy set - designed to fit in that little aperture. The Happy Mother's Day comes from Julie Hickey's Everyday Sentiment stamps and the lettering is Julie Hickey's Sweet Pea Alphabet set. 


I just love the sparkle the inks provide!!


Thanks for popping by, and I hope I have given you a little inspiration. Feel free to follow me here on my blog, or on FaceBookTwitterInstagram or Pinterest. For all the videos, pop over to the Hixxy Studio YouTube channel to subscribe. And FB lives are streamed on both the YouTube channel and the Hixxy Crafts FB page. The main items I use can be found on the Hixxy Crafts website - have a look under the Hixxy Studio tab.

Happy crafting,

Cxxx

Wednesday, 2 March 2022

Butterfly Pocket Card

Today I have another way to use the Butterfly Pocket Insert from Elizabeth Craft Designs: Art Journal collection. It makes a lovely little card - or, like I have done, a card on a card. The reason I did this was because I felt it was just a bit too small. So, I made an A6 card base from purple card, and mat and layered with green card and patterned paper.


I cut out the pocket insert from plain purple card, and stuck the pocket part together. I used the same green and patterned paper layers inside of the pocket card. To keep this all closed, I attached ribbon to the back of the pocket insert, before attaching it to another piece of green card. This was then stuck to the base card. The ribbon then ties around the front. 


The tag die from the set was cut from green card, also using the additional cut-in pattern die. This was backed with purple card, and then another tag cut from the patterned paper. To get the letters I wanted, I had to cut a combination of the dies from the set - but it's worth it.

For the butterfly, you need to cut this twice, as the die only cuts half. Cut one from the front of the paper, and one from the back. I did the same in the purple card as a backing. I used a small strip of card down the middle to cover the join.

If you want to see a video demonstration, then please click on the first photo.

Thanks for popping by, and I hope I have given you a little inspiration. Feel free to follow me here on my blog, or on FaceBookTwitterInstagram or Pinterest. For all the videos, pop over to the Hixxy Studio YouTube channel to subscribe. And FB lives are streamed on both the YouTube channel and the Hixxy Crafts FB page. The main items I use can be found on the Hixxy Crafts website - have a look under the Hixxy Studio tab.

Happy crafting,

Cxxx