About Me

My photo
I'm a retired primary school teacher, who started paper crafting in 2008, when I had a fancy to make my own Christmas cards. Since then, I have tried all sorts of techniques and styles - and I kind of like them all. I have been lucky enough to be on blog teams and large design teams and to do a bit of freelance demonstrating - and I love the challenge of working with different products. My crafting style is very varied - from junk journaling and art journaling, bookbinding and journal making, to quilting and patchwork - and of course I still make cards. This variety keeps me interested - and my crafty stash growing!! I'm always seeking inspiration for new projects.
Showing posts with label #JeaninesArt. Show all posts

Thursday, 1 December 2022

Jeanine's Art - Butterfly Flowers

A lovely selection of projects today using the beautiful Jeanine's Art Butterfly Flowers Collection.

The first card uses Ranger Alcohol Inks on Yupo paper - Gumball, Sunshine Yellow, Limeade and Valencia for the background, in conjunction with the Mandala Circle die set from collection.


The second uses the Mandala Circle and 4-in-1 Corner dies.


I LOVE this Hydrangea die from the collection. To achieve the colours, I coloured a piece of card using Shaded Lilac and Seedless Preserve Distress Oxides, and then die cut it.


This ombre card uses just the 4-in-1 Corner die set, with an ombre selection of cardstock from my stash.


And the last card uses an inky background created using Cosmic Shimmer Pixie Powders in Mango Blaze, Peacock Green, Aqua Lagoon and Purple Violet, along with Mermaid Lagoon, Wilted Violet and Scattered Straw Distress Oxide Sprays. The die set is Butterfly Borders from the collection.


Click on the image to see the video demo, and please feel free to follow me here on my blog, or on FaceBookTwitterInstagram or Pinterest.

And I now have a YouTube channel where I hope to add my video content to in the future. Would love it if you could subscribe. 

Thank you for popping by and happy crafting, 

Cxxxx

Tuesday, 29 November 2022

Jeanine's Art - Winter Charme Collection

Today's share includes three projects using elements from Jeanine's Art Winter Charme Collection. This time I chose to make a couple of different styles of boxes, and a white-on-white card. 

So, the first project is a white-on-white diorama card using the Snowflake Nesting dies, and the Landscape die set. I love white-on-white!! 


The second is a flip top box using the Snowflake Nesting die set. 


The third is another box using the Landscape die set. 


Click on the image to see the video demo, and please feel free to follow me here on my blog, or on FaceBookTwitterInstagram or Pinterest.

And I now have a YouTube channel where I hope to add my video content to in the future. Would love it if you could subscribe. 

Happy crafting, 

Cxxxx

Friday, 18 February 2022

Flower tag

Today's share is a gorgeous green and white tag, using Jeanine's Art: Welcome Spring Flower and Leaf Borders. I used this die set on the lantern that I blogged a while ago. It's a really simple tag - so quick and easy to make and looks great! Click on the picture if you would like to see the video of this project.

I have a set of greyboard tag templates that I use when making tags. I find them useful for when I want to cut something really thick that a die won't go through. But they are a great tool if you don't own a set of tag dies.

I used the tag template on the left below for the base, and actually created a new template that is roughly 1/8" bigger all round. The next size down was too small - so I wanted something just that bit bigger for the white part.

The larger tag was covered in patterned paper, and inked on the edge with Mowed Lawn Distress Oxide.

The new template was used to cut the white tag out of hammered card. I then cut the leaf border out of this and stuck it on the main tag, but replaced the "waste" so it looked more defined. You can see this on the video.  I cut the white leaves in half ready to go with the flowers.

I cut the flower die twice with co-ordinating green card and arranged them with the two pieces of the white leaves. 

I used a couple of reinforcers from Elizabeth Craft Designs Reinforcement Pack 2, to strengthen the hole, before adding the ribbon.

Thanks for popping by, and I hope I have given you a little inspiration. Feel free to follow me here on my blog, or on FaceBookTwitterInstagram or Pinterest. For all the videos, pop over to the Hixxy Studio YouTube channel to subscribe. And FB lives are streamed on both the YouTube channel and the Hixxy Crafts FB page. The main items I use can be found on the Hixxy Crafts website - have a look under the Hixxy Studio tab.

Happy crafting!!

Cxxxx

Tuesday, 15 February 2022

Humming Bees and Flowers

I have a little project using some fab dies from the Jeanine's Art: Humming Bees collection. The main die is the Flower Edge. But I realised that the larger bee from the Flower Corner die fitted exactly over the the one on the edge die. And if you flipped the edge die over, the smaller one fitted too.

That led to me cutting the edge twice out of Kraft card. The one on the left is the "correct" way round. The one on the left is flipped over. Have a look at the video (click on the photo) to see exactly how that works.


The base is Kraft card, and I have used white card and a light coloured, patterned paper for the mats and layers. The bees are cut in both Kraft and patterned paper, and the flower (Elizabeth Craft Designs: Susan's Garden - Coneflower) in all three. The smaller bee does not fit onto the bee when the edge die is round the right way (ie the one on the left hand side) - which is why I have put the flower there. The rest fit perfectly.

Thanks for popping by, and I hope I have given you a little inspiration. Feel free to follow me here on my blog, or on FaceBookTwitterInstagram or Pinterest. For all the videos, pop over to the Hixxy Studio YouTube channel to subscribe. And FB lives are streamed on both the YouTube channel and the Hixxy Crafts FB page. The main items I use can be found on the Hixxy Crafts website - have a look under the Hixxy Studio tab.

Happy crafting,

Cxxx


Friday, 11 February 2022

Lantern: The one where the glue wouldn't stick!!

Today's share is a Lantern that I made using Jeanine's Art "Welcome Spring" Flowers and Leaf Borders, with Precious Marieke "Beautiful Garden" Leaf Frame. I have put the link to the video on the first picture. To be honest, it was a bit of a disaster as none of the glue wanted to stick, so if nothing, it'll give you a laugh! 

The template is here as a JPG. Feel free to copy it. Printing it on full page will give you the biggest possible size. 

You will need two of these to complete your lantern. If your printer will take card, I suggest printing it straight onto the card. 


Cut the two pieces out as shown in the picture above.

Score down the middle between the two sides, and on the tab.

Then turn and score along the two "roof" parts. Don't forget the little tabs on the roof. 

Burnish all the folds, and it should end up looking like the photo above. Do not stick anything at this point. 

To cover the windows of the lantern, I cut the Leaf Frame die out of a piece of hessian printed paper from Crafter's Companion Sew Homemade paper pad. This was cut to size, and adhered to a piece of vellum, before attaching to each of the windows. 

Now you can assemble the lantern pieced. Stick the roof tabs on each. Attach a piece of twine to the inside of one piece before joining the two halves together. 

For all the sides, I cut two of the leaf borders in green.  For two of the sides, I cut the leaf in pink. The other two sides you need to cut the flowers from both the green and pink. The pink flower heads are cut and paper-pieced onto the green.

You can then arrange them on the sides of the lantern. This is the bit that just didn't want to work on the demo. It had all worked fine when prepping at home, but neither my tacky glue or my spray glue wanted to play ball. Hopefully, though, there is enough information, both in the video and here, for you to see how to do it. 

Thanks for popping by. Feel free to follow me here on my blog, or on FaceBook, Twitter, Instagram or Pinterest. For all the videos, pop over to the Hixxy Studio YouTube channel to subscribe. And FB lives are streamed on both the YouTube channel and the Hixxy Crafts FB page. The main items I use can be found on the Hixxy Crafts website - have a look under the Hixxy Studio tab.

Happy crafting!!

Cxxxx

Thursday, 27 January 2022

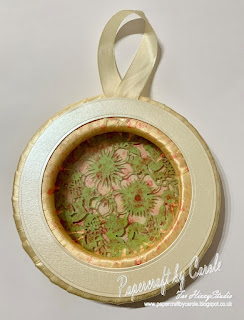
Spring Window Wreath

I have a very pretty window wreath to share today. I say it's for a window, because I have used alcohol inks with acetate so that the light can shine through the middle.


The wreath base is a 15cm polystyrene half ring. I wrapped it in approximately 4.5m of ribbon. This is a lot - but the trick is to get the cheaper ribbon. Hobbycraft have a great selection of colours at £1 for 15m!! 

I cut out a circle of Centura Pearl Ivory card big enough to be securely touching the sides of the wreath, as this is how the front will be attached. It also needs to be big enough to cut out the gorgeous "The Circle of Flowers" die, from Jeanine's Art Happy Birds collection. I also cut two circles of acetate the same size.  For the back, I cut a ring using two circle dies - one larger than this circle, and one smaller. 


I then used "The Circle of Flowers" die to cut a piece in green card, and also to cut into the ivory circle. The green piece then fits into the ivory piece, secured at the back with a little tape.

To colour the acetate, I used Shell Pink, Lemonade, Peach Bellini and Watermelon alcohol inks. One circle was stuck to the back of the die cut pieces and attached to the front of the wreath. The other was stuck to the ring for the back, and was attached after securing a hanging loop of ribbon. 

Thanks for popping over to have a look. Feel free to follow me here on my blog, or on FaceBook, Twitter, Instagram or Pinterest. For the videos, pop over to the Hixxy Studio YouTube channel to subscribe. And FB lives are streamed on both the YouTube channel and the Hixxy Crafts FB page. The main items I use can be found on the Hixxy Crafts website - have a look under the Hixxy Studio tab.

Happy crafting,

Cxxx


Monday, 24 January 2022

Flower Corner Gift Bag

Hello. Today I have a gift bag to share. It's just a standard Kraft gift bag that I have decorated to use for a Thank You present.  I have layered Centura Metallic card from the Precious Golds selection, with Kraft card and some wood effect paper from one of the Crafter's Companion 12x12 paper pads. 


The Flower Corner die (which includes the two bees) is from Jeanine's Art Humming Bee collection. I have paper pieced some of the Centura into the flowers. 

Thanks for popping over to have a look. Feel free to follow me here on my blog, or on FaceBook, Twitter, Instagram or Pinterest. For the videos, pop over to the Hixxy Studio YouTube channel to subscribe. And FB lives are streamed on both the YouTube channel and the Hixxy Crafts FB page. The main items I use can be found on the Hixxy Crafts website - have a look under the Hixxy Studio tab.

Happy crafting,

Cxxx

Thursday, 20 January 2022

Queen Bee

This Queen Bee card consists of an inked background teamed with a Jeanine's Art Buzzing Bees 3D Push Out. The black die cut is from Elizabeth Crafts Art Journal collection, and is called Honeycomb dots, and the letters are Trimcraft Bunting Alphabet.


The background is a piece of patterned paper (a sort of bright yellow brick wall) that I sprayed with the Distress Oxide sprays in Fossilized Amber and Spice Marmalade. I used the same colour ink pads and IndigoBlu's Queen Bee Mini stamp set, to add more texture to the background.

Thanks for looking, and feel free to click on the picture to see a video of how I created this.

Happy crafting,
Cxxx

Circle of Flowers Twisted Easel

Today I have a twisted easel card to share, with a bit of paper piecing. I used some cream card for the base, and pink for the mats and the die cut. The patterned paper is from a Crafter's Companion pad.

I decided to use a circle for the top part of the easel rather than the normal square like the base, to add some interest. 

Thanks for looking, and if you want more details, feel free to click on the photo to watch the video demonstration.

Happy crafting,

Cxxxx

Wednesday, 19 January 2022

Strawberry Trellis

I really loved using this little die set from Jeanine's Art. It's called Strawberry Trellis and is from the Humming Bees collection.


The effect is so fresh and summery with the bright green and red - teamed with background paper from Crafter's Companion. Click on the photo for a video showing how I made it.

Take care and happy crafting,
Cxxx


Friday, 14 January 2022

Rose Frame

Good  morning! Am off to the Hixxy Studio shortly, but just wanted to pop on to share a card. This is an A5 card base, made using Creative Expressions Periwinkle Foundations card. The patterned paper is from my stash.

The gorgeous frame is Rose Frame from the Romantic Roses collection by Precious Marieke. It's a good size - and very intricate. I have used it to frame the little decoupage image from Jeanine's Art Bzzing Bees 3D Push Out collection.

I have lots more inspiration to share on the Hixxy Studio YouTube Channel - and of course our weekly Facebook Lives on a Friday afternoon at 2pm.

Take care and happy crafting,

Cxxx