About Me

My photo
I'm a retired primary school teacher, who started paper crafting in 2008, when I had a fancy to make my own Christmas cards. Since then, I have tried all sorts of techniques and styles - and I kind of like them all. I have been lucky enough to be on blog teams and large design teams and to do a bit of freelance demonstrating - and I love the challenge of working with different products. My crafting style is very varied - from junk journaling and art journaling, bookbinding and journal making, to quilting and patchwork - and of course I still make cards. This variety keeps me interested - and my crafty stash growing!! I'm always seeking inspiration for new projects.

Thursday, 10 March 2022

Floral Easel Card

Hello! Today I have an easel card to share, using Julie Hickey Designs Floral Fantasy and Floral Foliage stamps. This would make a great card for Mother's Day. Click on the picture for the video link. I must apologise, as this one was a bit rushed on the live, and not totally completed. Hopefully, there is enough information both there and here combined.

The base of the card is made from a piece of purple card, 4 3/4" wide x length of A4. It is scored at 5 7/8" and 2 7/8". Before folding and burnishing, you need to cut a rectangular aperture. I used a 4" x 5" rectangle die - but you could cut it by hand if you need to. This is cut in the end with the score line. 


I also cut three frames - each uses a piece of card 5 7/8" x 4 3/4", and I used the same rectangle die.


For the acetate, I have two pieces - one is stuck onto a double sided adhesive sheet. I used Alcohol Inks to create a background in the bottom and left of each piece. The colours I used are: Purple Twilight, Watermelon and Pool.


For the flowers, I stamped three of each and used Squeezed Lemonade, Ripe Persimmon, Picked Raspberry and Seedless Preserves Distress Oxides to colour them in.


I stamped one of the images from the Floral Foliage set. These are almost impossible to cut out as a whole piece, but I cut it into individual leaves to tuck in amongst the flowers. I coloured these with Twisted Citron and Mowed Lawn Distress Inks. 


The sentiment stamp is from the Fantasy Floral set, and I cut the letters using Julie Hickey's Sweet Pea Alphabet set. You need to cut two sets, so that you can cover up the glue on the back. Do the same for whatever you stick the sentiment on.


The piece of acetate that is on double sided sticky, needs to be attached to a piece of white card. You can do this either before or after you stick the card to the base of the easel. One of the frames then goes over the top of this to hide the edges. The other two frames are used to sandwich the other piece of acetate, which is attached to the top of the easel.

I used glue gel to attach the flowers, and the glue doesn't really stand out against the alcohol ink, so doesn't need covering on the back. The leaves are tucked in amongst the flowers. The little hearts are part of the Alphabet set.


Thanks for popping by, and I hope I have given you a little inspiration. Feel free to follow me here on my blog, or on FaceBookTwitterInstagram or Pinterest. For all the videos, pop over to the Hixxy Studio YouTube channel to subscribe. And FB lives are streamed on both the YouTube channel and the Hixxy Crafts FB page. The main items I use can be found on the Hixxy Crafts website - have a look under the Hixxy Studio tab.

Happy crafting,

Cxxx

Wednesday, 9 March 2022

Dial Card

Hello! Today's make is a Dial Card - well, that's what I am calling it as an not sure it has a name. Anyway, this is from my Hixxy Studio FB live from last Friday, and you can see the video demo by clicking on the largest of the photos. I had a little brain fog during the demos, so will hopefully clear up any confusion that may result!

So, I have called it a Dial Card, as you can turn the circle, like a dial, revealing the different parts of the sentiment.


So, the base of the card is  made from a piece 5" x the length of the A4, which is scored at 1/4", 1 1/4", 4 1/4" and 5 1/4". This folds up to create a little "box" shape at the bottom. The piece for the front flap is 3" x 7", and is scored at 1/2" and 1 1/2". This sticks to the back of the flat part of the base, and the front of the box part, and is what the dial is stuck to.


I created an inky piece of card, using Speckled Egg, Cracked Pistachio and Peacock Feather Distress Oxides, along with some of the elements from All About the Girls by Hazel Eaton (Julie Hickey Designs), and one of the stencils from Elizabeth Craft Designs - Art Journal - SO40 - Pattern Stencil Pack. 


To create the dial, I used a 4" circle die, a 4 1/2" circle, and a 1" x 1 1/4" rectangle. I firstly cut a piece of card the same as the base with the larger circle, and a matching piece from a thin sheet of grey board. These were stuck back to back to strengthen the dial. I then and punched a hole in the centre, and cut an aperture using the rectangle die. To help find the centre of the circle, cut one from copy paper and fold into quarters.


I cut two circles from the inked background, using the smaller circle die. One was stuck onto a grey board circle. The other does not need a backing. The one on grey board is for your words. Take a bit more time than I did on the video, to work out exactly where to stamp the words from the All About the Girls set. On the other circle, stamp the large circle. Use the larger circle to work out where to cut the aperture in this part, before sticking these two pieces together.  


Make a little washer to go between the circles. I used a little circle punch and cut 6 layers of greyboard, that I stuck together. I then punched a hole in the middle with my Cropodile. Put a brad through from the front, pop on the washer, and add the smaller circle (with the words) on. 


The back part of the dial is then stuck to the card - making sure that the words are the right way up! 


I added some of the sentiments from the stamp set, and use Julie Hickey's Sweet Pea Alphabet set to cut the letters.

Thanks for popping by, and I hope I have given you a little inspiration. Feel free to follow me here on my blog, or on FaceBookTwitterInstagram or Pinterest. For all the videos, pop over to the Hixxy Studio YouTube channel to subscribe. And FB lives are streamed on both the YouTube channel and the Hixxy Crafts FB page. The main items I use can be found on the Hixxy Crafts website - have a look under the Hixxy Studio tab.

Happy crafting,

Cxxx

Tuesday, 8 March 2022

Umbrella Iris Shutter

A while back, I blogged a planner/journal page that I created using Elizabeth Craft Designs: Art Journal - Iris Shutter die set. That post has a detailed step-by-step of how to assemble the mechanism, so I will not go over that again here. Click here to have a look at that post. You can also watch the video link from that post - or the one for this post (click on the main photo) For this card, I haven't used the overlay part, and therefore did not use the extensions for the arrow on piece B.


For decoration, this time I have used Sizzix Thinlets - Flowers in Umbrella set. The little bird and some of the foliage were used as the image inside the iris shutter, with the rest providing embellishment for the card.

Thanks for popping by, and I hope I have given you a little inspiration. Feel free to follow me here on my blog, or on FaceBookTwitterInstagram or Pinterest. For all the videos, pop over to the Hixxy Studio YouTube channel to subscribe. And FB lives are streamed on both the YouTube channel and the Hixxy Crafts FB page. The main items I use can be found on the Hixxy Crafts website - have a look under the Hixxy Studio tab.

Happy crafting,

Cxxx

Monday, 7 March 2022

Colourful Parrot

 Along with the Peacocks, the Amy Design: Colourful Feathers range also features Parrots. Here is a card I have made with one of the 3D Push Outs, and I have used the tail feather die from the Peacock set to create a stencil for inking through.


In this sample, I have worked with ovals as that is the shape of the decoupage. The Distress Oxides I used were Picked Raspberry, Kitsch Flamingo, Twisted Citron, Cracked Pistachio and Peacock Feathers.

For the video, I demoed using a circular decoupage, with different colours. I cut a piece of stamping card, just marginally smaller than the piece I wanted to ink onto, and cut a circular aperture (oval for the sample) roughly in the middle. I then placed this onto my piece for inking, and sealed around the edge with low tack tape. 


I then used my brushes to ink through the circle, and briefly heat set it. Having previously cut the feathers die in stamping card, I laid this over the circular opening, and inked through it to create the pattern. The colours of ink I used in the demo are Candied Apple, Squeezed Lemonade, Mowed Lawn, Tumbled Glass and Mermaid Lagoon.

I cut a frame from the same card as the base to go round the inked area, and I cut a mat to go under the decoupage.

If you would like to watch the video demo, then please click on the main photo above.

Thanks for popping by, and I hope I have given you a little inspiration. Feel free to follow me here on my blog, or on FaceBookTwitterInstagram or Pinterest. For all the videos, pop over to the Hixxy Studio YouTube channel to subscribe. And FB lives are streamed on both the YouTube channel and the Hixxy Crafts FB page. The main items I use can be found on the Hixxy Crafts website - have a look under the Hixxy Studio tab.

Happy crafting,

Cxxx

Sunday, 6 March 2022

Peacock Easel Card

Another peacock card today, using the Amy Design: Colourful Feathers - Peacock die set. This time, I used the complete die set along with Cosmic Shimmer Watercolour Inks. The angle of the photo makes it look oval, but it is definitely circular! 


To start with , I cut the pieces of the peacock in white stamping card. For the feathers, I used Golden Sunrise, Turqoise Cascade, Ray of Sunshine and Holly Green - which are all pearlescent - and Peacock Teal - which isn't.


I mixed the yellow and green for the central part (and also the separate small part that sits behind the body of the peacock), and mixed the turqoise and teal for other parts of the feathers. The orange I kept the same. The body of the peacock is painted turquoise.

To create the easel, I score a piece of A4 card in half and used a large circle die placed just off the edge of the fold. It opens out like this. Score one of the circles in half to create part of the easel, and stick another circle onto this.


I used several mats and layers - and used an embossing folder for a little texture. The it's all assembled with a blingy stopper! If you want to see the video demonstration, then click on the main photo for the start (last 12 minutes of the clip) - then click here for the finish (first 18 minutes of the clip). Apologies for this - we had a little glitch during the FB live, so, unfortunately, the video is in two parts. 

Thanks for popping by, and I hope I have given you a little inspiration. Feel free to follow me here on my blog, or on FaceBookTwitterInstagram or Pinterest. For all the videos, pop over to the Hixxy Studio YouTube channel to subscribe. And FB lives are streamed on both the YouTube channel and the Hixxy Crafts FB page. The main items I use can be found on the Hixxy Crafts website - have a look under the Hixxy Studio tab.

Happy crafting,

Cxxx

Saturday, 5 March 2022

Foldback Gatefold Card

Today I am sharing a foldback gatefold card, with a belly band. I have used some brown and cream card, with a beautiful copper toned Centura Pearl from the Metallics pack. The video demonstration can be accessed by clicking the picture below (it's the first 45 minutes from the FB live). 


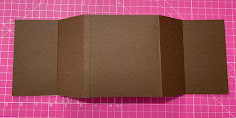
To make the card, I have used a piece of card 4 3/4" wide by 5 1/4" for the back, and two pieces 5 7/8" wide by 5 1/4" for the gatefold sides. These two pieces need to be scored at 3" from one end, and 3/8" from the other. This small end sticks around behind the back piece of the card.


The decorative pieces on the front are cut with Precious Marieke: Cuddling on the Farm - Wheat Border. You get one die for the flowers in the set, and I cut this out multiple times in the cream and coppper. I used a small circle punch to cut the centres out of the copper to put on the cream. It's a bit time-consuming - but well worth the effort.


For the inside, I have used the Chicken Wire Frame die set from the same collection. The main die cuts out the frame, and leaves you with a decorative piece which I have cut in half and used on the inner panels. I cut it in copper too, and just used that central piece for layering. The other die that comes with the set was used to cut the cream pieces for the inner panels and the centre - a place for your sentiment.


For the belly band, I used a piece of card that was the length of an A4 sheet, and 1" wide. This was scored at 2 3/4" from each end. When folded, the ends don't quite meet so you need to fix a small piece of card behind this. I put this at the front of the belly band as it would be concealed by the bow. Use red liner tape to fix your ribbon to the card.


Slide this over your card to keep it shut.

Thanks for popping by, and I hope I have given you a little inspiration. Feel free to follow me here on my blog, or on FaceBook, Twitter, Instagram or Pinterest. For all the videos, pop over to the Hixxy Studio YouTube channel to subscribe. And FB lives are streamed on both the YouTube channel and the Hixxy Crafts FB page. The main items I use can be found on the Hixxy Crafts website - have a look under the Hixxy Studio tab.

Happy crafting!!

Cxxx

Friday, 4 March 2022

Rose Box

This little box has a big impact because of the rose on the box. I used Rich Red Foundations card from Creative Expressions, and also Ivory Foundations for decorating the top. Click on the picture to take you to the video of this project.


The base of the box is made from an 8 1/4" square of card, scored on the Box Base side of your scoring board at 1 5/8" all round.

The lid is made from a 6 3/4" square of card, scored on the Box Lid side of your scoring board at 7/8" all round.

For the top of the box, I used Precious Marieke: Cuddling on the Farm - Chicken Wire Frame. I cut the die twice out of the Ivory card. One is used as it is. The other I cut into four pieces - halfway along each edge. I arranged these so that the corners created the points of the diamond shape that you can see. I also cut it out of the red card, but only needed the inside part that is cut out. There is also a smaller die which is used to cut the little ivory mat. 

I drew around the die on red card to create the mat for the frame, and I used a piece of patterned paper to just separate that from the red of the box.

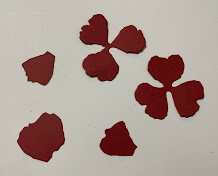
To make the rose, I used Elizabeth Craft Designs: Garden Notes - English Rose. There are two leaf dies that I didn't use, along with the two 3-petal dies, four single petal dies (my picture only show two of them), and a larger petal die that makes the centre.


The petals need to be pinched in at the bottom, then curled over at the top.


The three petal dies need an embossing tool running over the petals, and then the tops are curled over. The centre petal is rolled, with the end folded back, and the top curled over.

Stick the 3-petal pieces together - I used two of each, and then put glue in the middle (I used 3D glue gel) to stick the centre part in. I added more glue in around the centre and added all the petals - I used several of each.


I then quilled (I use that term loosely, as I am no quiller) some little leaf shapes to arrange around the rose. I cut thin pieces of the same paper I used on the top of the box - cutting it down the length of the A4 sheet. Using a quilling tool, I rolled them up and put them in the size 3 hole on my board (this was a magazine freebie many years ago). I then flattened one side of the coil, and fixed it with glue.

Thanks for popping by, and I hope I have given you a little inspiration. Feel free to follow me here on my blog, or on FaceBook, Twitter, Instagram or Pinterest. For all the videos, pop over to the Hixxy Studio YouTube channel to subscribe. And FB lives are streamed on both the YouTube channel and the Hixxy Crafts FB page. The main items I use can be found on the Hixxy Crafts website - have a look under the Hixxy Studio tab.

Happy crafting!!

Cxxxx