About Me

My photo
I'm a retired primary school teacher, who started paper crafting in 2008, when I had a fancy to make my own Christmas cards. Since then, I have tried all sorts of techniques and styles - and I kind of like them all. I have been lucky enough to be on blog teams and large design teams and to do a bit of freelance demonstrating - and I love the challenge of working with different products. My crafting style is very varied - from junk journaling and art journaling, bookbinding and journal making, to quilting and patchwork - and of course I still make cards. This variety keeps me interested - and my crafty stash growing!! I'm always seeking inspiration for new projects.

Saturday, 12 February 2022

Traveller's Notebook

Hello! Today, I though I would share with you my Traveller's Notebook. I demoed this on a FB live, and the video is available on the Hixxy Studio YouTube Channel - or just click on the picture below. 

I was given the Elizabeth Craft Designs: Art Journal - Bubble Flowers die set to play with. It comes with an amazing array of journaling dies - flowers, a great little bubble cut-in die, signpost, lock, keys and a couple of butterflies. But I was initially unsure as to what the large die was for. It looks like it cuts out a base card - with a score line (and I have a project using it in that way which I may share later). However, I like to know what I am playing with, so had a bit of a shifty around the internet and realised that it's for cutting pages to create signatures for the Elizabeth Craft Designs XL square Traveller's Notebook. ECD make three sizes of TNs - the XL Square which is 5 1/2", the Square which is 4 1/2" and the original which is 4.88" x 3.5".

That lead me to researching traveller's notebooks, and to ultimately deciding that, as I didn't have one then I would make one. 

I immediately thought of the faux leather technique to create the cover, but was unsure about how to create it. This YouTube video is what I ultimately found, and adapted to suit my sizing. 

So, firstly, let's look at how to make the faux leather. This technique has been around a while - and there are lots of variations, but this is how I do it.  You need glycerine (just bog standard from the chemist or supermarket), water, a spray bottle and the card you want to make into faux leather. I tend to use Kraft card as it already has a suitable tone for the leather look. But you can use other card if you want a different coloured effect.

Mix the glycerine with water. There are various different ratios out there online. I used a ratio of 6 parts water : 1 part glycerine, which has a higher amount of glycerine than some. It doesn't really matter how you measure this. I marked an old Distress Sprayer bottle that I have managed to break the sprayer on, and marked it at 1/4" intervals. I then decanted it into a smaller spray bottle.


Spray your card and get it quite wet. Gently massage the liquid in. If you rub too hard, the card will start to pill. Do this on both sides. Scrunch the card up, and open out. You can repeat the application of the liquid if you think it still feels a little stiff.


At this point, while it's still wet, you can run it through with an embossing folder (which I did on the video), or you can leave it with the creases from the scrunching (you can run it through your machine with just the plates to make it flatter if wanted). On my finished piece, I did both - one for the outside and one for the inside. You can heat dry it, or leave it to dry naturally. 

Then next step is to ink it. I have used Distress Inks (NOT Oxides): Spiced Marmalade, Rusty Hinge, Fired Brick, Vintage Photo and Black Soot. Apply them from lightest to darkest ie Spiced Marmalade, Rusty Hinge and Fired brick - all of which I was quite random with. With Vintage Photo, I took more time to get an overall coverage on the whole piece. And finally, Black Soot over that adds that aged look. 


The piece below is the one I created on the FB live.


For the journal, I created two pieces - one that was embossed with a folder for the outside, and one that was left with the creases for the inside.


When I originally made this, I had pre-cut the pieces of card to the size I wanted them to be. I would suggest that you don't do that - do two full pieces of A4 - as I found, once they had been made wet and embossed and dried, that the didn't match up anymore. Once you have inked and they are dry, then cut your pieces. Use the whole length of the A4 card, and then cut to somewhere between 5 1/2" to 6". My template is based on 5 1/2" - but I would probably make it nearer 6" if I did it again.

Stick them together with either a good PVA or a book binding glue. In the video, I said I used Paper Pantry - actually it's Jane's Originals Paper Bindery Smooth Stick. Run a brayer over it to ensure a good adhesion, and check the edges to make sure there are no gaps. Seal your cover with something - Mod Podge or another decoupage type glue. I used Cadence Satin Finish Decoupage glue. Sponge it on - don't brush it - otherwise you will move the Distress Ink around. Let this dry. 


You now need to insert the elastic that will hold the signatures in. I used 3mm round black elastic, and started with a piece approximately 90cm. It's a good idea to make a template for placing your holes. I started with a paper one, which I used to create a more durable card one. If you are making your notebook 6" as opposed to 5 1/2", then alter the 2 3/4" measurement to 3". The 3 top and bottom holes need to be just at the top and bottom of the paper, so again, that may need adjusting - it would be useful to watch the video to see what I mean. 


You then need to thread the elastic through. I will write the instructions here - but the video may help. 

Have the inside of the notebook face up. 
Push the elastic out through the top middle hole, and back up through the top left. Leave the end from the middle hole reasonably long, and keep it to one side. Fix with a piece of washi if it helps. 
Then: out from the bottom left, and in through the bottom middle
          out through the top middle, and in through the top right
          out through the bottom right, and in through the bottom middle
Tie the two ends together, making sure it's reasonably tight - but will allow you to add in your signatures.


To create the loop to hold the notebook together, you need approximately 60cm of elastic. If you don't want the bookmark, you can use less.

The elastic needs to be threaded from the inside to the outside, and then back through to the inside, leaving a loop. You then need to judge how much of a loop to leave. Mine was 3". Secure the loop on the inside with a knot. The rest is for your bookmark - you can add a charm at the end if you like.


Create your signatures using the base die from the Bubble Flowers set. This notebook will hold three. One I made from single sided papers (from my stash and that have been sitting there forever), and coloured paper from a child's drawing pad; another was from old double sided papers (again - from my stash); and the third was from a combination of mixed media paper, watercolour paper and stamping card. Personally, I like that the signatures are loose leaf and not bound - but that is my preference. 

Thanks for popping by, and I hope I have given you a little inspiration. Feel free to follow me here on my blog, or on FaceBookTwitterInstagram or Pinterest. For all the videos, pop over to the Hixxy Studio YouTube channel to subscribe. And FB lives are streamed on both the YouTube channel and the Hixxy Crafts FB page. The main items I use can be found on the Hixxy Crafts website - have a look under the Hixxy Studio tab.

Happy crafting!!

Cxxxx

Friday, 11 February 2022

Lantern: The one where the glue wouldn't stick!!

Today's share is a Lantern that I made using Jeanine's Art "Welcome Spring" Flowers and Leaf Borders, with Precious Marieke "Beautiful Garden" Leaf Frame. I have put the link to the video on the first picture. To be honest, it was a bit of a disaster as none of the glue wanted to stick, so if nothing, it'll give you a laugh! 

The template is here as a JPG. Feel free to copy it. Printing it on full page will give you the biggest possible size. 

You will need two of these to complete your lantern. If your printer will take card, I suggest printing it straight onto the card. 


Cut the two pieces out as shown in the picture above.

Score down the middle between the two sides, and on the tab.

Then turn and score along the two "roof" parts. Don't forget the little tabs on the roof. 

Burnish all the folds, and it should end up looking like the photo above. Do not stick anything at this point. 

To cover the windows of the lantern, I cut the Leaf Frame die out of a piece of hessian printed paper from Crafter's Companion Sew Homemade paper pad. This was cut to size, and adhered to a piece of vellum, before attaching to each of the windows. 

Now you can assemble the lantern pieced. Stick the roof tabs on each. Attach a piece of twine to the inside of one piece before joining the two halves together. 

For all the sides, I cut two of the leaf borders in green.  For two of the sides, I cut the leaf in pink. The other two sides you need to cut the flowers from both the green and pink. The pink flower heads are cut and paper-pieced onto the green.

You can then arrange them on the sides of the lantern. This is the bit that just didn't want to work on the demo. It had all worked fine when prepping at home, but neither my tacky glue or my spray glue wanted to play ball. Hopefully, though, there is enough information, both in the video and here, for you to see how to do it. 

Thanks for popping by. Feel free to follow me here on my blog, or on FaceBook, Twitter, Instagram or Pinterest. For all the videos, pop over to the Hixxy Studio YouTube channel to subscribe. And FB lives are streamed on both the YouTube channel and the Hixxy Crafts FB page. The main items I use can be found on the Hixxy Crafts website - have a look under the Hixxy Studio tab.

Happy crafting!!

Cxxxx

Thursday, 27 January 2022

Spring Window Wreath

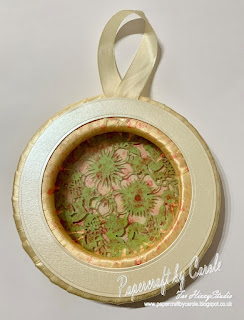
I have a very pretty window wreath to share today. I say it's for a window, because I have used alcohol inks with acetate so that the light can shine through the middle.


The wreath base is a 15cm polystyrene half ring. I wrapped it in approximately 4.5m of ribbon. This is a lot - but the trick is to get the cheaper ribbon. Hobbycraft have a great selection of colours at £1 for 15m!! 

I cut out a circle of Centura Pearl Ivory card big enough to be securely touching the sides of the wreath, as this is how the front will be attached. It also needs to be big enough to cut out the gorgeous "The Circle of Flowers" die, from Jeanine's Art Happy Birds collection. I also cut two circles of acetate the same size.  For the back, I cut a ring using two circle dies - one larger than this circle, and one smaller. 


I then used "The Circle of Flowers" die to cut a piece in green card, and also to cut into the ivory circle. The green piece then fits into the ivory piece, secured at the back with a little tape.

To colour the acetate, I used Shell Pink, Lemonade, Peach Bellini and Watermelon alcohol inks. One circle was stuck to the back of the die cut pieces and attached to the front of the wreath. The other was stuck to the ring for the back, and was attached after securing a hanging loop of ribbon. 

Thanks for popping over to have a look. Feel free to follow me here on my blog, or on FaceBook, Twitter, Instagram or Pinterest. For the videos, pop over to the Hixxy Studio YouTube channel to subscribe. And FB lives are streamed on both the YouTube channel and the Hixxy Crafts FB page. The main items I use can be found on the Hixxy Crafts website - have a look under the Hixxy Studio tab.

Happy crafting,

Cxxx


Wednesday, 26 January 2022

Seaside Canvas

Last week, I demonstrated this canvas on the FB live for Hixxy Studio. The full video is on the YouTube channel (click on the final picture for the link), but I have a few pictures of the stages to share here. I have recycled an old box canvas for this project - you can just make out the stripes underneath the layer of white gesso.

For the sea, I used white tissue paper and decoupage glue to create some texture like the waves.

For the sand, I used Imagination Crafts Icy White Paste because it has a grainy texture.

I used acrylic paints mixed with Gesso to paint both parts of the canvas.


I used Amy Design Maritime Fishing Net die to cut out the mesh from funky foam. I used white as it is easier to add colour to - with acrylic paint. I tore this up to add to the top of the canvas. To adhere it, I used transparent texture paste.


More paste was used to add the twine. You will see in the finished picture that I tweaked it and pulled it around once the picture was on. 


The photo was mounted onto a piece of card torn from a box. I ripped the edges of the card to expose the corrugated parts. And finally, I added shells.

Feel free to follow me here on my blog, or on FaceBook, Twitter, Instagram or Pinterest. For all the videos, pop over to the Hixxy Studio YouTube channel to subscribe. And FB lives are streamed on both the YouTube channel and the Hixxy Crafts FB page. The main items I use can be found on the Hixxy Crafts website - have a look under the Hixxy Studio tab.

Happy crafting,

Cxxxx

Monday, 24 January 2022

Flower Corner Gift Bag

Hello. Today I have a gift bag to share. It's just a standard Kraft gift bag that I have decorated to use for a Thank You present.  I have layered Centura Metallic card from the Precious Golds selection, with Kraft card and some wood effect paper from one of the Crafter's Companion 12x12 paper pads. 


The Flower Corner die (which includes the two bees) is from Jeanine's Art Humming Bee collection. I have paper pieced some of the Centura into the flowers. 

Thanks for popping over to have a look. Feel free to follow me here on my blog, or on FaceBook, Twitter, Instagram or Pinterest. For the videos, pop over to the Hixxy Studio YouTube channel to subscribe. And FB lives are streamed on both the YouTube channel and the Hixxy Crafts FB page. The main items I use can be found on the Hixxy Crafts website - have a look under the Hixxy Studio tab.

Happy crafting,

Cxxx

Sunday, 23 January 2022

Pastel Safari!

Hello!! The weekend is almost over - but not quite!! I have a safari themed card - without the safari sunset colours! The colours for this one were suggested by my lovely crafting friend, Karen, when all I could see were sunsets!!


There are two versions of this card - the one with the giraffes was my sample, and the one with elephants is the one I made on the video (click on either photo for the link). For the shiny, sparkly background, I have used Creative Expressions 7x7 Safari Landscape with Cosmic Shimmer Lunar Paste in Moonlight Ocean and Stellar Lemon. The green was created by mixing the two. The elephant and giraffe came from cutting into Amy Designs Wild Animals - Wild Frame. I cut the frame 3 times, and then layered the colours to match the stencil. The sentiment is from Trimcraft First Edition Sentiment dies. 

Thanks for popping over to have a look. Feel free to follow me here on my blog, or on FaceBook, Twitter, Instagram or Pinterest. For the videos, pop over to the Hixxy Studio YouTube channel to subscribe. And FB lives are streamed on both the YouTube channel and the Hixxy Crafts FB page. The main items I use can be found on the Hixxy Crafts website - have a look under the Hixxy Studio tab.

Happy Crafting,

Cxxxx

Saturday, 22 January 2022

Leaf Vine

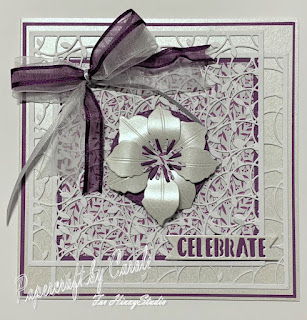
Today's card uses Precious Marieke's Leaf Frame, and Elizabeth Crafts Clematis dies. I cut the frame twice from Centura Pearl Hint of Silver. I used a patterned paper with a purple border underneath. The sentiment is from Trimcrafts First Edition Sentiments set.


Thank you for stopping by my blog. If you would like to see a video demonstration of the card, please click on the photo to take you to the Hixxy Studio YouTube channel.

Happy crafting,
Cxxx