About Me

My photo
I'm a retired primary school teacher, who started paper crafting in 2008, when I had a fancy to make my own Christmas cards. Since then, I have tried all sorts of techniques and styles - and I kind of like them all. I have been lucky enough to be on blog teams and large design teams and to do a bit of freelance demonstrating - and I love the challenge of working with different products. My crafting style is very varied - from junk journaling and art journaling, bookbinding and journal making, to quilting and patchwork - and of course I still make cards. This variety keeps me interested - and my crafty stash growing!! I'm always seeking inspiration for new projects.
Showing posts with label cards. Show all posts

Saturday, 18 February 2012

My New Look Website!!

At last - I have finished updating and revamping my website!! Any of you that have been with me since the beginning, will remember that the reason I set up the blog was for me to be able to document my trials and tribulations when setting up the website. Somewhere along the line, the blog took a different direction (one which I am very happy with I have to say), while the website faded away into the background.

I lost interest in it last year with the whole redundancy thing, and it never really did very well. To be honest, it didn't do well AT ALL. I realise now that it needs something else to make it somewhere people will want to visit . I'm not going to abandon the card selling - I can't stop making cards, and I need somewhere to sell them BUT I need to try something else. I haven't in the past, sold my other non-card items through the site - things like boxes, bags and the plethora of other things I now make and sell when I manage to get to craft fairs and the like, with my stall. So that will be my next job.

I'm also looking into a few other ideas - some of which could be a joint enterprise with my husband - others which are still a bit 'pie in the sky'. But you never know - some of them may just work!!

However, in the meantime, I felt that the site needed a much more interesting look. It was very white and uninspiring - and probably reflected how I felt at the time, as much as the amount I knew about developing a website. Alongside the new look, I have added a Clearance section, and another called "As seen on my blog", where selected cards featured in my blog will be available for sale. These currently have no message inside, so the purchaser will have the opportunity to choose what they would like to say!!


It's been quite a frustrating job to do the revamp - as when I altered one thing, it had a knock on effect on something else. At one point last week, I thought I'd lost the whole thing - and believe me there were tears and tantrums. I have to say, however, that once I got the hang of the live chat/help facility, which meant I could get advice and help on the problems within minutes, I was away. I feel sorry for the poor guys on the other end as I feel I was probably asking some quite stupid and obvious things!!

So, please feel free to check out the new-look site (click here to be re-directed there now) - and leave a message either there on the Guest Book, or here on the blog, letting me know what you think!! And as and when I add new things on, I'll let you know.

Speak soon!!

Cxxx

Wednesday, 5 October 2011

Wedding Bells!!!

No, not for me - I'm very happily married already!! But I feel like ringing all the bells I can get my hands on to celebrate that I have managed to finish the Wedding Invitations I have been commissioned to make!!! I have had my ups and downs with this project which I will explain as we go, but I am really chuffed to have it complete.

To give you a little background, I was asked by a friend if I would make the invites for her son's wedding. Having agreed, I spent a lovely evening with her, her son and his fiancee, where we discussed what they would like in terms of design (whilst eating a scrummy tuna pasta bake). They decided on a simple design with yellow ribbon and daisies, on white pearlescent card. The final details they left to me.

So, I went away and spent some time finalising what I wanted to do, sourcing the materials that I would need, and costing everything up. That was a exercise in itself, and I ended up setting up a spreadsheet to keep track of what I needed and from where!!


The design I came with up for the invitations uses the X Cut Rosa Border Die, wrapped firstly with yellow satin ribbon, and then with a thinner lemon organza ribbon. Three fabric daisies are then mounted onto the ribbon, and they in turn are topped with 4mm flatback lemon pearls. The silver foiled message was also decorated with the pearls.

Both the day and evening invitations were completed in landscape format, and each required a RSVP card with envelope. These are A7 (... I think ie they are half of A6),  and this time the foiled message is mounted on the border strip to allow room for the message.

The Order of the Day has not been completed yet, as the details have not been finalised, but the design is the same - just in portrait instead of landscape.

All sounds great - and it is - but goodness me, I now know what it must be like to work in a factory and do the same process over and over and over again. I decided that I should prep everything and then assemble it all at the end. Well, the daisies came as a long string, so I have had to trim hundreds of individual daisies. Then cutting the border strips - well, as there is a lovely punched out area, as each border was cut, I then had to clean all the bits out of the die. Over 100 of those and I was begininng to lose the will to live. Then fixing ribbon, then ribbon on top of ribbon, then sticking the tape to the back of the border ready to attach to the card.


My biggest faux pas happened only this morning, when I realised that I had prepped all the RSVP's for Wedding Invitations, when half of them were supposed to be for the Evening Reception!! Took a bit of time to remedy that one.

BUT, the invitations are all done now and ready for delivery tomorrow!! And I have to say I'm rather pleased with myself!!

Have lots of projects in the pipeline, now that I've broken the back of this, so hopefully will be blogging again soon.

Cxx

Monday, 3 October 2011

My first design team challenge!!

Well, I am so excited to have been invited to become a Design Team Member for Crafty Cardmakers!! Thank you for all the lovely comments that were left on my blog. I was rather gobsmacked to be chosen to say the least - but really pleased too. I hope that my style of projects and techniques will be varied enough to bring you a little inspiration. Congratulations to all the other new team members!!
So here it is!! The Challenge is "Anything Goes!", and I decided that I would see what I had lying around in the vastness that is my crafty stash, to see what would inspire me!!

What I came up with was a black and white patterned base card from an old deckle edge card and insert pack, and the wooden shoe and hearts embellishments.  The shoe is mounted on white card, cut with a Spellbinders beaded oval die, and lightly embossed with That Special Touch Dotty Mask. I cut the tag from the same white card and inked it up with Milled Lavender and Black Soot Distress Inks, before embossing with the same mask, and spraying with Iridescent Spray and Sparkle.The matching insert paper was cut using a Spellbinders rectangle die, with a scalloped rectangle cut from the white.
I then decided to have a play with something else I found whilst rummaging - Cosmic Shimmer Mica Powders. To begin with, I squished an  clear embossing ink pad all over a piece of white card, then dusted Violet Frost all over it. Not content with that, I spied a spray bottle of Pearlescent lurking in the box so intended to delicately spritz it over the top. Well, that was never going to happen as the bottle was totally clogged from being abandoned for so long!! So, I reached for the pipettes that were lying in the same box, and settled for a more splogged effect, blotted with kitchen towel. I then cut the card to the size I wanted, and edged it with more Black Soot, then embossed with That Special Touch Swirl Mask. This was mounted onto white card to make it pop a little more.

Having punched a hole in the tag, and attached an eyelet, I finished it off with lilac satin ribbon from my stash. The tag was raised off the card with foam tape to add more dimension.
I am really looking forward to seeing what you all come up with - so go on - have a rummage and see what you can find.
Make sure to pop over to the the Crafty Cardmakers Blog to see what the other DT Members have created.

See you soon.
Cxxx


Wednesday, 17 August 2011

Nan's Buttons!!


At the end of last week, I had a break from crafting and spent some time researching my family tree. I have been working on this for several years - working in fits and starts, and moving slowly back into my family's past. The lady in this photo is my Nan (my Mum's mum). I don't have many memories of her - and that makes me sad in that I was 9 when she died - not exactly very young. My eldest niece is now 10, and I know how close she is to my Mum. If (heaven forbid) anything were to happen to my Mum (or my Dad), I wonder just how much would she or her younger sister would remember. I know I spent lots of time with my Nan - every Saturday afternoon she would look after me, my sister and my two older cousins so my Mum and my Aunt could go shopping on their own without the kids(something they still do to this day). It's sad that I don't remember.

On Monday, I took my Mum to two local cemeterys to look for the graves of her grandparents - strange I know, but I'm finding gravestones a good source of information, and I didn't have accurate death dates for them!! Mum quite enjoyed herself, as did my two nieces. My sister was less impressed - she said that graveyards gave her the heebeejeebees!! 

So, what does all this have to do with buttons? Well, the lady in this photo is my other Nan - and of course this is her wedding photo with my Grandad. Now this Nan I knew very well - and she was the last of my grandparents to pass away - just one year after my Grandad. I inherited her button box - along with all her other sewing things which I still use for all my mending. But until this week, all the buttons had just been left unused. I had sorted them into colour groups ages ago - but hadn't really been inspired to use them for anything. Until now!!

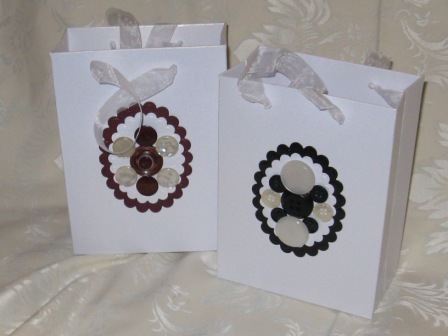
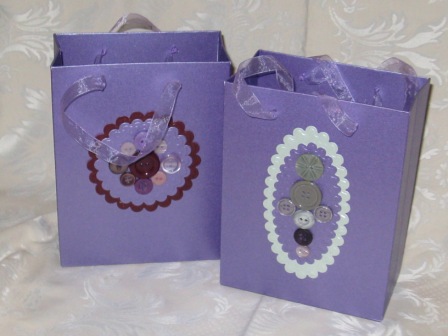
I had been wanting to have another go at making some gift bags - and finally got round to it. The bags are made from pearlescent card which gives them a lovely sheen - and although at 14cm x 18.5cm x 7cm not overly large - I'm happy that they are a useful size.

I chose to delve into the buttons to decorate the bags. Now this might sound quite straightforward, but, as my friends know, I am an organised person, and generally like things neat and tidy. And that does tend to mean that, in my crafting, I like my colours and embellishments to match.

But when you have a totally random selection of buttons, that is not easy. I have to admit that I had a real crisis with these two blue bags. They were the second and third bags I decorated. My husband brought me up a cup of tea during this process to find me pushing buttons round and round on my craft mat, desperatly trying to find a configuration of the buttons that I was happy with. His helpful suggestion (which I didn't take) was to just throw the buttons up in the air and see where they landed! He very nearly had them thrown at him!!!

Eventually, I was able to find a layout I was happy with - and from then I found it easier to accept that the buttons didn't match, had never matched and were never going to match!! So it was a case of actually going for less symmetrical, and more eclectic mixes and layouts!!

I'm really happy with the results on all the bags. And I'm sure my Nan would be glad to see that I'm finally putting her buttons to good use.


The bags were finished with ribbon handles - they're reinforced with an extra piece of card hidden under the folded bag top, so should take a reasonable weight.The bottom is also reinforced with an extra piece of matching card. The card and paper mounts for the buttons were cut from various scraps using Spellbbinder dies on my trusty Cuttlebug. They are all embossed with dots, using the That Special Touch of Mica Masks - the larger mat was embossed with the middle size of the three dotty masks, and the smaller mat with smallest dots.

 I am now looking into making a bigger size of bag - but that's going to have to wait a while as I am away for a few days (going to watch cricket!), and then it's all systems go to get ready for Studland Country Fair on Saturday 27th August. Am nervous but still looking forward to it.


Am sure I will have to spend some time next week practising how I want to set my stall out!! And my Nan's Buttons will definately be making an front row appearance!
Cxxx

Friday, 11 March 2011

Why is everything so difficult?

I've been looking at the website and feel it needs a bit more character. There are these big, white, empty spaces down each side of the page. I would love to be able to use the same side borders on the website as I have here on my blog. But I don't have a clue how to do that - and not sure I'd be allowed to use them if I did!

I've even tried to design my own and save as a jpeg, which I know how to import onto the website. But it was not wide enough, so repeated the design making the right hand side look very strange. As I can't seem to work out how wide it should be, then I can't make it work.

It's something I'm going to have to work on, as it is beginning to frustrate me. If any of you out there can give me a heads up on what to do, it would be much appreciated.

I've now managed to put some Mother's Day cards onto the site - I intend to make a few more, so watch this space. I've also been working on a page with information on commissioning cards, so that should be up and running soon. I'm also going to start a clearance section. I make loads of cards - it's sort of obsessional!! And need to clear some space for all the new stuff I've got planned. I'm going to start work on it this weekend - will keep you up to date with how I'm getting on.

Aside from all of that, I've included a few pictures of cards I've recently made. The first one was a difficult one to make. Not because it has advanced techniques, but because it was a sympathy card for a close friend who recently lost her Mum. She was a wonderful lady that I knew for nearly 30 years - all through my teens and into adulthood - and she will be sadly missed.
The Kanban Floral Garden collection lends itself to this difficult area of card making - this topper is from the Roses sheet. I used a tall white card, and matted and layered Papermania Luxury Velvet Paper in Black, with Gold Mirror Card. The sentiment is from the Orchid and Calla Lily sheet. It is finished off with black organza ribbon down the left side, with black, flat-backed pearls.


The second is a birthday card for another close friend. The background paper was actually an insert from a Deckle Edge Card Kit - I used the cards but not the inserts at the time!! I have to confess that I have no idea where the lighter pink paper came from - it was in my box and just seemed appropriate. The shapes are cut using Spellbinders Nestabilities. I printed the message onto the paper first before I cut it. A couple of pink skeleton leaves lie under the message, whilst the fabric flowers (WHSmith clearout sale yonks ago - I bought loads and am still working throught them) are held together with Papermania brads.


I decided to make a matching gift. One of my favourite shops is Past Times, and I picked up this beautiful set of pink butterfly and dragonfly frames. I printed the same message to sit in one frame, and placed a piece of the insert paper inside the other, attaching another fabric flower to the outside of the frame with a glue dot.
I was really pleased with the finished project. I do rather like things that match!!
And now I think I'm going to have to sign off, as Gardener's World has just started, and my favourite - Monty Don - is back this series!! Need to find out what he thinks I should be doing in the garden this weekend!!
Speak to you soon.
Cxxxx

Tuesday, 8 March 2011

What's in a Word??

Well, one word can be extremely expressive!! It can explain a feeling, an occasion, provide a description or just say what something is.

The first word that springs into mind right now, is totally unusable – because this is the second attempt at this blog entry!! The first attempt was lost right at the end when my laptop decided to crash my Internet connection!!! So, as I say, the first word that comes to my mind is not usable!!

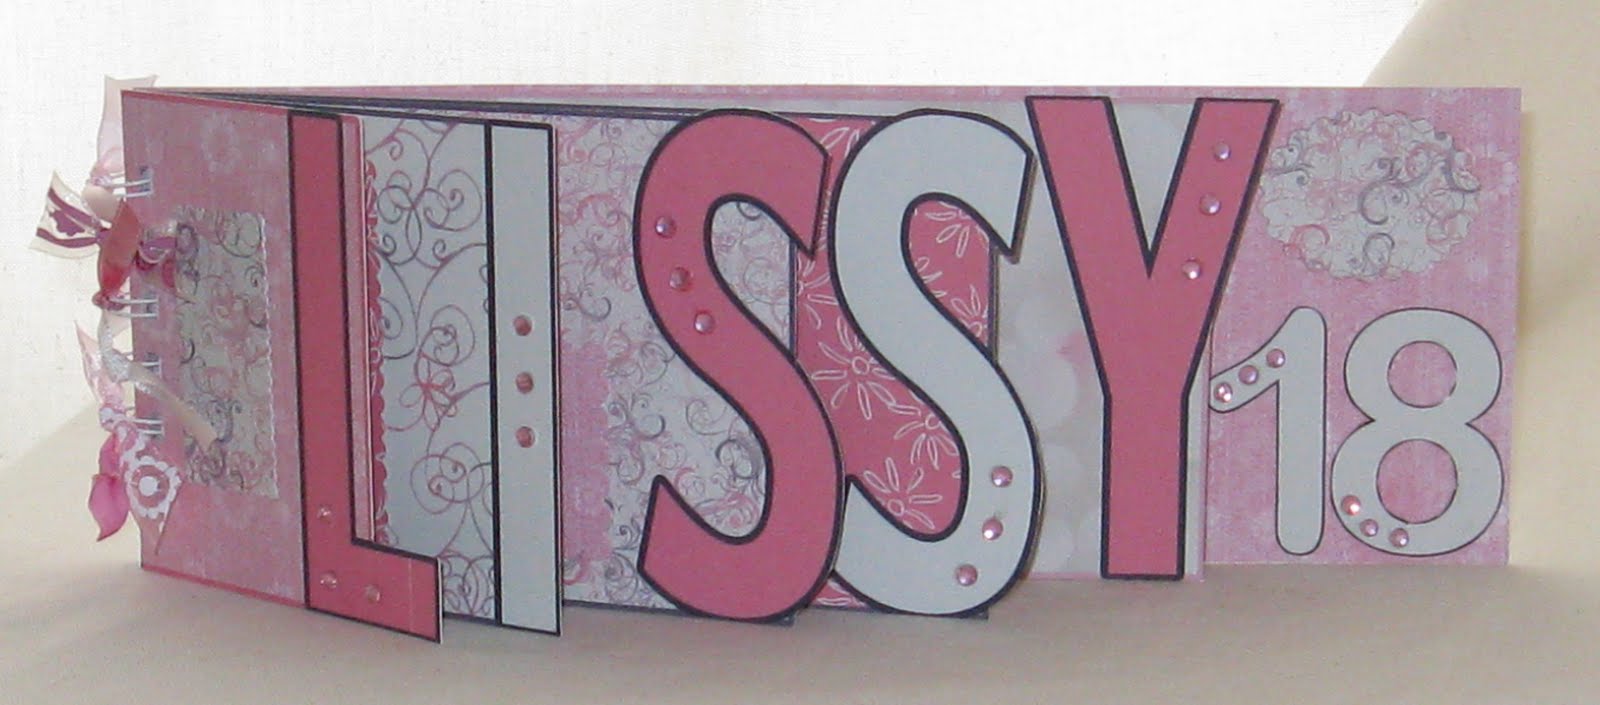
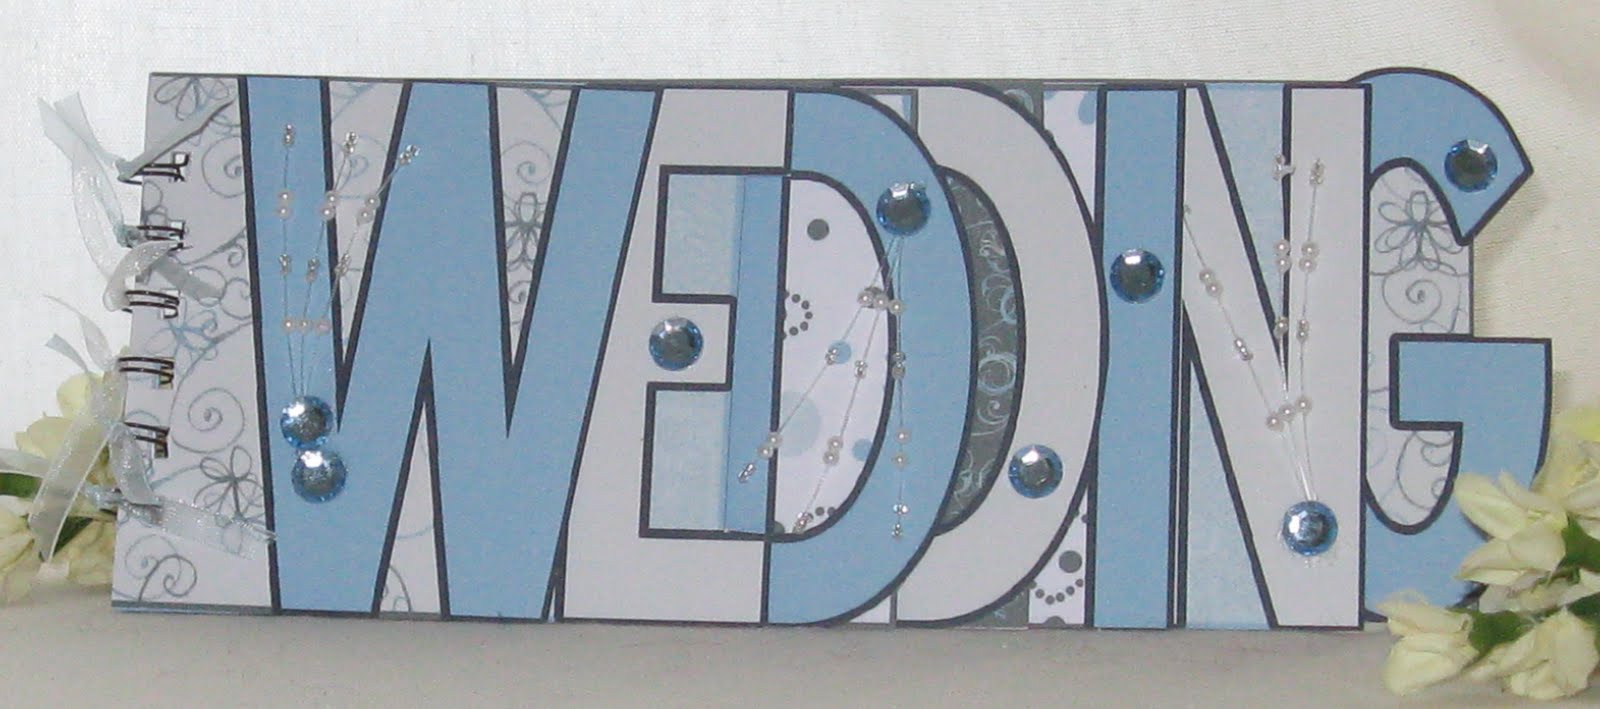
So, what IS in a word? In this context, maybe the question should be “What’s in a Wordbook?” Or perhaps the place to start is “What IS a Wordbook?” Well, it sort of does what it says on the tin. It’s a book that it made from one word.
And that word is chosen to describe the person, event or occasion that it will be used for.

Each page of the book has a letter (or number) at the end, with the first page being the shortest, and subsequent pages increasingly longer.

Wordbooks can spell out a name or any special occasion.

And don’t forget those landmark ages – the 18th’s, 21st’s, 40th’s etc etc. In fact, you can use any combination of letters and numbers.


I print the pages onto 300gsm card, using the various, gorgeous Funky Hand CD’s, which have a great range of colours and styles.

Because I use A4 card, the maximum number of pages I would work with is 6, although 7 can be used at a push.
I decorate the pages using flowers, sequins and gems. And with my trusty Cuttlebug, I cut a variety of mats using matching card, which are used inside the book – for writing messages on – or for attaching photos. The book is bound using a Zutter Bind it All, and small sections of ribbon tied around the binding wire provide the finishing touches.

OK, so that’s what they are. But what are they for? Well, they make great alternatives to cards for those special birthdays and occasions – they will certainly stand out from the crowd. But they can also be used as mini scrapbooks for photos and other memorabilia. And there’s no limit to the occasions – I’ve used them for a Secret Santa, with little gifts attached to the pages!!

So what’s in a word – well, whatever you want to put into it.

And my final word for the day is PANCAKES!! Because of course, it's Shrove Tuesday - Pancake day. The day when people (much more noble than me) traditionally decide to give up something for Lent. I'm afraid I don't have the willpower (she says as she munches on a chocolate digestive!!) but always admire those that can!! But back to pancakes!! Unfortunately, we were a bit slow off the mark, and there were no lemons left in a two mile radius. I always have sugar and lemon on my pancakes, so was a little disappointed. Has golden syrup instead, which was OK - but will have to make sure I'm better prepared next year!!

And on that note... until next time!!

Cxx

PS Many thanks to my lovely husband who finally helped me get this blog done, after my second attempt also very nearly failed!!! Then there would have been a whole other load of words that would have sprung to mind!!

Tuesday, 22 February 2011

His Valentine Card!!


So, I did relent and make a Valentine Card for my other half. And here it is. I'm quite proud of it - not cutesy or even a predictable Valentine type card. I based it on a layout I saw in a Docrafts magazine a couple of years ago - one of those images I cut out and stuck in one of my many ideas books.

For any crafty types reading the blog, it's an 8x8 base card, covered in a sheet of paper from Papermania's V&A Quilts 8x8 pack. It's been distressed around the edges by sanding, and edged with Brushed Corduroy Distress Ink.

The hearts are cut from Bazzil cardstock (not sure of the colour names - they were off cuts in my odds & sods box) using my Craft Robo, and the letters are also Bazzil cardstock cut using XCut Die-Licious Alphabet Dies (Smoothie) and my trusty Cuttlebug.

The bottom mat is from DCWV's Luxury Cardstock Stack, and the other is Bazzil card. Ribbon from my stash, along with a flourish stamp and sequins finished it off nicely.

Have a few more recently made cards to post - will do so one at a time so as not to bore you non-crafting friends who I know read my blog out of a sense of duty and friendship!! God bless you all!!!

Things have been a bit quiet since Christmas, I have tonnes of cards waiting to be made - loads of new stash that I think people will love when I've had a chance to work my crafty (although hopefully not too inky) fingers on, and transformed into cards.

Problem is (and believe me this is a problem in the most good and positive sense of the word), I keep getting commissions to make. Shouldn't complain, as I do love making special cards. But all my good intentions of having time to play and create seem to just pass by. And now with Spring just around the corner, my garden is screaming for some attention.

My lovely husband is in the process of putting up a greenhouse for me, and over the winter he dug up a (small)section of the lawn to extend my veggie patch. So, am torn between planning the months ahead for my garden, and making cards and playing with messy, inky stuff.

Plus, I've just remembered I've got tags to make for a swap that need doing this week. Oh dear - my work is never done!!

So, better sign off here, and make a plan of what to do when. (You may notice that I am a bit of a planner - rather compulsive one I suppose).

Bye for now
Cxxxx

Friday, 22 October 2010

The Time Is Coming ....

..... for me to launch the website!! Yaaay!! Now, I know I haven't given any updates recently, but to be honest, I have been struggling to motivate myself to get moving on it. But, having had a bit of time on my hands recently, I have bitten the bullet, and got on with it. To be fair, some of the time has been spent making a great deal of cards to put on the website - about 175 to be precise (although using the word "about" doesn't really make it precise).

Anyway, the first big move was to set up the bank account. I did that a while ago - all seemed quite straightforward, until a couple of weeks later when I had a letter demanding another piece of paper evidence or they would have to close the account. Needless to say, I wasn't overly impressed and went down to the Bank the same day. I was all set to tell them where to put their Business Account, but was kind of thrown when the guy seemed to know all about me, my business and the letter, before I'd barely spoken a word. Turns out that the person I'd seen when I'd set up the account wasn't the Business Advisor, and consequently she made a couple of mistakes on my application. This caused my business to be flagged as "high risk" - when in fact it isn't. He was most unhappy that I had been sent a letter, as he had literally just e-mailed head office about it, and thought he had sorted it. He felt I should never have been sent the letter, so got straight on the phone. Anyway, upshot is, I still have my account, and two days later, the largest box of chocolates I have ever seen in my life arrived on my doorstep. 3/4kg (yes that's right - 3/4kg) of Thornton's chocolates and a card with an apology for the stress I had been caused!! Mmmm - they have kept me going during the hours sat at the computer setting up the website.

So, bank account sorted, next step was a PayPal account. That was quite straightforward - or at least it has been so far. I suppose time will tell when I get any orders!!

After the mammoth cardmaking sessions (literally days), each card had to photographed, bagged and labelled. It takes a lot longer than you think - well, a lot longer than I thought, anyway. But, hopefully in future I can make a few on a regular basis to put on there. Having said that, I do have a large batch of Christmas cards to make soon.

So, I now had everything ready to start the website. It's taken a while to get used to the website software - but think I have a reasonable handle on it now. Hopefully it will be easy to navigate, and clearly set out. But I suppose you lot will be the judge of that.

So, the shop was set up - but that thorny issue of postage reared it's ugly head again. Another re-think was needed in order to fit in with the options available to me on PayPal, but I am reasonably happy with it now. I wish I could offer free P&P, but I don't think it's financially viable for me!!

Finally, I have had to consider issues such as privacy of information, returns and refunds - among other little things that I've discovered, regarding Internet and distance selling. Thankfully, a lovely lady who runs a successful website from which I regularly order some of my crafting goodies, kindly allowed me to use the way she has approached these issues as the guideline for mine. She has given me some tips, and shown me where to look. So a big thanks to the lovely lady I know as Winspiration!! Definately an Inspiration!!!

So, I now just need to have a final run through to make sure it's all working - and have today's work proof read by my lovely husband - and then we're all set for launch.

So ...... watch this space!!!

Cxxx

Friday, 9 July 2010

.... and back down south again!!

Just thought I'd update you and let you know I got home OK. The lovely Welshmen fixed my tyre just in time for me to get to my course before it started. I've had a very tiring - but very worthwhile - three days increasing my invertebrate knowledge (and getting very wet and bitten to death in the process), and investigating new and different ways of engaging the kiddies when learning about creepy crawlies!!

And along the way, I have consumed an inordinate amount of food!!! Blimey!! Cooked lunch, homemade cake at afternoon tea, and a three course dinner - and that was just the first day!! Add in a cooked breakfast on the following two days as well, and I have never eaten so much food in such a short space of time!!

So now I arrived back from a very damp Wales to a very warm and dry Dorset !! No mishaps on this journey. But was a much nicer one not just because of that. On the way up, I had taken advice from family about the best way to get there, and so had programmed my sat nav to go via these places - basically motorways for a lot of it. On the way back I decided to just let the sat nav take me where it wanted (I know my lovely sister-in-law has fallen out with her sat nav, but I have a great affection for mine and trust it implicitly - well, most of the time). I don't mind driving long distances, but I don't really like motorways, and the roadworks I went through on the way up looked to have the potential to be worse going home.

As it turned out I've had a lovely trip including a lot of reminiscing. I drove all the way through Wales from North to South, passing through mid Wales (as you obviously would!!) where we spent many childhood holidays with friends of my parents. Passed one of the parks we used to play in and it reminded me of winter snowball fights we had there!! Then further down, I crossed the New Severn Crossing. When I was doing my teacher training in Bristol, it was still being constructed (showing my age now!!) and we did a project looking at bridges and how it could be incorporated into the curriculum through maths and design technology! Yawn!!!!!

Then I picked up the route I used to travel back to Dorset from Bristol when I went home from Uni, remembering the exact point at the side of the road where I threw up on one particular journey! My Mum had come to collect me after I got a really nasty chest infection - and I was feeling very poorly!!

And nearer to home, I passed the little village pub where my husband and I had our first two dates!! It all really helped to pass a very long journey. And hopefully, the Red Bull shot will wear off soon, and I will be able to get the sleep that I know my body is in desperate need of!!

Cxxx

Tuesday, 6 July 2010

A journey north!!

Well, this post has nothing to do with setting up the website, but just had to let you know about my day. I am currently sat in a very lovely B&B in Criccieth, North Wales, having left home at 10am this morning.

I had done really well, was almost there - just outside of Porthmadog so I discovered later - when disaster struck.

But, let me take you a bit further back up the road, when I first noticed my car acting "funny" - every time I steered left there was a rubbing sound - and I didn't really need to turn the wheel very far left either! Well, with thoughts of all sorts of problems from wheel bearings to suspension (not that I know anything about cars!!) I decided to pull over at the next safe place. I was praying that I would find nothing, and that the car would be OK to get me here and maybe home again of Friday. Having said that, I was already envisaging being towed all the way back to Dorset - how on earth would I be able to hold a conversation with a complete stranger for that long?

Well, that safe place seemed to take ages to appear. So, was sat in a queue just outside of Porthmadog at temporary traffic lights, when a man coming the other way stops to tell me I have a flat tyre!!! Feeling somewhat relieved that the puzzle had been solved, I spied, on the opposite side of the road, the entrance to a derelict building, so pulled over there - the car actually struggling to get moving again.

So, knowing what to do, but not whether I could actually manage to do it, I proceeded to unload the contents of my boot (of course I'd packed EVERYTHING into the boot) onto the side of the road. One lovely lady, sat in the queue in her car, called out to me, asking if I wanted help. How sweet. I politely refused as I was sure I'd manage, and we both commented on the fact that no men had bothered offering to help me!! So, with my wordly possessions strewn around, I managed to get the jack out, but then proceeded to struggle with the tyre itself. I was just about to admit defeat and call the RAC (all the while wondering where the hell I would tell them I was), when one of the workman from the roadworks came over to see if I needed help!! Doh!! Of course I did!! He said his boss had seen me struggling and had sent him over to give me a hand. He kindly put the spare on with no fuss or bother and directed me to the nearest garage - it was at this point that I found I was just outside of Porthmadog (pronounced Portmadoc) and that there was a garage there that would be able to sort my tyre out. And it was on the way to Criccieth (pronounced Crickith) so wouldn't have to go out of my way!!

The two lovely Welshmen in there now have my tyre (which they tell me I made a great job of destroying), and will have it ready to refit to my car at 9.15am tomorrow morning!! Bless them!! Expect it will cost me a fortune but never mind!! They were very worried about my spare, and I can understand why. It's one of those small ones designed to take up less room in the boot, and only useful in emergencies. They were telling me to go slowly, particularly on the bends. When you look at the car, I can only describe it as looking like it has a peg leg!!

So, am now in my hotel room, where I'm staying tonight before heading off to the centre where the course is taking place. Have phoned to warn them I will be late. Have just had a very nutritious dinner in my room of pot noodle and jaffa cakes - I'm not one for going out to restaurants on my own anyway. Good job, as I don't want to drive any more than I need to. Hopefully the next three days at the centre, will see me well fed to make up for it.

Hopefully, my car will be sorted tomorrow, and with any luck there isn't any other damage!! The course had better be worth it after all that!! Cxxx

Saturday, 10 April 2010

The Beginning

The purpose of this blog is to help me make sense of all the mysteries and vagaries of setting up a website. I always find writing things down helps me to think.

I currently make greetings cards as a bit of a side line - most unprofitable as I can never quite resist all the latest bits and bobs that come out. I have an almighty stash - both of stuff and cards I have made.

My lovely friends think I'm quite good at it - they're my best customers - and I have been encouraged to try to sell to a wider audience. As I work full time - and some quite odd hours, getting out and about to the craft fairs etc is not really feasible, and so I have embarked on this (ad)venture to try selling my wares on the Internet.

I have to say that I have been prevaricating over this for quite some time. It's quite something to put your creations out there - if people don't like them it feels like a personal rejection. But, now I have decided to take the plunge, I have found myself pondering on something much more complex. What do I call the website?

Having already got a logo (the one at the top of the page) that I use on my "Handmade" stickers, I wanted something either to link with it - or that wouldn't fight with it. I've been through all the obvious names, but pretty much anything with "craft" in it is already taken. I even tried some really left field ideas - "quercus" means oak (like my leaves) but variations of that have been done.

Another of my interests is researching my family tree, and I have one distant relative whose name was Aquila. Looking it up on the Internet it linked to the Bible and a lovely quote "bloom where you are planted". Great, I thought. Surely no-one would be using aquila as a website name. No such luck - 8 different websites on the first google page!! So I have decided to be completely unoriginal and stick to what I started with on my original "Handmade" stickers - Papercraft By Carole. Hopefully, it'll "do what it says on the tin"!.

Having made that momentous decisions (which also has also allowed me to finally set up my blog), I'm going to go outside and enjoy this lovely sunshine in the garden. Hopefully everything I put in will "bloom where it was planted"..

Cx